How to Draw Autumn Scenery Acrylic Painting
Create a glowing autumn lakeside scene with acrylics—gold leaves, quiet water, and warm sunbeams cutting through blue sky. We’ll build it from big shapes to crisp accents: sky, shoreline, treeline, reflections, foreground canopy, trunks, sparkling grass, and a simple bench. The sequence follows your images, so paint along comfortably, pausing for quick drying. You’ll practice gradients, scumbling, glazing, and directional strokes that suggest light and depth without fussy detail. Use a small palette and repeat colors between land and water to keep harmony. Work light to dark, then reclaim brights last. Keep brushes clean, edges varied, and strokes confident. Beginners can finish this in an afternoon; intermediate painters can push textures. Ready to relax and paint a bright, breezy afternoon? Gather canvas, water, paper towels, and your favorite warm colors.
Supplies for This Drawing
- Acrylic paints: titanium white, lemon yellow, yellow ochre, cadmium orange, burnt sienna, raw umber, sap green, ultramarine, phthalo blue, Payne’s gray
- Canvas/panel: A4 (8.3×11.7 in) or 9×12 in, pre-primed
- Brushes: 1″ flat, ½″ flat, filbert, medium round, small round, liner
- Glazing medium, water, palette, paper towels, masking tape
- Palette knife and soft cloth
Prepare the Materials
- Tape edges and set bright, even lighting.
- Arrange paints light-to-dark; pre-mix sky blue and leaf orange.
- Keep one clean damp brush only for blending.
- Place scrap paper for testing rays and reflections.
- Print or open the step images nearby.
- Mist paints occasionally to prevent skinning.
Special Features of This Drawing
- Warm sunbeams cutting through a cool sky.
- Treeline mirrored with broken horizontal reflections.
- Foreground canopy framing the lake view.
- Controlled glazing for translucent light.
- Bench as a narrative focal point.
- Varied edges: crisp near bench, soft in distance.
Tutor’s Suggestions
- Blend early, then stop; let layers dry before glazing.
- Design reflections as shape echoes, not vertical scribbles.
- Keep tree groups irregular—avoid repeating spacing.
- Reserve pure white for final sparks and sunbeams.
- Shift greens warmer near light, cooler in shade.
- Use the knife edge for bright bench accents.
Uses
- Weekend paint-along or class demo.
- Cozy wall art for living rooms.
- Greeting cards and prints.
- Practice study for reflections and sun rays.
- Relaxing mindfulness painting session.
- Gift for autumn lovers.
Level of Difficulty
Beginner-friendly to Intermediate — simple shapes with light glazing and reflection control.
Map Sky and Land

Block in sky and land. Paint the upper two-thirds a flat mid-blue with a large flat brush. Leave no streaks. For the foreground, lay a warm burnt-sienna/orange band. On the right, climb the land into a gentle hill shape. Keep the horizon soft, not ruler-straight. Let this dry; it’s a simple map establishing distances, big shapes, and a warm-cool color contrast today.
Haze and Sunburst
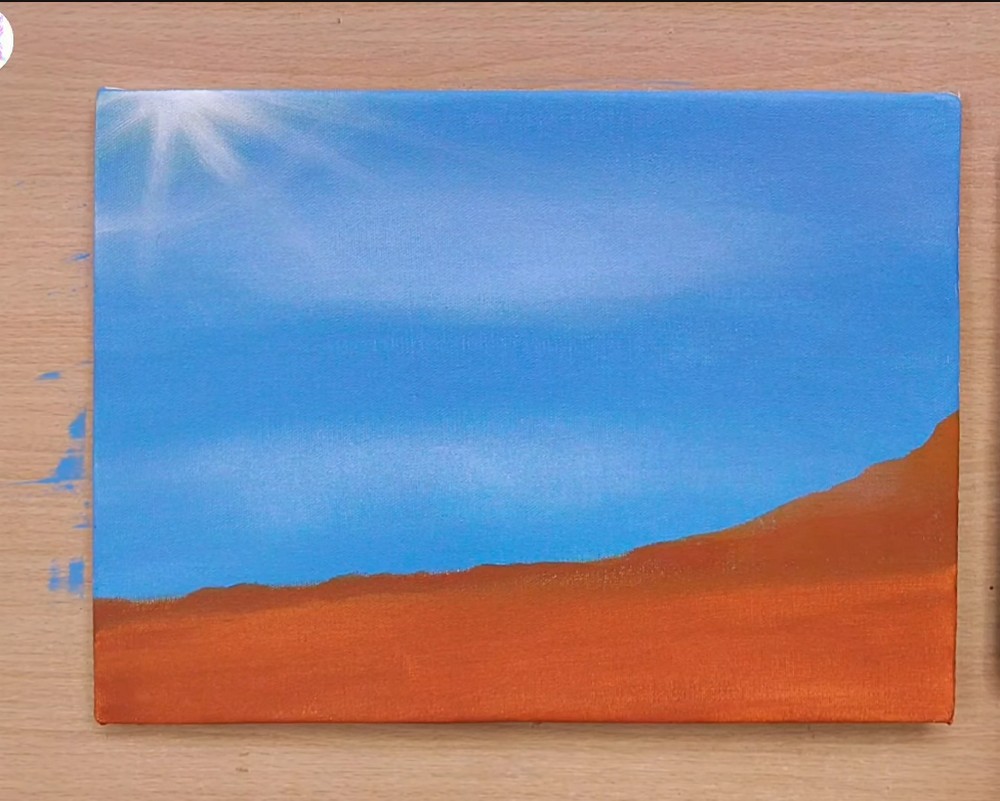
Glaze atmosphere across the sky. Mix white with a touch of blue to create milky bands and a faint sunburst in the top-left corner. Pull soft, diagonal rays using a dry brush, fading as they cross. Keep them transparent so blue peeks through. Re-soften the horizon with the same mix, suggesting far humidity. Allow everything to tack before continuing for smooth blending.
Treeline and Reflection Block
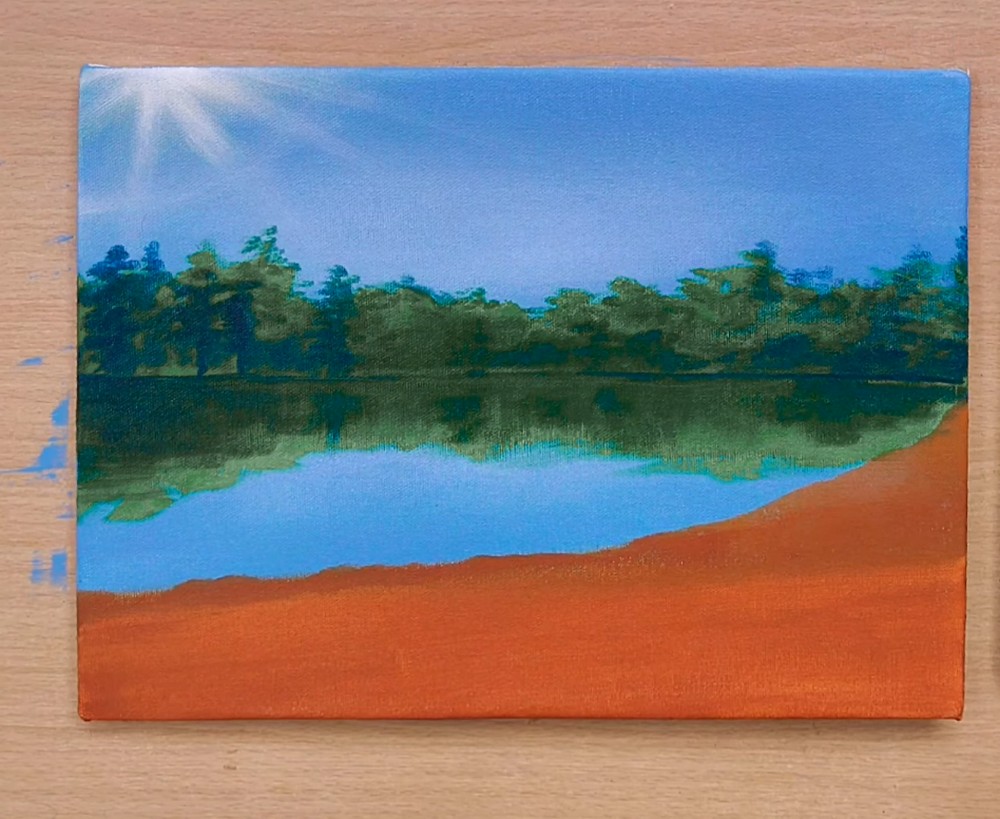
Block the distant treeline. Mix deep green from blue and sienna. Tap irregular crowns along the horizon, leaving varied heights. Mirror these shapes upside-down beneath to mark still water. Keep the water edge level. Indicate the near shore on the right by curving darker greens into the orange bank. Work soft; these are underlayers that will support later color, sparkle, and detail.
Lights in Trees and Lake
Light and color time. Stipple yellows, sap green, and touches of burnt orange onto sunward sides of trees. Keep trunks subdued. Drag horizontal strokes of the same colors into the lake, slightly blurrier, to build reflections. Weave darker greens between light patches for depth. Strengthen the dark waterline. Leave pockets of blue water showing; the broken pattern suggests ripples across the surface.
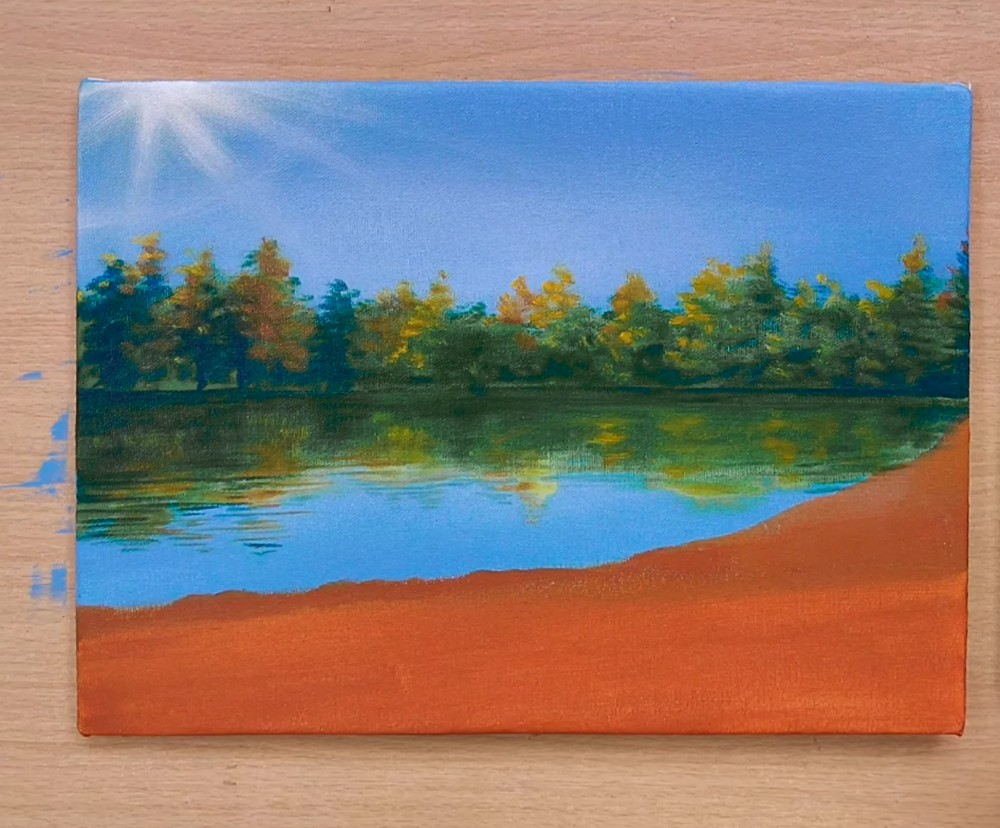
Strengthen Sunbeams
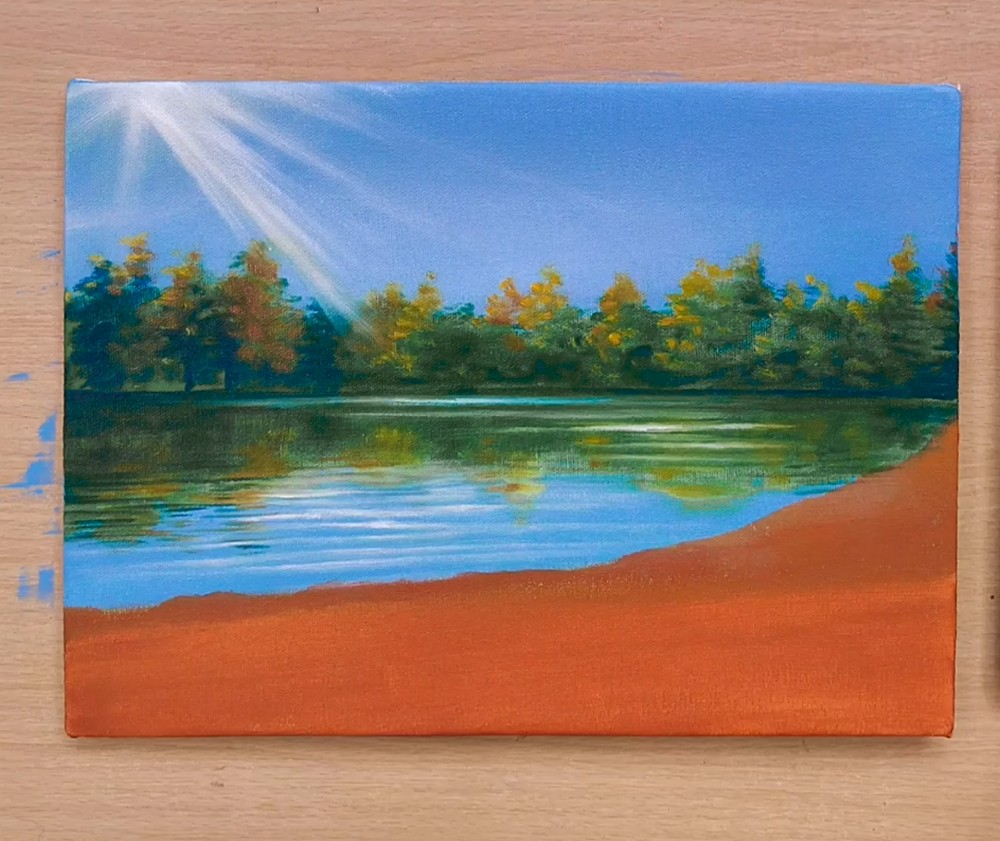
Revisit the sunlight. With thin, milky white, pull longer rays from the top-left, widening as they descend. Soften with a clean dry brush. Add pale bloom on treetops directly under the beam and glide a few white streaks across water to echo the light path. Keep values delicate; you’re layering translucency, not chalk. Let this layer settle before proceeding further to paint.
Foreground Canopy and Banks
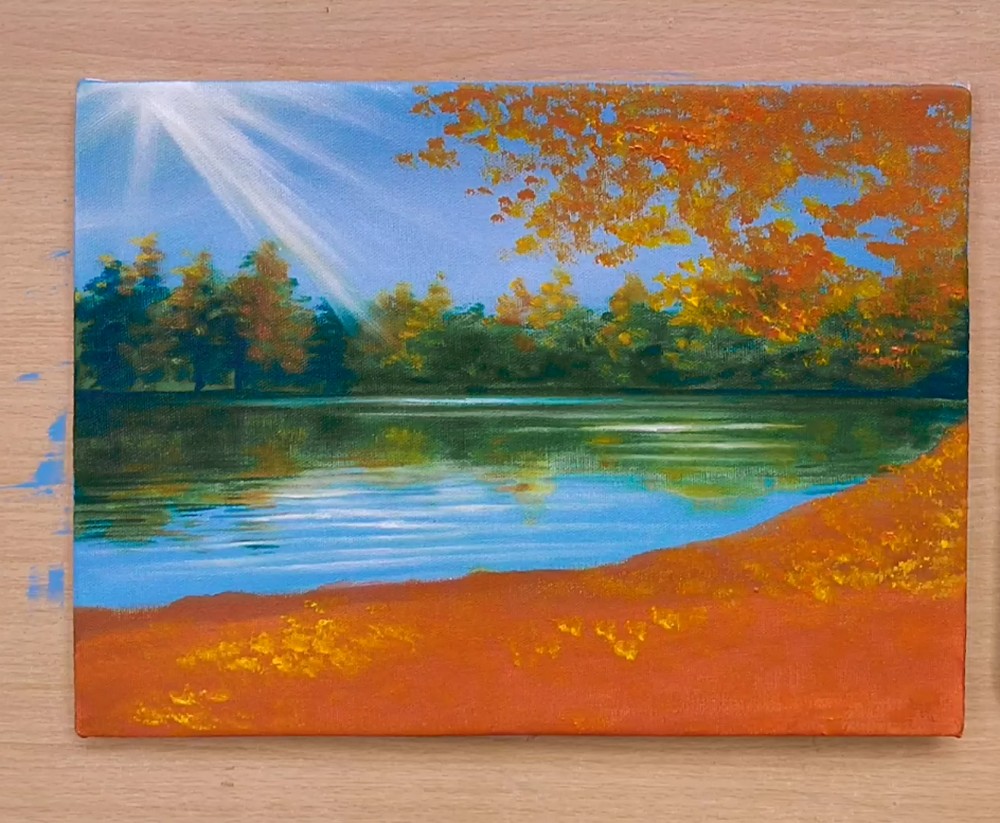
Design foreground interest. Using oranges, yellows, and a little green, scumble leafy clusters along the right bank and hang an overhanging canopy from the top edge. Keep interiors darker, edges brighter. Break shapes into clumps, leaving sky holes. Add small sparkles where the beam lands on leaves. Step back; balance warm shapes against cool water until the composition feels inviting and cohesive.
Trunks, Branches, and Shadows

Pull in near trees. Mix dark brown with ultramarine for sturdy trunks at right, tapering upward. Add a smaller mid-ground tree behind. Block cast shadows across the path with deep maroons. Keep trunk bases wider and rooted. Carve negative spaces around branches to separate sky. Preserve leaf clumps overhead; they frame the scene and direct the eye toward sparkling water and reflections.
Sunlit Ground Cover

Pop sunlit grass. Stipple bright yellow-orange over earlier oranges, keeping a darker underbed showing near rocks and shadowed corners. Pull soft, sweeping strokes to describe gentle mounds. Add a few dark stones at water’s edge to stage scale. Deepen shadow under the main trunk to anchor it. Feather brighter shoreline bands reflecting rays across the still water’s surface for harmony and sparkle.
Add a Bench

Sketch a lakeside bench. With a small round, draw two angled legs, a curved seat plank, and three back slats. Fill with dark brown, then suggest perspective by shortening the rear leg and tilting the seat slightly. Cast a shadow to the right. Keep edges crisp against foliage. This man-made shape adds story and scale without cluttering the peaceful shore at all.
Highlights and Finishing

Finish with light. Hit leaf tops, bench edges, and trunk planes facing the sun using yellow-white. Dot tiny fallen leaves along the path and a shimmering line where light meets water. Strengthen darkest shadows for contrast. Glaze a whisper of blue into sky holes for sparkle. Step back, adjust balance, sign in a corner, and let the painting cure fully before varnishing.
Conclusion
Step back and enjoy the glow you built from simple layers. Your blues, ochres, and oranges balance beautifully, and the bench invites a viewer to rest beside the water. Keep refining edges selectively, not everywhere. Next time, shift the sun angle, swap tree species, or add distant figures. Repeat the workflow and your landscapes will grow faster and richer tomorrow.
A Bonus Tip
Pull water reflections vertically first, then lightly drag sideways; this two-stroke sequence keeps the surface believable.
FAQs
Q: How long will this take?
A: About 90–150 minutes including drying and glazing pauses.
Q: What canvas size is best?
A: A4 (8.3×11.7 in) or 9×12 in gives room for rays, trees, and the bench.
Q: My rays look chalky. Help?
A: Thin the white with glazing medium and dry-brush lightly, building layers gradually.
Q: How do I keep trees from looking uniform?
A: Vary clump sizes, heights, and gaps; drop cooler greens in shade and warmer highlights near the sun.
Q: Should I varnish?
A: Yes—after curing 24–72 hours, apply a thin satin or gloss coat for protection and pop.