How to Draw a Cute Rose with Face
Roses look fancy, but this version is simple and friendly. You’ll draw a smooth bud, a winding center swirl, two soft leaves, and a happy little face. The steps are clear and repeatable, so beginners and kids can follow along easily. Use light sketching first, then add clean pen lines and color. We’ll keep shapes big and curved to avoid tangles. An A4 sheet (8.3×11.7 in) works great, or any similar paper you have. A regular HB pencil, eraser, black fine liner, and colored pencils are all you need. You can finish in under an hour. When you’re done, you’ll have a cute rose perfect for cards, notes, or classroom displays. We’ll also add tiny hearts around the flower, which makes the drawing cheerful and ready for gifts or Valentine messages.
Supplies for This Drawing
- HB pencil and 2B pencil
- Kneaded eraser and plastic eraser
- Black fine liner (0.3–0.5 mm)
- Red, pink, green, and gray colored pencils or markers
- A4 (8.3×11.7 in) 160–200 gsm drawing paper
- Sharpener
- Ruler (for paper borders, optional)
Prepare the Materials
- Clear the desk and place good lighting.
- Tape paper edges for a neat border.
- Sharpen pencils and test strokes on scrap.
- Keep reference images visible.
- Open markers, cap them between passes.
- Keep a soft cloth for smudge control.
Special Features of This Drawing
- Simplified rose bud using big, clean curves.
- Playful spiral center for instant “rose” read.
- Friendly cartoon face with glossy eyes.
- Contrasting red petal lines against black leaves.
- Floating hearts that frame the character.
- Easy color layering to suggest gentle form.
Tutor’s Suggestions
- Sketch lightly; treat early lines as guidelines.
- Use the side of the pencil for soft shading.
- Thicken lines where shapes overlap to show depth.
- Keep eyes symmetrical by marking midpoints first.
- Color with curved strokes that follow the form.
- Lift mistakes with a kneaded eraser, not rubbing.
- Take short breaks to spot proportion issues.
Uses
- Valentine or birthday card art.
- Classroom drawing demo or warm-up.
- Cute wall print for a kid’s room.
- Coloring page for younger artists.
- Social post celebrating love or friendship.
- Small gift tag illustration.
Level of Difficulty
Beginner-friendly — large shapes, clear steps, and simple coloring.
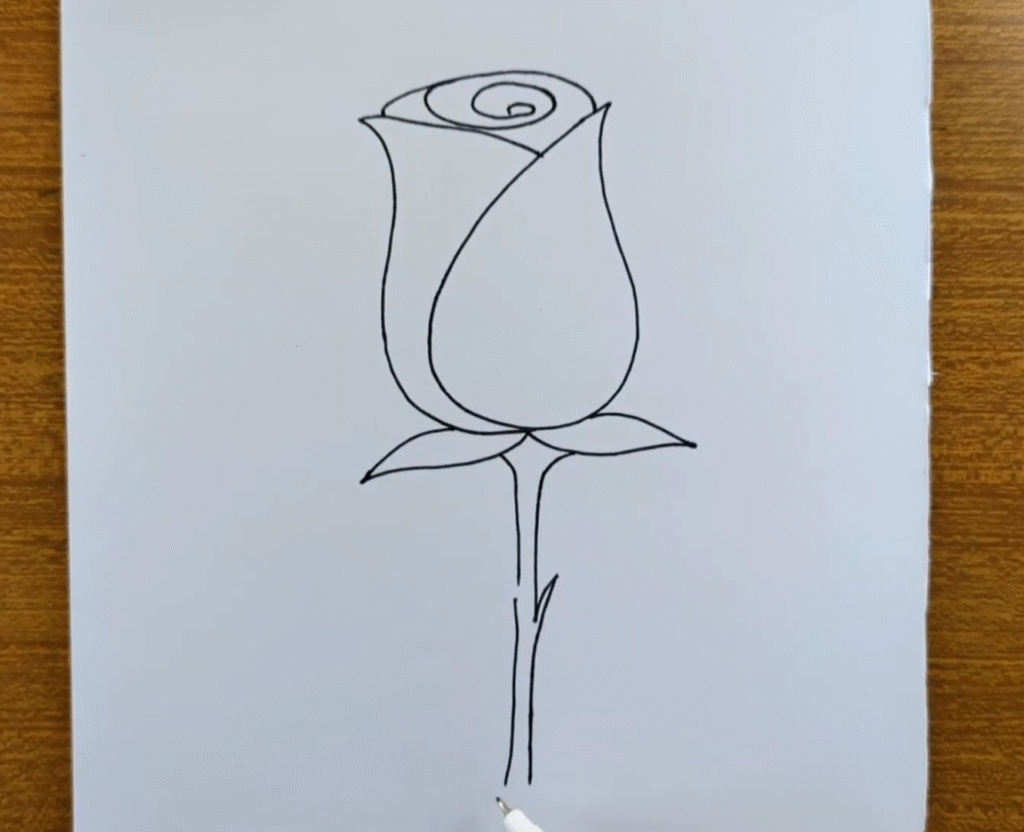
Build the Bud Shape

Start with the bud. Draw a rounded triangle shape with a soft point at the top. Add a curved line down the right to suggest the front petal. Sketch a narrow curved side on the left. Inside the top, draw a small spiral for the rose center. Keep lines light and smooth, focusing on clean, flowing curves. Erase guides that feel distracting.
Add Sepals and Stem Start
Under the bud, draw two small curved sepals, meeting at the middle. From that point, pull two long parallel lines downward to begin the stem. Keep the stem slightly wavy, not perfectly straight. Add a tiny notch or bump on one side to hint at a thorn. Check symmetry and adjust the bud’s bottom curve to sit neatly. Erase overlaps if necessary.
Draw Leaves and Branches

Add leaves. From the sepals area, sketch two wide leaf bases spreading left and right like small wings. Below them, draw a short branch on each side of the stem. Attach a simple leaf to each branch with smooth outer curves and a pointed tip. Add a single vein inside each leaf. Keep proportions balanced and pleasant. Refine lines to read clearly.
Add a Cute Face and Hearts

Give it personality. In the front petal area, place two big oval eyes with tiny highlights near the top left. Add a small curved mouth centered between them. Draw light eyebrows if you like. Around the bud, sketch four simple heart outlines to boost the cute mood. Keep everything symmetrical and gentle so the face feels friendly. Erase extra construction lines softly.
Ink Petals with Red Lines

Time for inking accents. Trace the outer petal edges with a red fineliner or colored pencil, keeping the inner spiral and front-petal curve bold. Leave leaves and stem in black for contrast. Use smooth, confident strokes; resist sketchy repeats. Thicken lines near overlaps to suggest depth. Let the ink dry before resting your hand anywhere. Clean smudges gently with kneaded eraser afterward.
Color the Bud

Fill the rose with color. Use a red pencil or marker to shade evenly inside the petals. Follow the curve of each shape with your strokes so the texture wraps naturally. Leave small white ovals in the eyes as shines. Deepen the spiral shadow slightly. Keep coverage smooth, layering lightly rather than pressing hard in one pass. Soften edges with gentle blending.
Color Leaves and Stem

Color the greens. Shade the two big leaves, the small top leaves, and the stem using a medium green. Add a darker pass along the center veins and where leaves tuck under the bud to suggest volume. Keep highlights along outer edges. If using markers, avoid flooding the paper; move steadily. Clean any bleed with your fineliner. Re-outline leaf tips if needed.
Finish Hearts and Details

Finish the hearts. Color each small heart a soft pink, leaving a tiny highlight near the top for shine. Add a subtle shadow under the bud and leaves with a light gray pencil to ground the rose. Step back, check balance, and adjust line thickness where needed. Your cute rose with a face is complete and charming. Sign quietly in a corner.
Conclusion
Simple shapes and soft curves make this rose friendly for beginners, yet the face and small hearts add personality. Keep the petal lines smooth and confident, and let your coloring follow the form. Swap colors for different moods—classic red, peach, or even blue. Share it on a card or decorate a note to brighten someone’s day. Frame it for display.
A Bonus Tip
Place a faint oval shadow under the rose last; a grounded drawing instantly looks more polished and intentional.
FAQs
Q: How long will this take?
A: Most people finish in 30–50 minutes, including sketching, inking, and coloring.
Q: What paper size and weight work best?
A: A4 (8.3×11.7 in) at 160–200 gsm handles markers and layering without buckling.
Q: My bud looks lopsided. How do I fix it?
A: Lightly draw a centerline first. Mirror each side to that guide, then erase the guide.
Q: Should I shade before or after outlining?
A: Outline first, let it dry, then shade. You’ll keep edges crisp and avoid smears.
Q: Markers or colored pencils?
A: Either works. Markers give flat, bold fills; pencils layer softly and are easier to control.
Q: How do I color the eyes?
A: Fill dark, leave small white highlights, and add a thin gray rim for a glassy look.