
How to Draw Cute Teddy Bear
Let’s draw a cute teddy bear holding a big heart—perfect for cards, classrooms, or a quick gift. This tutorial keeps shapes simple and friendly, so beginners and kids can follow along easily. We’ll start with light pencil lines, build the head and ears, place the face, then sketch the paws and heart. After that, we’ll add the body, clean the outline, and shade for soft, plush texture. Use any paper you have; A4 (8.3×11.7 in) is ideal. Work gently, erase lightly, and keep curves round. By the end, you’ll have a lovable bear you can leave in graphite or color. Markers or colored pencils look great for finishing touches, but plain HB shading works beautifully. Pause between steps, compare both sides, and keep proportions balanced with light guidelines throughout carefully.
Supplies for This Drawing
- HB pencil for sketching; 2B and 4B for shading
- Fineliner (0.3–0.5 mm) optional for clean outline
- White vinyl eraser and kneaded eraser
- A4 (8.3×11.7 in) 160–200 gsm drawing paper
- Pencil sharpener
- Blending stump or soft tissue
- Ruler (for centering marks, optional)
- Colored pencils or markers (optional)
Prepare the Materials
- Clear your workspace and set good lighting.
- Tape paper edges to your table or board.
- Sharpen pencils; keep scrap paper for tests.
- Place these step images where you can see them.
- Lightly mark center lines on the page.
- Keep an eraser crumbs brush or tissue handy.
Special Features of This Drawing
- Big heart shape creates instant cuteness and message space.
- Oversized ears and paws for plush proportions.
- Simple facial features with bright, shiny eyes.
- Clear overlaps: paws over heart, head in front.
- Gentle graphite shading for soft fur texture.
- Works equally well in color or grayscale.
Tutor’s Suggestions
- Sketch lightly first; build darks at the end.
- Keep curves smooth by moving your whole arm.
- Mirror-check symmetry by rotating the page.
- Erase in dabs, not rubs, to protect paper.
- Layer values slowly: HB → 2B → 4B.
- Keep highlights clean around eyes and muzzle.
- Take short breaks to spot proportion issues.
Uses
- Classroom drawing practice or holiday activity
- Valentine or birthday card artwork
- Coloring page for kids or events
- Framed mini print for nursery decor
- Quick fan art or sketchbook warm-up
- Personalized gift with a name on the heart
Level of Difficulty
Beginner-friendly — simple shapes, clear overlaps, and forgiving shading.
Top Head Curves

Near the top center of your page, draw three gentle bumps like a wide cloud: left curve, higher middle curve, and right curve. Leave gaps on each side; these will drop into the cheeks later. Keep strokes light and smooth, using your wrist, not your fingers. Aim for a relaxed, rounded silhouette, slightly wider than it is tall. Centered above future face.
Add Ears and Cheeks

On the left and right, draw big circular ear outlines connected to the top curves. Inside each ear, add a smaller inner curve for fluff. From the base of each ear, drop short downward curves to suggest cheeks; stop before meeting in the middle. Keep symmetry loose and cute. Keep lines light so you can adjust proportions. Use a relaxed wrist motion.
Place Eyes and Snout Guide

Inside the face, place two small circles evenly spaced under the top curve. Add tiny highlight circles, then shade lightly around them to make pupils. Over each eye, draw short eyebrow arcs. From cheek to cheek, sketch a shallow U that dips to a small point in the center—this guides the snout and heart notch below. Keep sizes equal and friendly looking.
Draw Muzzle and Nose
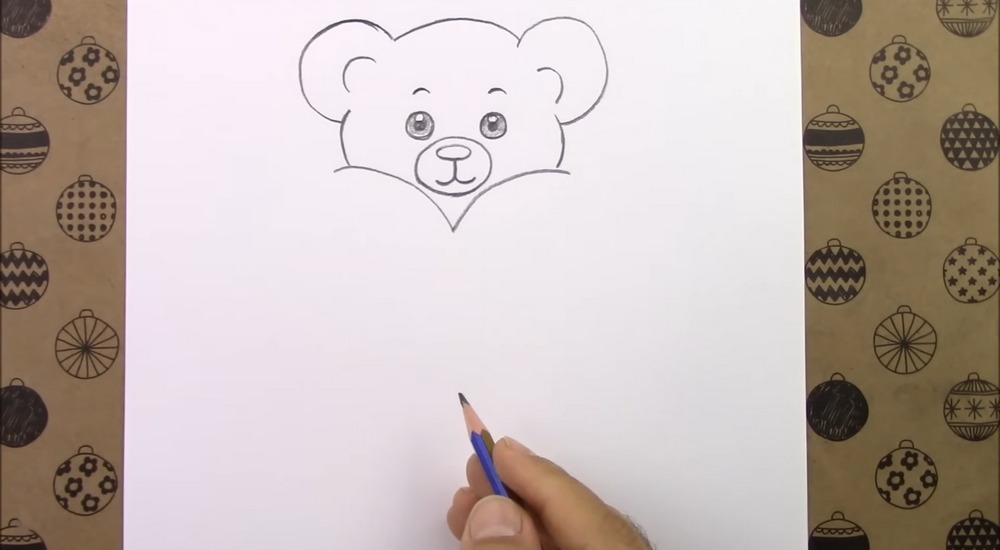
Center a rounded oval muzzle over the point. Split it with a soft vertical line. Add a small oval nose on top, and a short J-shaped mouth under it. Thicken outer eye rings slightly to pop the expression. Keep everything compact so the bear stays sweet, leaving room for paws and the large heart later. Erase guides if they distract a bit.
Add Paws Over Heart Edge

From each side of the cheeks, draw a small curved forearm ending in three rounded fingers. Angle the hands inward as if resting on something. Make sure both paws sit slightly above the center point. Keep overlaps clean by letting the fingers sit in front of the face. These will soon grip the heart’s upper edge. Keep spacing cute and balanced visually.
Sketch the Big Heart

Below the snout point, sweep two long curves to form a large heart that fills most of the page. Let the top curves tuck under the paws so they appear to hold it. Aim for symmetry, but favor charm over perfection. Finish at a neat bottom point centered under the head, creating a bold, lovable centerpiece. Lightly refine thickness and curves evenly.
Draw Body and Feet

Behind the heart, add two short side lines for the body. At the bottom, draw wide rounded feet that peek out on both sides, connecting with a small gap at the heart point. Keep the legs simple and plush. Check overall balance: head, heart, and feet should stack vertically, giving the bear a sturdy, adorable stance. Round toes softly for cuteness appeal.
Clean Lines and Soft Shading

Trace your final outline with slightly darker pencil, smoothing any bumps. Add soft shadow along the head edges, inside the ears, and beneath the paws to show overlap. Shade lightly around the heart’s edges and under the muzzle point. Keep gradients gentle for plush fur. Avoid heavy lines on highlights to preserve a cuddly look. Blend with tissue or stump for softness.
Finish Texture and Details

Deepen eye pupils, leaving highlights crisp. Add a faint rim of tone around the bear to separate it from the page. Feather short strokes inside ears and along limbs for velvety texture. Darken the lowest parts of feet and the heart’s base shadow. Keep the heart lighter within, ready for lettering, color, or a short message. Sign your drawing with pride today.
Conclusion
Cute shapes, clear overlaps, and gentle shading make this teddy bear work for any skill level. Keep curves smooth, eyes bright, and the big heart centered. If something looks off, nudge proportions before darkening lines. Add names or colors to personalize it. With practice, the same method adapts to different poses, gifts, and occasions. Share it to brighten someone’s day.
A Bonus Tip
Lightly shade the heart first, then lift a soft oval highlight in the middle with a kneaded eraser to make it glow.
FAQs
Q: How long will this take?
A: Most beginners finish in 30–45 minutes, including shading. Add extra time if you plan to color.
Q: What paper size works best?
A: A4 (8.3×11.7 in) or Letter works great. Heavier paper (160–200 gsm) handles erasing and blending better.
Q: My heart isn’t symmetrical. How do I fix it?
A: Lightly fold or trace one side onto scrap, flip, and copy the better half. Or use a center line and adjust each side gradually.
Q: Should I ink the outline?
A: Optional. Ink after pencils are correct and fully dry. Erase graphite gently to keep the ink crisp.
Q: How do I shade without streaks?
A: Use tiny circular motions, keep pencil sharp, and blend lightly with tissue. Build layers slowly rather than pressing hard.
Q: Can I color it with markers?
A: Yes. Ink first, erase pencil, then lay light marker tones. Add colored-pencil details on top for soft fur and highlights.


