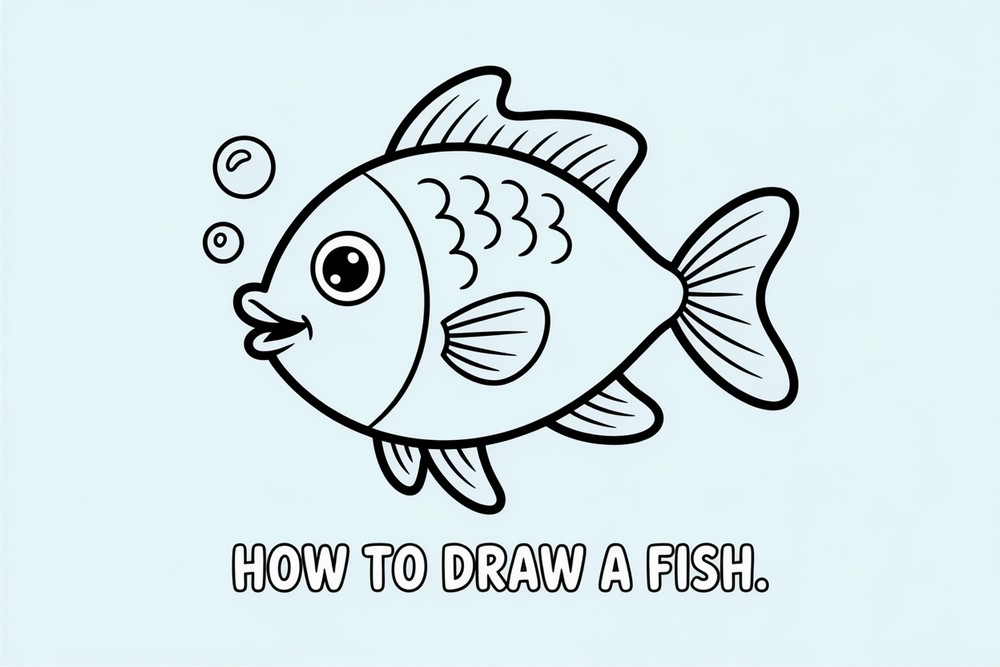
How To Draw A Fish
Want a cute fish drawing that kids and adults can finish in minutes? This step-by-step guide shows you exactly where to place each line, starting with simple shapes and building up to fins, scales, and playful details. We’ll sketch lightly first, then trace crisp outlines so every curve feels tidy and confident. The body uses gentle curves, so mistakes erase easily. You’ll practice proportion, symmetry, and flow while keeping everything friendly and simple. Grab a pencil, eraser, paper, and your favorite colors. A ruler helps place the first curve, yet you can freehand. By the last step you’ll add bubbles and lines to suggest texture, turning a basic outline into a charming character. Ready to draw a happy fish that looks great colored or left as line art? Let’s begin.
Supplies for This Drawing
- HB pencil for sketching; 2B for soft shading
- Fineliners: 0.3 mm and 0.5 mm (optional)
- Kneaded eraser and vinyl eraser
- Sharpener (handheld or crank)
- A4 (8.3×11.7 in) 180–220 gsm drawing paper
- Ruler (15–30 cm / 6–12 in)
- Colored pencils or markers (optional)
- Tissue or blending stump (optional)
Prepare the Materials
- Clear your desk and set bright, even lighting.
- Tape paper edges to a board for a clean border.
- Sharpen pencils; test pressure on scrap.
- Place references within easy view.
- Keep erasers handy; knead before use.
- Confirm paper orientation and start lightly.
Special Features of This Drawing
- Smooth, rounded body built from two long curves
- Simple, readable face with shiny eye highlight
- Split tail with gentle inward notch for character
- Overlapping “rainbow” scales for rhythm and texture
- Flexible fins accented by inner bands
- Optional bubbles add motion and playfulness
Tutor’s Suggestions
- Sketch lightly first; commit to ink only when shapes feel right.
- Vary pressure to keep curves smooth and lively.
- Use the gill plate as a landmark to check proportions.
- Keep scale rows offset like bricks.
- Clean lines beat fussy ones—erase and redraw.
- Build shading slowly from light to dark.
- Take short breaks to see symmetry fresh.
Uses
- Classroom warm-ups and art club projects
- Cute greeting cards or gift tags
- Coloring page for kids or events
- Notebook sticker or wall print
- Simple animation frames or flipbook
- Relaxing daily drawing practice
Level of Difficulty
Beginner-friendly — forgiving curves, clear landmarks, and easy finishing details.
Head and Eye

Start with the head. Draw a rounded diamond, point facing left, using one smooth arc on top and one on the bottom. Inside, add a medium circle for the eye. Place a smaller circle near the upper left for shine, and shade the pupil around it. Keep lines light so you can adjust the proportions before outlining later. Keep the shape compact.
Mouth and Head Contour

Curve a small smile near the left point to suggest a friendly mouth. Then refine the head’s back edge: trace a slightly straighter line on the right side to flatten the profile a touch. Keep the eye centered between top and bottom arcs. Erase stray marks, keeping the outer contour clear and even so your fish reads simple, cute, and to ink.
Gill Plate and Belly Curve
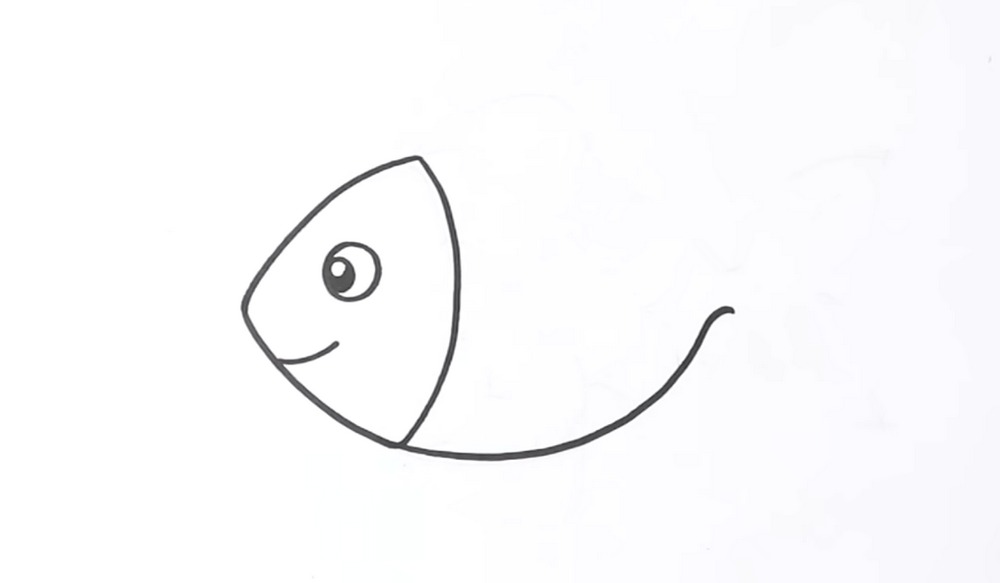
Add a curved divider behind the head: draw a short vertical arc from top to bottom, creating a gill plate. From the lower tip, sweep a long S-curve to the right for the belly, gradually rising as it goes. This line sets the body’s length and flow. Keep it graceful, not wobbly, and leave space at the far right for the tail.
Back Line and Body Flow
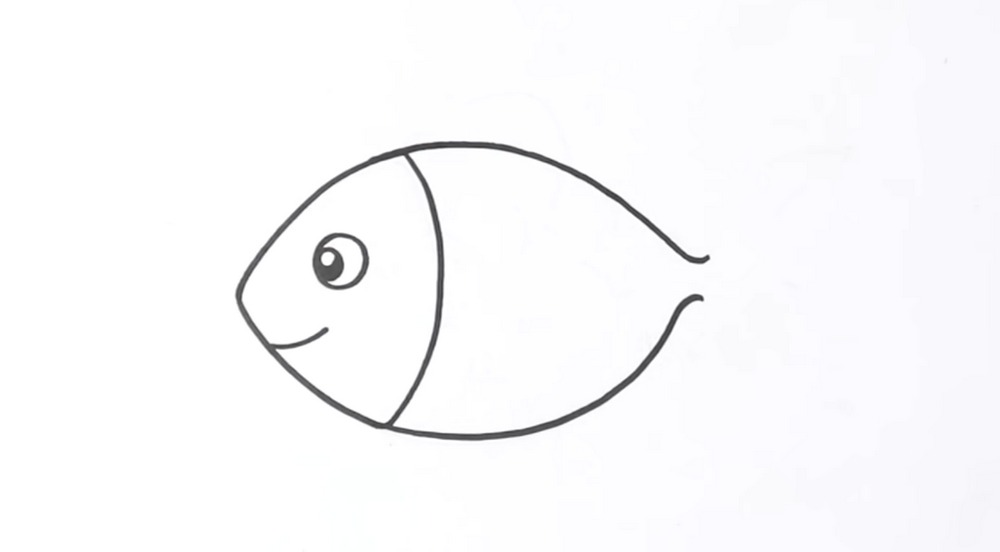
Mirror that movement with the top contour. Start near the gill plate’s upper tip and curve a long line to the right, narrowing toward the end. Stop before closing the shape so both top and bottom lines finish as points. These will connect into the tail. Check that the belly and back feel balanced, meeting near the spot for a smooth silhouette.
Tail Opening
Shape the tail opening. From each tip, draw a short inward curve, like two hooks facing each other. This creates the notch where the tail fins meet. Keep the curves even so the tail sits centered on the body. The body should now feel like one continuous, flowing shape that narrows gracefully toward the tail base, ready for fins. Nicely symmetric.
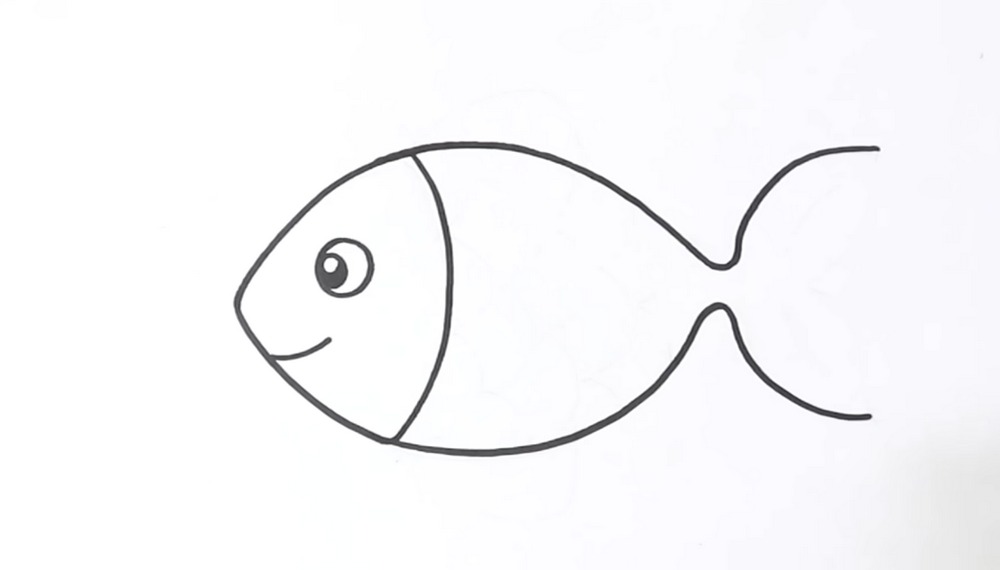
Tail and Side Fins

Complete the tail by adding two leaf-shaped lobes, meeting at the notch you prepared. Then add fins: a small rounded triangle on top near the gill plate, and a matching one below the belly. Keep their bases attached to the body, not floating. Aim for smooth outer edges so they appear flexible, like soft fabric in water, not sharp triangles and natural.
Scales and Fin Bands
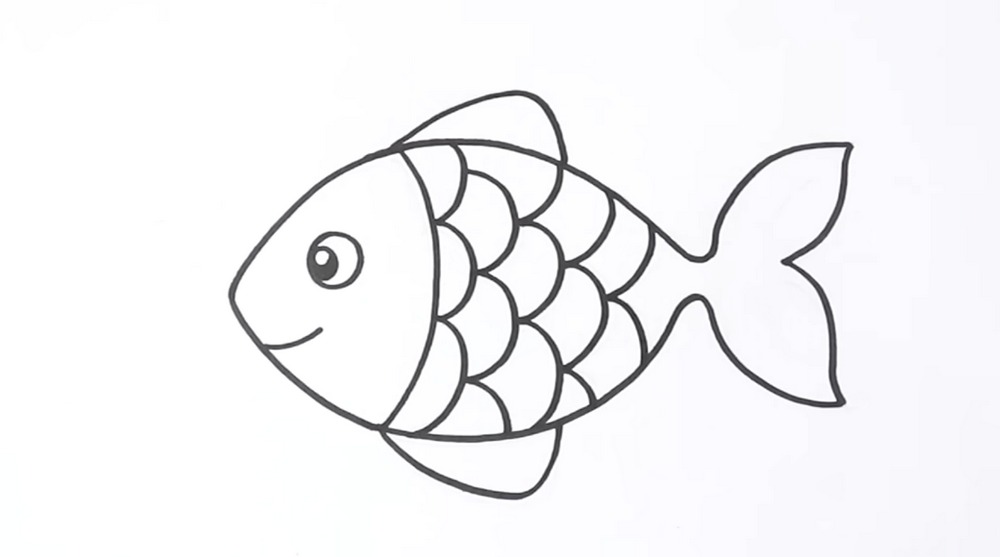
Draw scales using overlapping rainbow shapes. Start with a row of arches along the back, then add a second row beneath, offset like bricks. Continue toward the tail, keeping scale size consistent and stopping before the narrow base. Add a curved band inside the top and bottom fins to show thickness. Leave the face and gill plate clear so the expression stays.
Texture, Bubbles, and Clean Outline
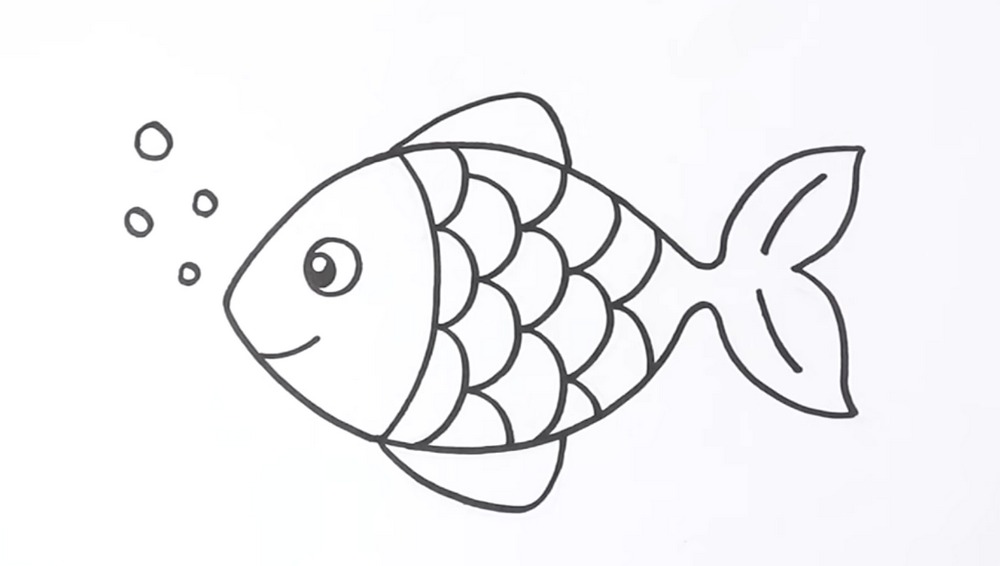
Finish with details. Add two light curved lines inside the tail lobes to suggest structure. Draw a few round bubbles drifting upward near the nose for a playful touch. Now trace your final outline with a pen or darker pencil, letting the clean line pass smoothly around curves. Erase construction marks when dry. Your friendly fish is ready for color or shading.
Conclusion
This fish is built from friendly curves, so it’s perfect practice for control and confidence. Keep your lines relaxed, use the gill plate as a landmark, and space the scales like bricks. Color boldly or shade softly; both approaches work. Most of all, enjoy the simple rhythm of repeating shapes. That calm flow is why drawings like this feel cheerful.
A Bonus Tip
Curve every line toward a destination point at the tail base—this shared flow keeps the body lively and unified.
FAQs
Q: How long will this take?
A: Most beginners finish in 25–45 minutes, including inking and cleanup.
Q: What paper size works best?
A: A4 (8.3×11.7 in) gives comfortable space for smooth curves and clear scales.
Q: My proportions look off. Help?
A: Compare distances to the gill plate: eye to top, eye to mouth, and head to tail base.
Q: Should I shade before or after inking?
A: Ink first, let it dry, erase construction lines, then shade lightly to avoid smudges.
Q: Markers or colored pencils?
A: Both work. Markers give bold flats; pencils layer gentle gradients and texture.