Cute Kawaii Mushroom Drawing
Drawing a cute mushroom is a quick, confidence-building project for kids and beginners, yet satisfying for anyone who enjoys calm, cozy art. You only need a pencil, eraser, black marker, and a few colored pencils. The shapes are friendly: flowing curves, round spots, and little leaves that hug the stem. This step-by-step guide takes you from a single guideline to a bright, finished character. You’ll practice keeping curves even, placing features for a happy expression, and layering flat color with light shading. Work lightly at first, so corrections are easy. When the structure looks right, trace confident lines with your marker.
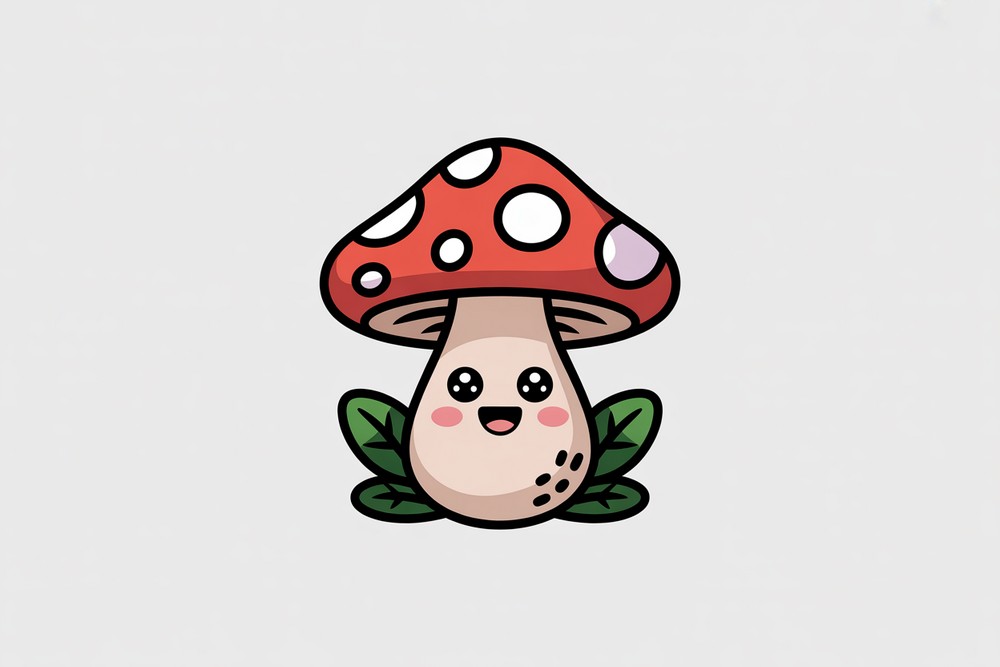
Finally, add color: scarlet cap, creamy stem, rosy cheeks, and fresh green leaves. Keep white circles on the cap for highlight and charm. Pause after each step, compare both sides, and nudge lines until they feel balanced. By the last frame you’ll have a friendly toadstool that looks clean, bold, and ready to hang on the fridge or share online. Let’s begin. Before you start, tape the paper edges if you like crisp borders, rotate the page to check symmetry, and keep a scrap sheet nearby for testing pencil pressure. Small, slow strokes beat long, rushed ones. Enjoy it.
Supplies
- Smooth white drawing paper (A4 or 9×12)
- HB pencil (plus a softer 2B if you like)
- Eraser: kneaded + vinyl block
- Black fineliner/marker (≈0.5 mm)
- Colored pencils: red, pink, light beige/cream, light green, dark green, warm gray
- Sharpener and scrap paper for testing strokes
- Optional: washi tape for borders, blending stump or cotton swab, white gel pen for sparkle
Prepare the Materials
- Sharpen pencils; keep points clean by testing on scrap.
- Tape the paper edges if you want a crisp border.
- Place the paper vertical; keep room above the center for the cap.
- Check light—no glare on the page.
- Set out colors in drawing order: red, pink, beige, greens, gray.
- Warm up with a few light curves and circles.
- Keep a soft brush or tissue handy to sweep away eraser crumbs.
Special Features of this Drawing
- Big friendly cap with high-contrast white spots
- Kawaii face (oval eyes, tiny smile, rosy cheeks)
- Two simple leaves that balance the base
- Very few shapes; easy to scale up or down
- Works in pencil, markers, or crayons
- Built-in places for highlights, shadow, and texture
Tutor’s Suggestions
- Draw lightly first; save the bold lines for the marker stage.
- Turn the page while inking curves—let your hand stay comfortable.
- Keep the cap larger than the stem; it’s the cuteness key.
- Color in small circles for even coverage; layer gently.
- Protect the white spots—don’t press over them.
- Add a second pass of red under the cap edge for a quick shadow.
- If a line wobbles, thicken the opposite side to balance it.
Level of Difficulty
Beginner-friendly (great for kids and new artists). Typical time: 15–25 minutes.
Uses
- Coloring page or classroom activity
- Greeting card or gift tag
- Sticker design or notebook cover
- Nursery/kids’ room mini print
- Autumn craft, forest theme bulletin board
- Step into character design: swap colors, add hats, tiny snails, or rain drops
Step of Kawaii Mushroom Drawing

Begin with a light, gentle curve across the page. This is the underside of the cap and sets the width of your mushroom. Keep the curve slightly raised at both ends, like a soft smile, so the cap will feel round and friendly later. Hold the pencil loosely and use short, repeated strokes rather than one long sweep; it’s easier to adjust. Center the line and leave plenty of space above for the big hat shape. Check that both ends sit level with each other. If one side droops, erase, breathe, and redraw until the curve feels balanced and relaxed.
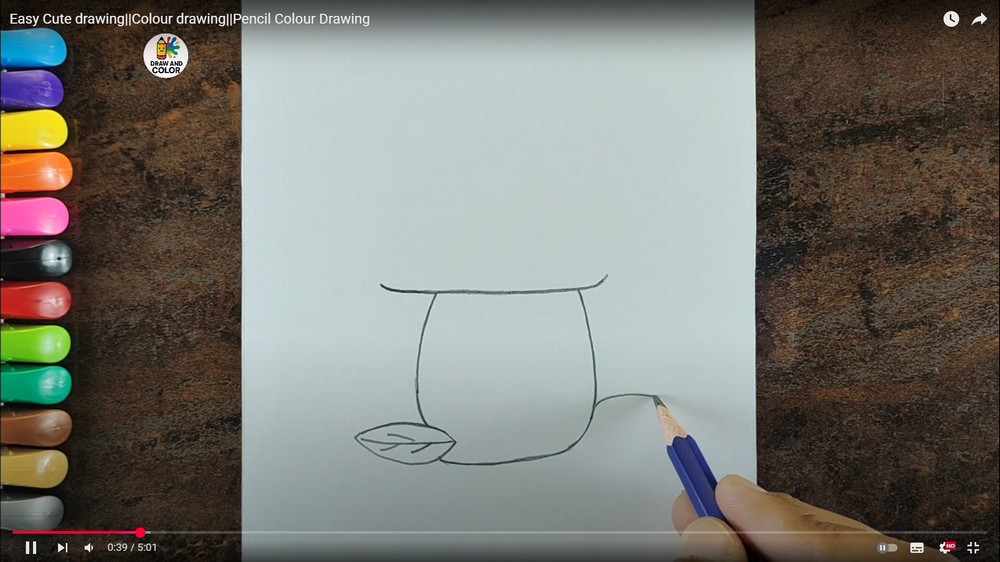
Drop two soft, slightly inward curves from the guide line to form the stem. Let them flare gently at the bottom, then connect with a rounded base so the stem looks sturdy. Add a small leaf on the left: an almond shape that tucks under the stem, with a center vein and two short slanted veins. Keep everything light; these are still construction lines. To the right, sketch an outward swoop that will become the second leaf. Step back and check proportions: cap line wider than the stem, leaf small enough to read as an accent rather than a distraction.

Build the cap. From the left edge of the guide line, arc upward in a domed curve, then descend to the right edge. Keep the top slightly flattened for a plush look. Add round spots of sizes across the cap; vary their spacing to look natural. On the right, finish the second leaf: mirror the left leaf’s almond shape and veins, tucking it behind the stem. Add two tiny crease marks where the cap touches the stem to suggest overlap. Review the silhouette. The cap should feel larger than the stem, with leaves balancing the base like friendly wings.

Place the face. Add two tall ovals for eyes, spaced evenly across the stem. Leave a small white oval inside each later for sparkle. Sketch a tiny smile between them, a soft curve that sits slightly below center. Add round blush circles on both sides of the mouth. Keep features low on the stem; this pushes the cuteness. If anything feels crooked, lift lines with your eraser and nudge them over. Check spacing by covering one eye with your finger: the remaining shapes should still look centered. When the face feels friendly and balanced, you’re ready to commit with ink.

Trace your best lines with a black marker. Move slowly, turning the page to keep your hand comfortable while you follow each curve. Outline the cap, leaf shapes, stem, and spots first. Then ink the tiny crease marks beneath the cap and the veins inside both leaves. Fill the eyes solid, but leave small highlights uncolored for shine. Re-draw the smile in a single smooth stroke. Keep your pen moving; hesitations can create wobbles. If a line thickens accidentally, even it out by matching the thickness on the opposite side. Let the ink dry completely before erasing remaining pencil guide.

Lay in the main colors. Fill the cap with red, working in small circular motions so the color looks even. Keep the white spots clean as you color around them. Deepen the edge just under the cap with a second pass to suggest shadow. Color the cheeks with pink, feathering the edges so the circles blend softly into the stem. Leave the stem itself white for now. Double-check the eyes: they should read inky and glossy with the preserved highlights. Stand back. The drawing already looks lively because the bold cap and blush add warmth and personality. Keep strokes gentle.

Youtube
Finish with color on the stem and leaves. Use a pale beige or cream for the stem, pressing softly to keep it light. Darken the lower edge a touch for roundness. Color both leaves with fresh green, then pass again along the veins to suggest depth. If you like, add a faint warm gray shadow under the base so the mushroom sits on the page. Review edges and touch up any thin ink gaps. Finally, blow off eraser crumbs and lift smudges with a kneaded eraser. Your smiling mushroom is complete and ready to frame, gift, or photograph for sharing.
Final Thought
Simple shapes, steady lines, and small color choices can turn a blank page into a warm, happy character. If your first try feels uneven, celebrate it anyway—every drawing is a step forward. Redraw the cap larger, shift the eyes, or try different leaf angles until the personality clicks. Keep your pencils sharp, your touch light, and your mindset curious. Most of all, have fun. That joy is the secret ingredient people always notice. Enjoy drawing.
FAQs
1) What paper works best?
Any smooth student sketch paper; printer paper is fine for practice.
2) What if my cap isn’t symmetrical?
Lightly sketch, flip the page upside down, and nudge the flatter side to match.
3) Can I use markers instead of pencils?
Yes. Ink first, erase pencil, then fill with alcohol markers; leave spots white.
4) How do I keep colors even?
Use light pressure and tiny circular strokes; build color in two passes.
5) How do I get shiny eyes?
Leave a small white oval when filling the black, or add it later with gel pen.
6) My outlines look shaky—help?
Slow down, anchor your wrist, pull lines toward you, and rotate the page often.
7) Can beginners add shading?
Sure—add a soft warm gray under the stem and a deeper red under the cap rim.
8) How can I make a set?
Draw three mushrooms at different sizes, tilt one cap, and vary the spot sizes.
A Bonus Tip
Print or trace your favorite version onto thicker card, then color three ways—classic red, pastel pink, and autumn orange. Mount them side-by-side for an instant “mushroom trio” wall piece that looks planned and polished.


