How To Draw Charmander from Pokémon
Charmander is one of those characters that always makes people smile. The big eyes, the round cheeks, and the little flame at the tip of the tail give it instant charm. This step-by-step version keeps everything simple and friendly, so kids and beginners can follow along without stress. We use easy shapes—U-curves, ovals, and soft lines—to build the head, the seated body, and the signature flame. Then we add the bold outline and gentle coloring that bring the drawing to life.
You’ll see clear checkpoints in each image: first the head shape, then the leg guides, body and tail, face, and finally color. Work lightly with pencil at the start, switch to a black pen when you’re happy with the lines, and finish with colored pencils. Layer the orange slowly so it stays smooth, save the lightest areas for highlights, and warm up the flame with yellow inside, orange around it, and a hint of red to deepen the glow.
By the end, you’ll have a cute, seated Charmander that looks clean on white paper and pops on camera. It makes a great mini poster, sticker scan, or coloring page for friends and family.
1. Build the base “U” for the head
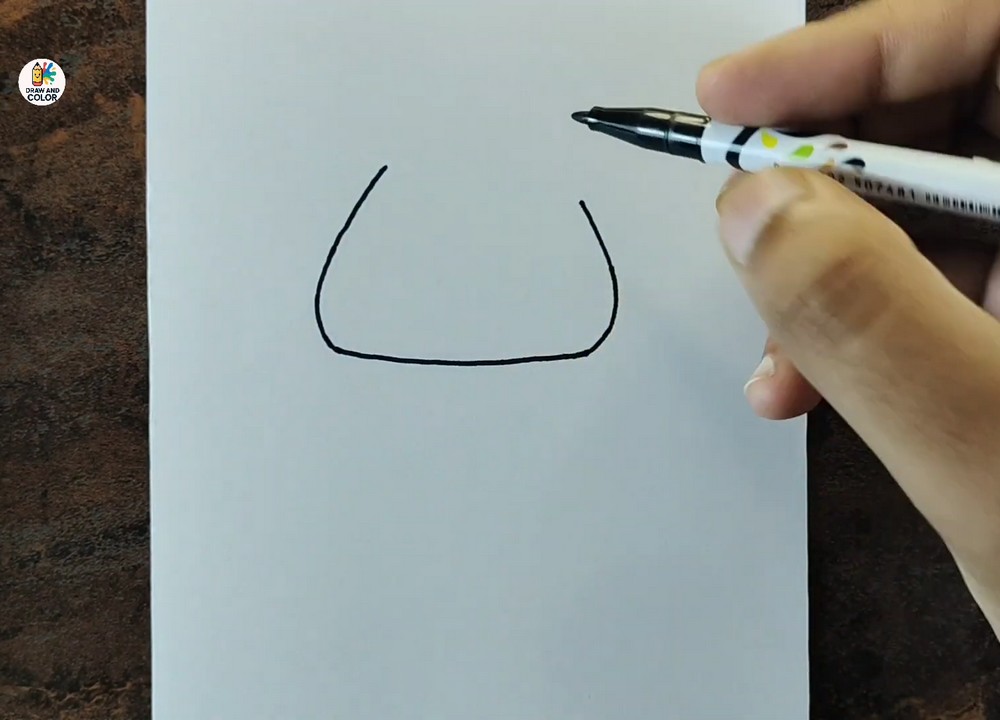
Start with a wide, soft “U” shape near the center of the page. Keep the bottom stroke almost straight, then curve gently upward on both sides. This will become Charmander’s head and cheek line, so make it smooth and confident. Leave enough space above to close the head later. Draw with light pencil first, then trace once you like the curve. Check that both sides feel balanced; they don’t need to be perfectly symmetrical. Think “rounded bowl”—friendly, not pointy. This simple shape sets the cute proportions, so take a moment to nudge the corners until the curve looks natural.
2. Close The Head and Place Leg Guides

Curve over the top to close the head like a domed cap. Keep the top slightly wider than the base for that cozy, chibi look. From the bottom corners, drop two short, slightly inward lines—these are the sides of the body. Add two small circles at the ends for the feet. The circles are guides, not final detail, so keep them light. Make sure there’s a little space between the feet so the belly can sit in the middle later. Step back and see if the head still feels big and cute; that oversized head is the secret to charm.
3. Body, Belly, Arms, Tail, and Flame Outline

Connect the body sides with a soft curve. Add a round belly shape centered between the feet. Sketch two short curved arms that rest on the belly; add tiny triangle nubs for claws near the feet to hint at toes. Now sweep a thick, tapering tail out to the right and curl it back in, ending with a teardrop flame shape. Inside the flame, add a smaller teardrop—this will be the bright core. Keep all lines smooth and rounded. The pose should feel seated and relaxed, with the tail supporting the silhouette and the flame ready for color later.
4. Face, Eyes, Mouth, and Small Details

Place two big, tilted ovals for the eyes, high on the head. Leave two small white ovals inside each eye for highlights, then fill the rest dark. Add two tiny nostril dots and a friendly, curved smile. A short line under the mouth suggests the chin. Light cheek marks or small eyebrow curves add expression without clutter. Re-trace your favorite lines in black pen, keeping the outline slightly thicker around the outside and thinner inside. Thicken the tail’s outer curve to frame the flame. Let the ink dry, then erase any pencil so the drawing looks crisp and clean.
5. Start Coloring: Tail Flame First

Begin with the flame so you don’t smear orange body color later. Lay a light yellow in the small inner teardrop. Around that, add a ring of orange. Touch the very outer edge with a hint of red to deepen the glow. Keep your pencil pressure gentle; you can always add more. Leave the flame outline clean and sharp. Lightly shade the tail near the flame with orange, fading toward the body so the glow feels real. This small color area is a warm-up for smooth shading. Check edges for neatness before moving on to large surfaces.
6. Base Colors For Body, Belly, and Feet

Fill the body and tail with a medium orange, using small circular strokes for even coverage. Keep the chest, belly, and foot pads a pale cream or light yellow. Add a slightly darker orange around the edges of the body and under the head to suggest soft shadow. Darken the ring around each foot pad to make it pop. Put a gentle pink-red inside the mouth and a darker line along the smile. If the eyes lost their tiny white highlights, re-tap them with an eraser or a white gel pen. Keep everything smooth and friendly.
7. Final Shading, Polish, And Tiny Accents

Youtube
Deepen shadows where forms overlap: under the cheeks, inside the arm curves, along the belly edge, and where the tail meets the body. A light pass of warm gray or deeper orange along the outer contour gives soft dimension without killing the cuteness. Reinforce the flame: bright yellow center, orange mid, thin red rim. Add a touch of orange on the cheeks for warmth. Clean any smudges and re-ink lines that faded during coloring. A tiny white dot on the lower lip and one extra sparkle in each eye add life. Sign your drawing. You’re done!
Final Thoughts
You built this drawing from the simplest shapes and let color do the rest. The big head, bright eyes, and gentle shading create instant appeal, while the tail flame adds a fun pop of warmth. Keep your sketch light, your outline confident, and your coloring layered and smooth. Try the same steps with different expressions or poses, or switch to markers for a bolder finish. Most of all, enjoy the process—cute drawings reward patience and small details.
Supplies
- Smooth white drawing paper (A4 or letter)
- HB pencil + eraser
- Black fineliner or marker (0.5–1.0 mm)
- Colored pencils: orange, yellow, red, cream/light yellow, pink, warm gray (optional), black
- Sharpener, tissue or blending stump (optional)
- White gel pen (optional for eye highlights)
Prepare the Materials
- Sharpen colored pencils lightly to avoid scratches.
- Test colors on scrap paper: pick your orange, cream, and red.
- Place a spare sheet under your hand to prevent smears.
- Keep an eraser crumb-free; brush, don’t rub, to clean.
- Sketch lightly, then ink only the lines you love. Let ink dry before erasing.
Special Features of This Drawing
- Chibi proportions with a big head and seated pose
- Giant glossy eyes with simple highlights
- Clear, thick-to-thin outline for a crisp cartoon look
- Signature tail flame with three-tone glow
- Simple shapes that are easy for kids and beginners
Tutor’s Suggestions
- Rotate the paper to keep curves smooth.
- Build color in two to three light layers, not one heavy pass.
- Keep the belly bright—stop shading early there.
- Use circular strokes for even orange coverage.
- Leave tiny white eye spots for sparkle; add gel-pen dots last.
Uses
- Classroom art project
- Party activity or favor bag sticker (scan and print)
- Pin/post for art blogs and socials
- Coloring page handout
- Cute card or mini poster for a friend
- Practice piece for smooth pencil shading
Level of Difficulty
Beginner-friendly. Great for kids with light guidance. Expect 20–35 minutes depending on coloring and line work.
Bonus Tip
For extra glow, very lightly haze yellow around the outside of the flame, then softly blend it into the white paper. Keep the haze faint so the tail edge stays clean.