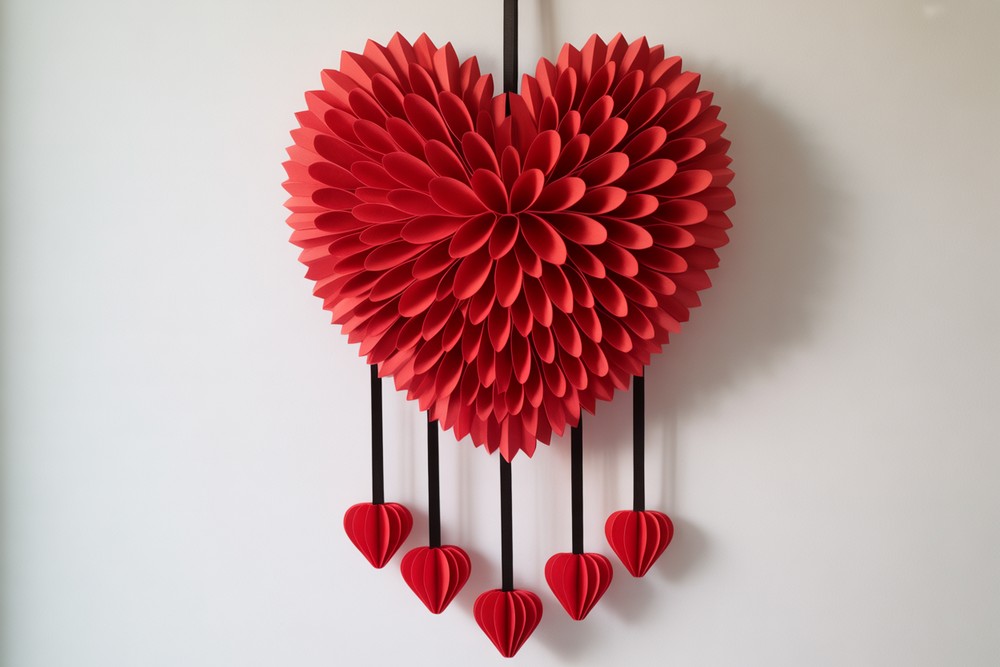
How To Make Paper Heart Wall Hanging
Make a beautiful paper heart wall hanging that looks lush, dimensional, and completely handmade. We’ll build one large heart from layers of cupped paper circles, then attach slim paper “strings” with dangling mini hearts for movement. This project works with any red paper you have and a piece of cardboard for the base. Cut, curl, and glue at a relaxed pace. Display it over a desk, bed, or doorway, or gift it to someone special. It’s beginner-friendly, affordable, and easy to scale: small for cards, large for walls. Expect rhythmic steps—trace, cut circles, shape them gently, and stack them until the form looks plush. No special tools required beyond scissors, glue, and patience. Customize the number of danglers, their lengths, and the red shades to match your space or occasion.
Supplies for This Drawing
- Cardboard sheet for base, about A4–A3 size (8.3×11.7–11.7×16.5 in)
- Red cardstock or craft paper, 160–220 gsm
- Pencil, ruler, round object (coin/bottle cap), optional compass
- Sharp scissors and optional craft knife + cutting mat
- White glue or tacky craft glue
- Bamboo skewer or pencil for rolling tubes
- Black paper/paint or tape to cover tubes
- Double-sided tape or hook for hanging
Prepare the Materials
- Clear a flat workspace and good lighting.
- Tape cardboard edges if frayed.
- Sharpen pencil and test glue on scrap.
- Pre-trace and cut many red circles.
- Prepare a heart template that fits your wall.
- Keep a damp cloth for glue cleanup.
- Lay everything within easy reach.
Special Features of This Drawing
- Overlapped circles create petal-like texture and soft shadows.
- Lightweight construction hangs easily with tape.
- Modular design scales from small to statement size.
- Dangling mini hearts add movement and rhythm.
- Contrasting dark “strings” frame the bright red.
- Simple shapes; no tricky folding required.
Tutor’s Suggestions
- Keep glue thin; heavy blobs flatten the texture.
- Overlap circles consistently to avoid gaps.
- Vary the cupping depth for lively highlights.
- Dry fully before flipping the base.
- Cut more circles than you think you’ll need.
- Test hanging height before final placement.
- If edges look messy, trim a fresh outline.
Uses
- Valentine’s décor or anniversary backdrop
- Bedroom, dorm, or nursery wall accent
- Classroom craft or bulletin board feature
- Photo prop or party centerpiece
- Handmade gift or greeting embellishment
- Window display or shop signage accent
Level of Difficulty
Beginner-friendly — repetitive, simple steps with forgiving materials.
Trace the Heart Base
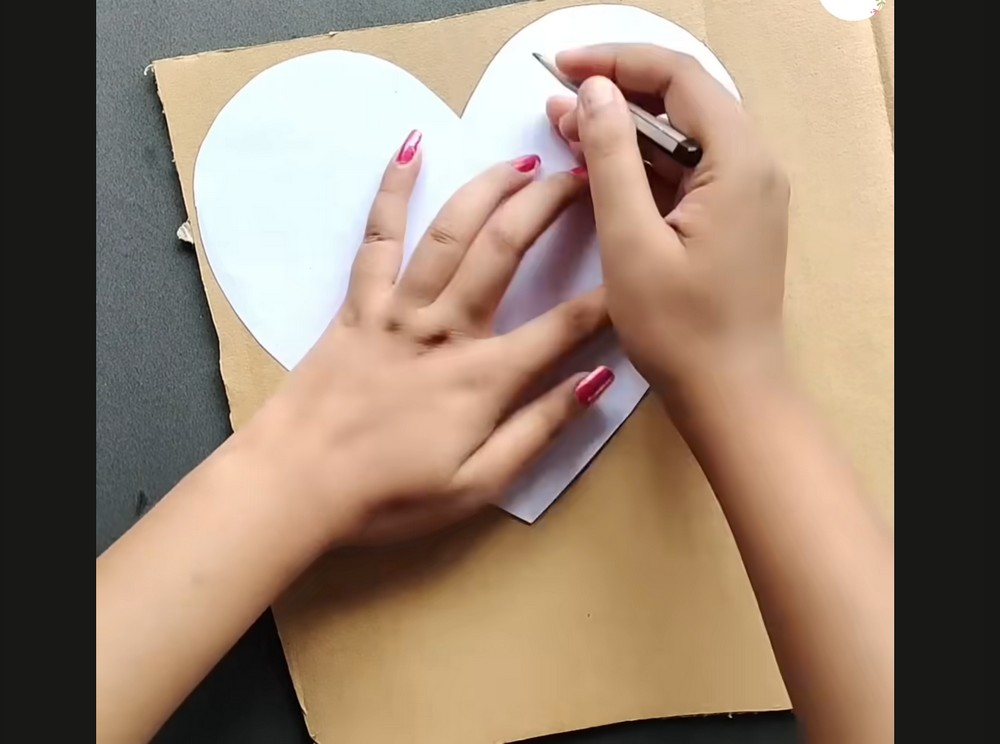
Place a paper heart template on sturdy cardboard. Hold it steady and trace around the edges with a pencil or pen so the line is visible. Keep your fingers away from the point while tracing curves. If you don’t have a template, fold paper in half and cut a symmetrical heart first. This cardboard base will support all the layers and sturdy.
Cut the Cardboard Heart

Cut out the cardboard heart carefully with strong scissors or a craft knife. Work slowly around tight curves to keep the outline smooth. Trim small nicks to clean the shape. Test it flat on the table; it should sit even with no flaps. This base determines the final silhouette, so neat edges make the finished wall piece look professional. Take your time.
Punch Lots of Circles
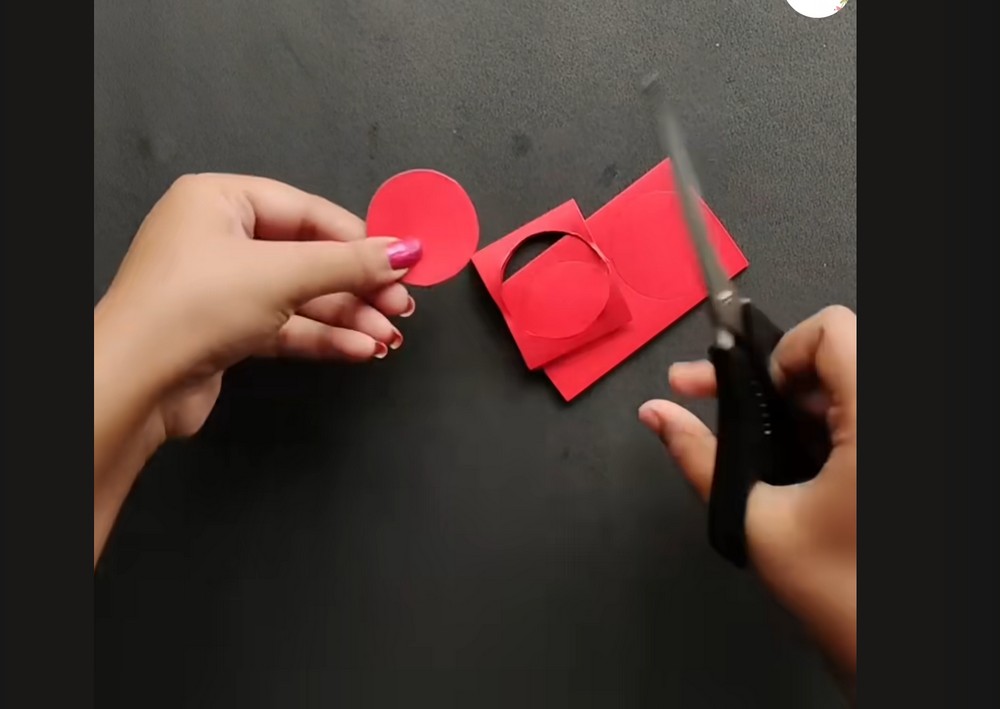
On red cardstock, trace several circles using a bottle cap or coin as a guide, then cut them out. Aim for lots—dozens. These circles become the heart’s “petals.” Keep sizes consistent for a uniform look. If using thin paper, double up sheets to speed cutting. A tidy stack of circles will save time during gluing. Cut extras now to avoid stopping later.
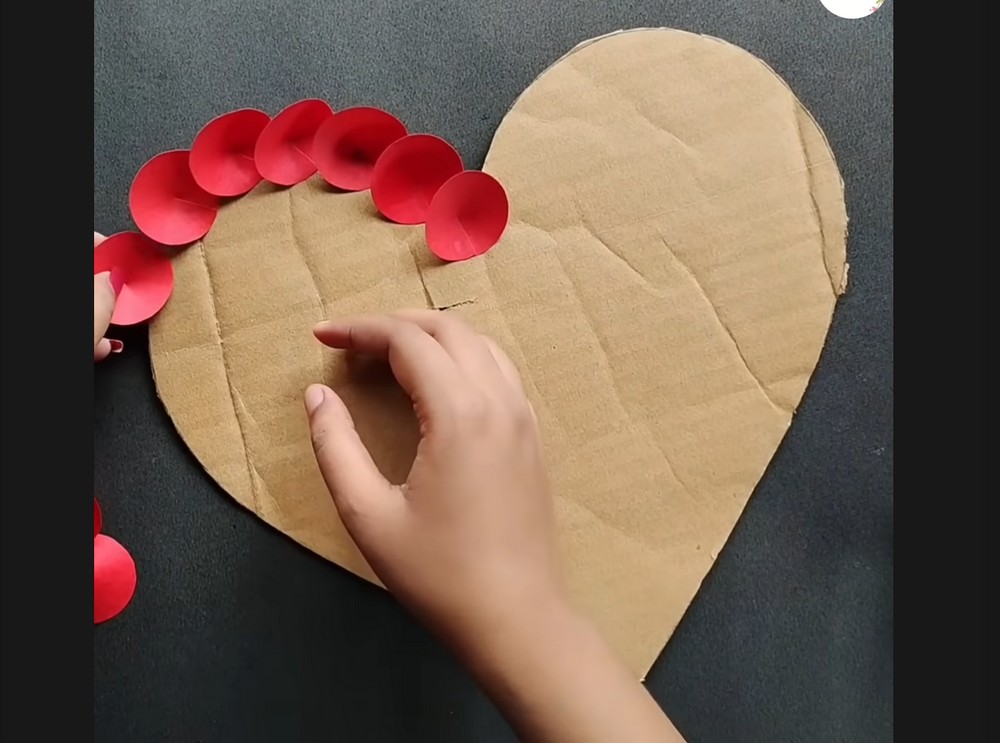
Cup and Start the Border
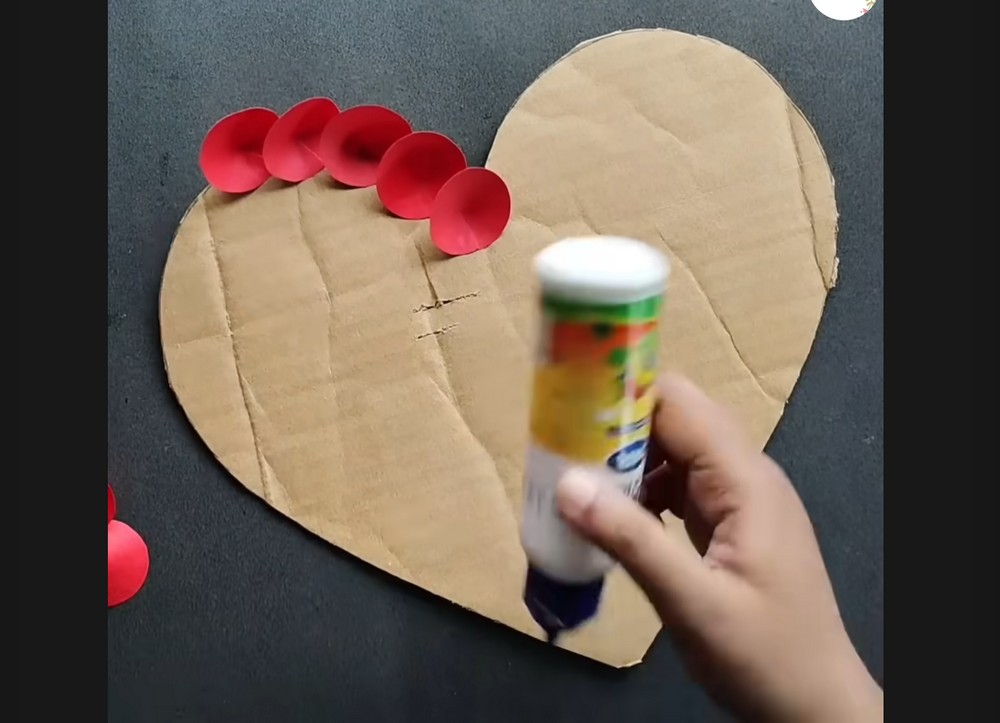
Lightly curve each circle by pressing its center with a fingertip or rounded tool so the edges lift. Start gluing the cupped circles along the cardboard’s outer edge, overlapping them slightly like roof shingles. Use a thin glue line so pieces stick cleanly. Keep the first row following the heart outline; this creates a crisp, scalloped border. Work neatly for layered edges.
Build the Second Row
Continue adding overlapped circles in a second row just inside the first, staggering the seams. Work slowly around the shape so spacing stays even. Adjust cupping as you go; deeper curves create more dimension. Press each piece briefly so the glue grabs. This layered approach quickly builds volume and texture without complicated folding techniques. Keep rows parallel, patient, and gently pressed evenly.
Fill the Center Plush
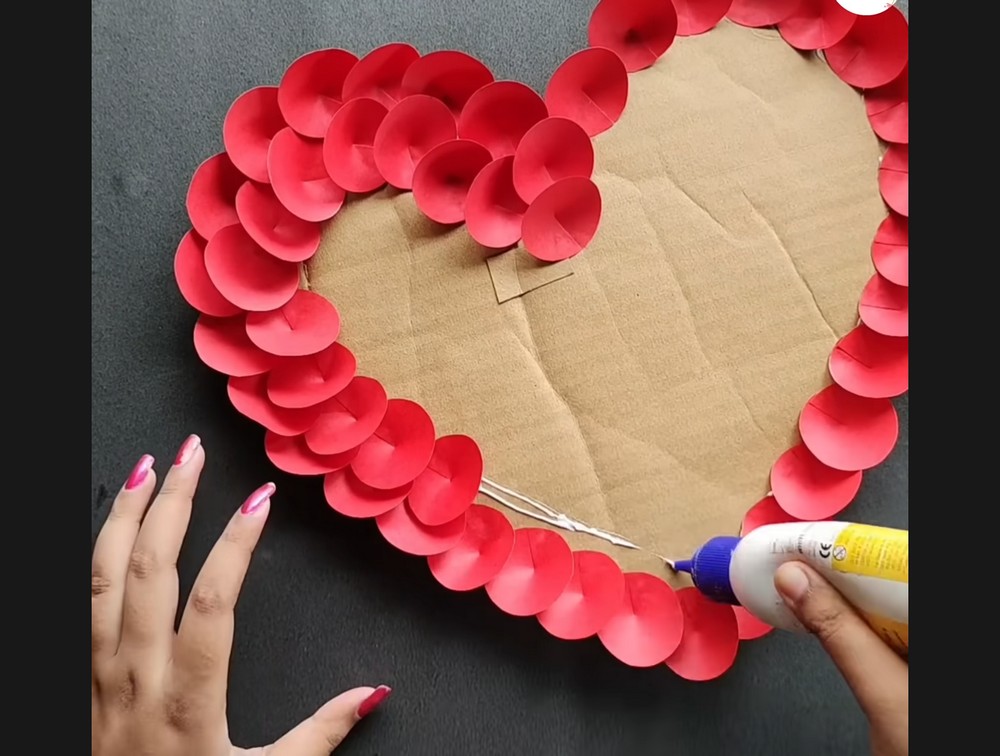
Build more rows toward the center, keeping overlaps tight. Vary the cupping slightly to avoid flat patches and hide cardboard underneath. If gaps appear, tuck a smaller circle to fill them. Step back every few minutes to check balance and symmetry. When the surface looks plush and full, let the heart dry completely before flipping. Let glue set before turning the heart.
Roll Slim Paper Tubes
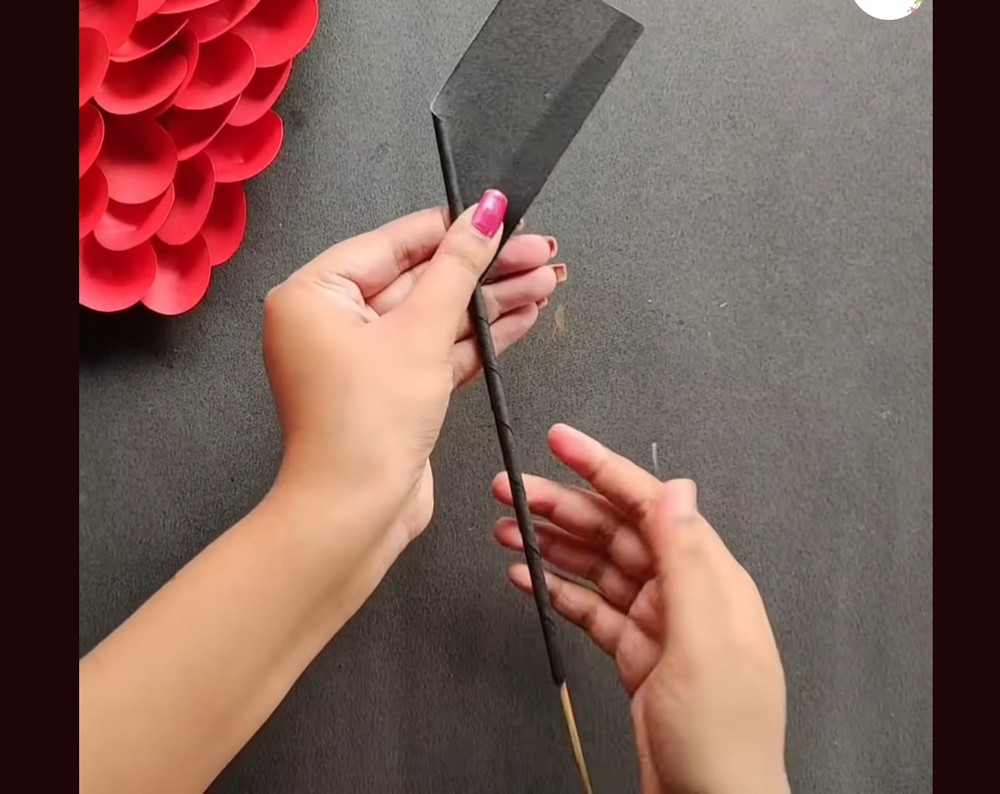
Roll thin paper tubes by winding scrap paper around a skewer or pencil, then secure the edges with glue. Paint or wrap them black for contrast if desired. Flatten one end slightly to glue easier. These tubes act like elegant strings beneath the heart, giving the hanging movement and a graceful, modern look. Make four to six tubes for visual variety nicely.
Attach Tubes to Back
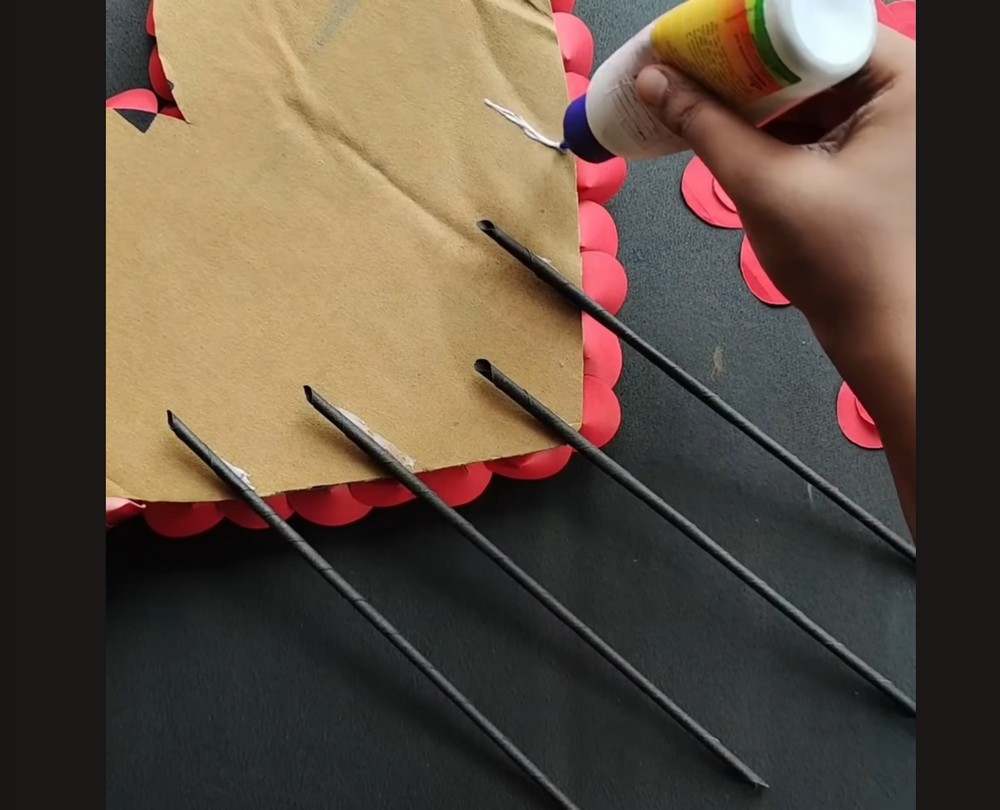
Glue several paper tubes to the back lower edge of the big heart, spacing them evenly. Run thin beads of glue and press each tube into place. Let them extend downward at different lengths for a lively arrangement. Reinforce with small tape pieces while drying if needed. The tubes must cure to hold the mini hearts. Straight lines keep the design graceful.
Add Layered Mini Hearts
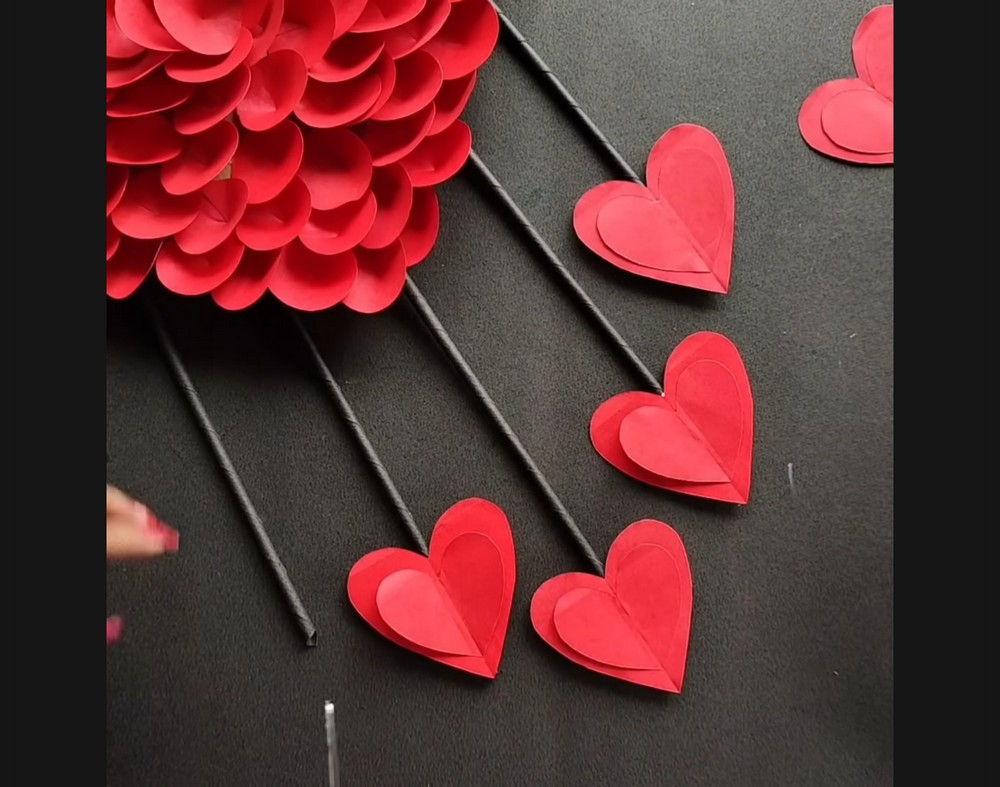
Cut pairs of small hearts from red paper. Layer a slightly smaller heart on top of each larger one to add depth. Lightly curl the top layer’s edges. Glue a mini heart to the end of each tube, pressing firmly at the points. Mix sizes and angles so the danglers feel playful and balanced together. Keep points aligned so hearts read clearly.
Hang and Fluff
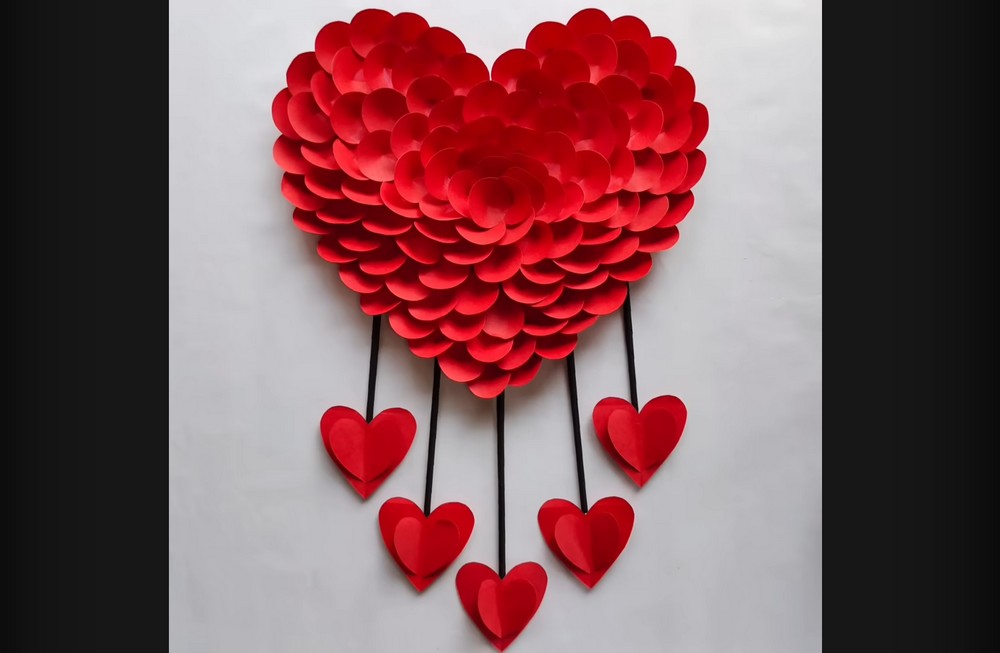
Hang the finished piece against a clean wall using double-sided tape, poster strips, or a small hook. Fluff any flattened circles with your fingertip so the top heart looks lush. Adjust the dangling hearts until they sit at pleasing levels. Step back, check symmetry, and enjoy your handmade, dimensional wall decor that catches light beautifully. Tidy any glue shine with a cloth.
Conclusion
Handmade doesn’t have to be hard. This cheerful wall hanging uses simple shapes, steady overlapping, and patient drying to create big impact on a tiny budget. Change paper sizes, shades, and lengths to fit birthdays, anniversaries, or classrooms. When the light hits those cupped circles, the heart glows. Hang it proudly and let it brighten the room year-round at home.
A Bonus Tip
Lightly curl the top edge of a few outer circles after hanging; selective curls add sparkle and depth without more layers.
FAQs
Q: How long will this take?
A: About 60–90 minutes, depending on how many circles you cut and how quickly your glue dries.
Q: What size paper works best?
A: A4 or A3 (8.3×11.7 or 11.7×16.5 in) red cardstock, 160–220 gsm, holds shape yet curls nicely.
Q: My edges look uneven—fixes?
A: Trim the cardboard silhouette after the first row, then continue layering to hide rough spots.
Q: Do I need a compass for circles?
A: No—trace a bottle cap, coin, or small cup. Consistent size is more important than perfect math.
Q: Should I use markers or paint?
A: Not required. If desired, lightly shade circle edges with a colored pencil for subtle depth; avoid wet paint that could warp paper.
Q: How do I keep tubes attached securely?
A: Roughen the cardboard with a scratch, use a thin glue bead, press firmly, and let it cure before hanging.


