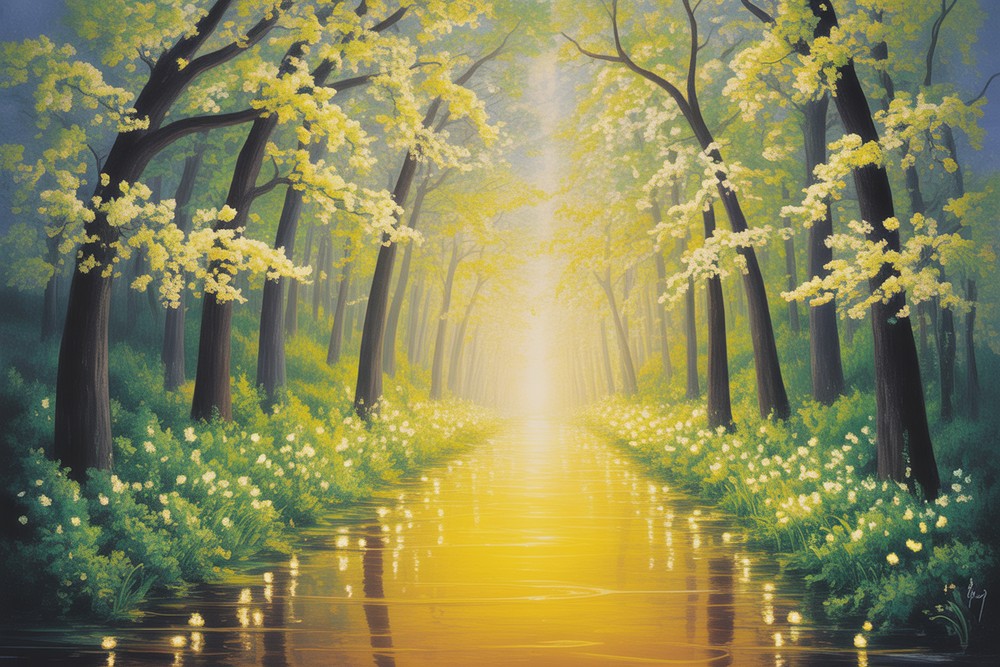
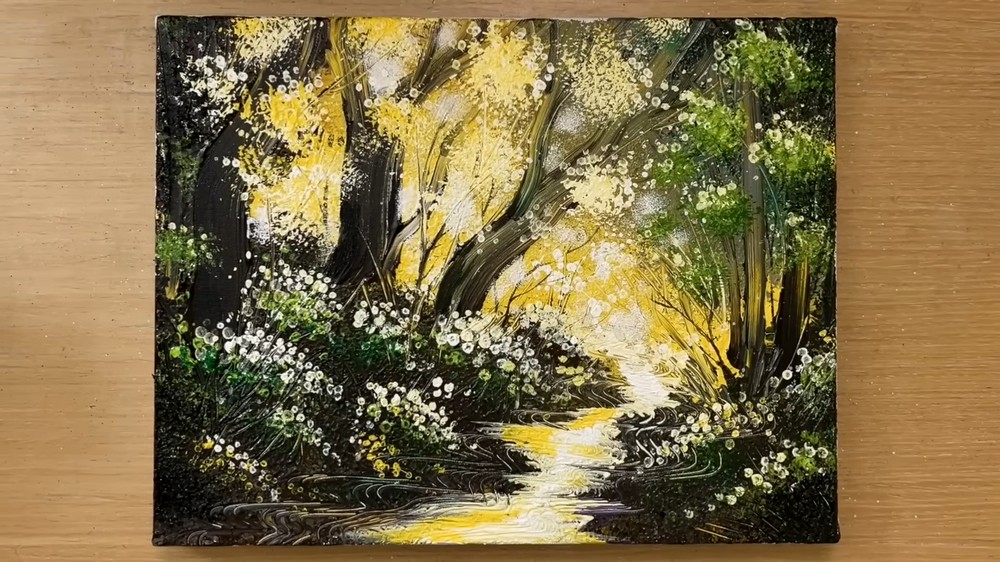
Painting a Yellow Forest Road
Want a fast, textured landscape that glows? This step-by-step “Yellow Forest Road” uses heavy acrylic, a palette knife, and a few surprising household tools to build trees, flowers, and a winding path. Instead of careful outlines, we’ll push and pull thick paint to let strokes create the scene. It’s great for beginners who enjoy bold color and for anyone who wants a relaxing, low-pressure session. You’ll learn how to lay a luminous center, mass in dark shapes, texture the forest floor, then carve grasses and path lines for movement.
Dabbing with cotton swabs and a scrubber makes fluffy foliage in minutes. Work wet-into-wet so colors mingle and edges stay soft. The palette centers on warm yellows with deep browns, greens, and clean white accents. Follow the images in order; each one keeps the shapes simple and the gestures big. By the end, you’ll have a glowing woodland and a cheerful path that invites the eye forward. You don’t need drawing skills—just patience, thick paint, and a willingness to let tools do the texturing for you.
Supplies for This Drawing
- Stretched canvas, A4 (8.3×11.7 in) or similar, 280–380 gsm
- Acrylic paints: primary yellow, yellow ochre, titanium white, sap green, black, burnt umber, grey (optional purple accent)
- Palette knife or wide painting scraper
- Flat brush, small
- Cotton swabs (bundle several with a rubber band)
- Dish sponge or scrubber pad
- Fork or paint comb
- Texture paste or coarse pumice gel (optional but recommended)
- Water container, paper towels, masking tape, apron
Prepare the Materials
- Tape the canvas edges and set up good lighting.
- Arrange paints on a palette from light to dark.
- Pre-wet sponges and wring out.
- Sharpen edges of the palette knife with a wipe.
- Keep cotton swabs bundled and singles nearby.
- Place reference images within view.
- Test strokes on scrap paper.
Special Features of This Drawing
- Luminous off-center glow guiding composition
- Knife-pulled trunks with expressive direction
- Carved path ripples for motion
- Stippled foliage made with household tools
- High-contrast ground using coarse texture
- Broken color that keeps edges lively
- Simple palette with strong value design
Tutor’s Suggestions
- Work wet-into-wet so strokes fuse softly.
- Use firm pressure for trunks; feather pressure for foliage.
- Keep the lightest values clean—wipe the knife before reloading.
- Build darks in layers rather than flooding them at once.
- Vary dot size when tapping flowers to avoid patterns.
- Step back often to judge balance.
- If mud appears, scrape, wipe, and repaint.
Uses
- Relaxing weekend painting session
- Classroom demo on texture and value
- Giftable wall art for a cozy nook
- Social post or process reel
- Color-study practice for landscape glow
- Portfolio experiment in alternative mark-making
Level of Difficulty
Beginner-friendly — big shapes, forgiving textures, and simple tools.
Place Color Dots and Start the Glow
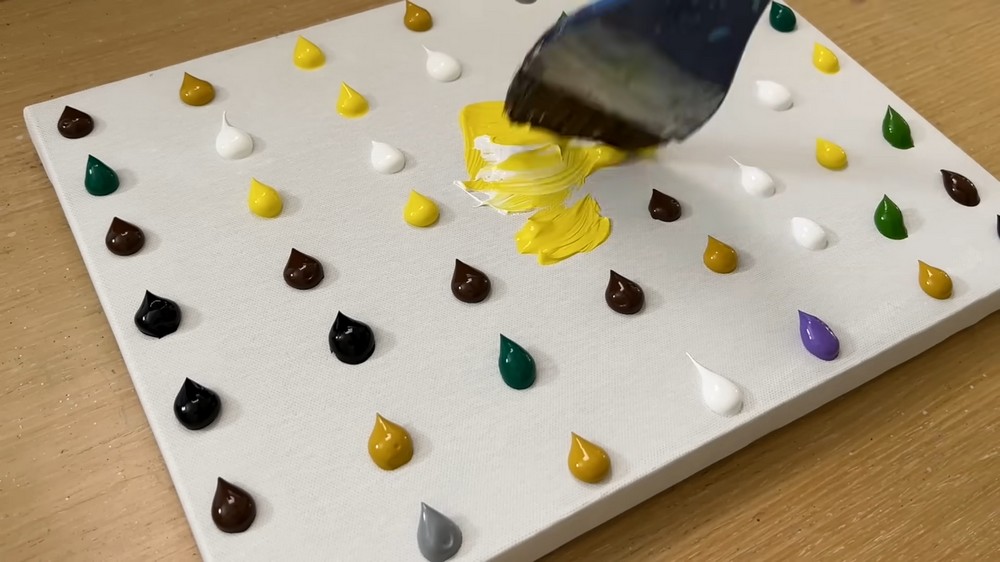
Prime an A4 canvas with gesso if needed, then place generous acrylic drops in a grid: yellows near the middle, white around them, dark browns and blacks on the edges, with a few greens and greys. Using a palette knife or wide scraper, press and pull the central yellows and whites in short, circular sweeps. Keep the brightest area slightly off-center to suggest sunlight. Don’t smear the dark dots yet; we’re reserving them for trees and ground shadows and depth.
Block in the Big Masses
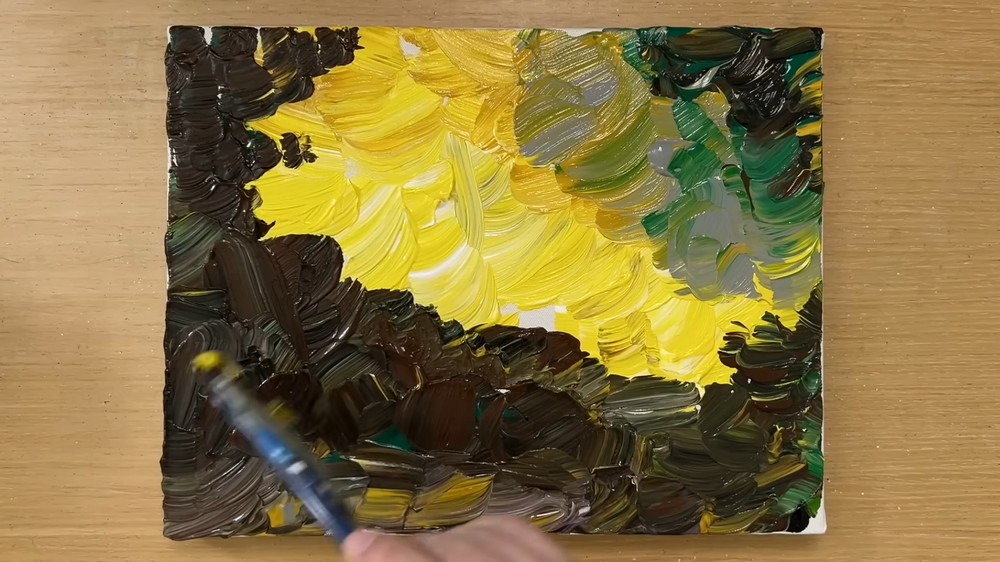
With the knife, scoop from the darker dots and lay chunky strokes around the glowing center to establish the forest’s silhouette. Use curving swipes to suggest overlapping mounds and canopy clusters, letting a little yellow peek through. Add touches of green near the right side for color variety. Keep paint thick; texture is your friend here. Leave a lighter channel winding from bottom to center—this will become the road or stream. Don’t overblend; broken color keeps everything lively and fresh.
Texture the Ground
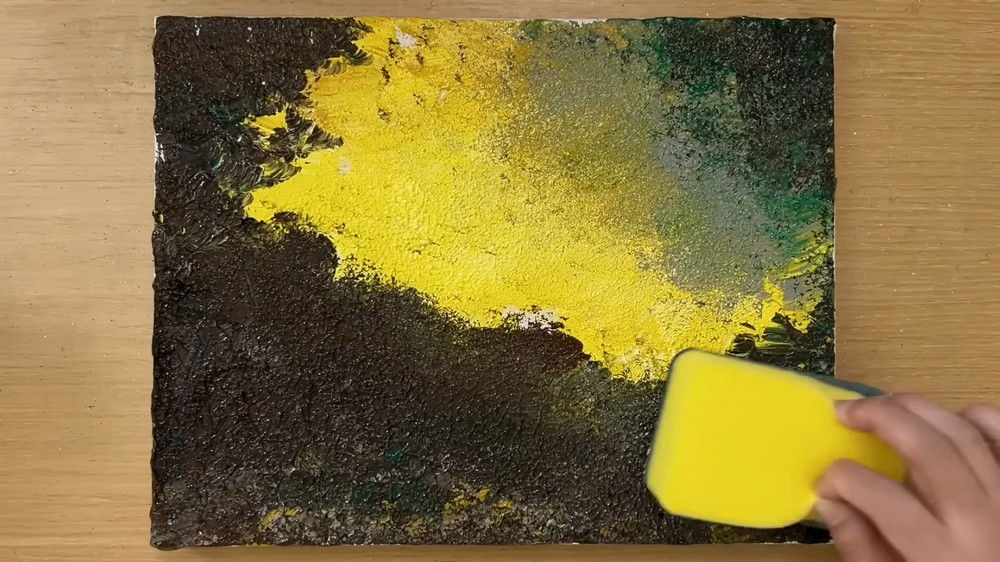
Spread coarse texture paste or pumice gel across the dark lower areas with a sponge or small scraper, pressing to create gritty peaks. While still wet, drag a dry brush lightly to flatten only the tops, so paint later catches the texture. Feather yellow outward from the glow using a soft tap to transition into the rough ground. Aim for a contrast: buttery light above, earthy grit below. Let a few specks invade the highlights for sparkle and natural randomness.
Pull Trunks and Carve Movement
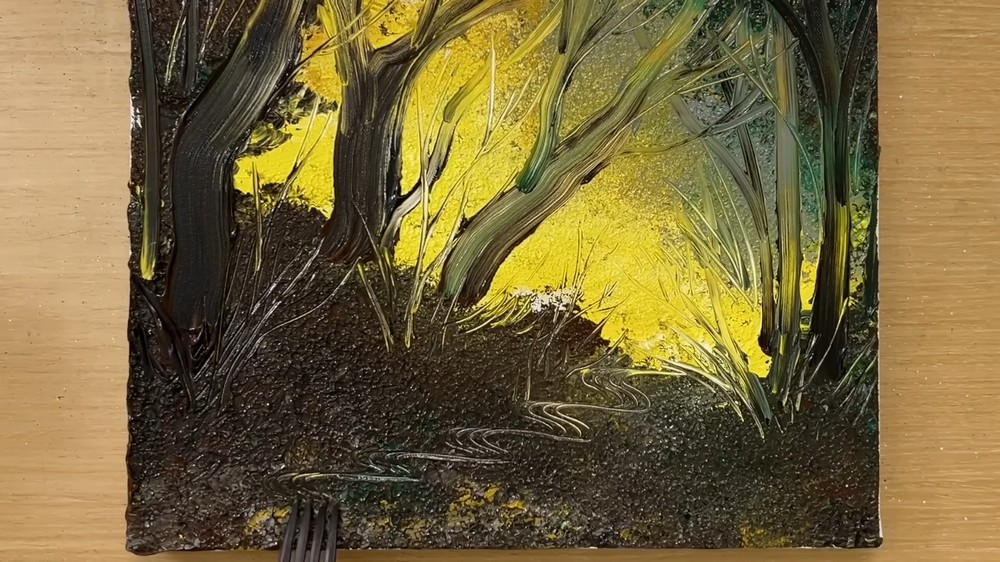
Load the knife’s edge with a mix of black and burnt umber. Starting near the bottom, pull upward in one confident motion to form tree trunks that lean slightly toward the light. Vary widths and angles for rhythm. Use the knife tip to flick slender grasses radiating from the foreground clumps. With a fork or comb, carve wavy, parallel lines through the wet ground to map the winding road or stream. The grooves reveal lighter layers and add flowing energy.
Dot Base Flowers and Leaves
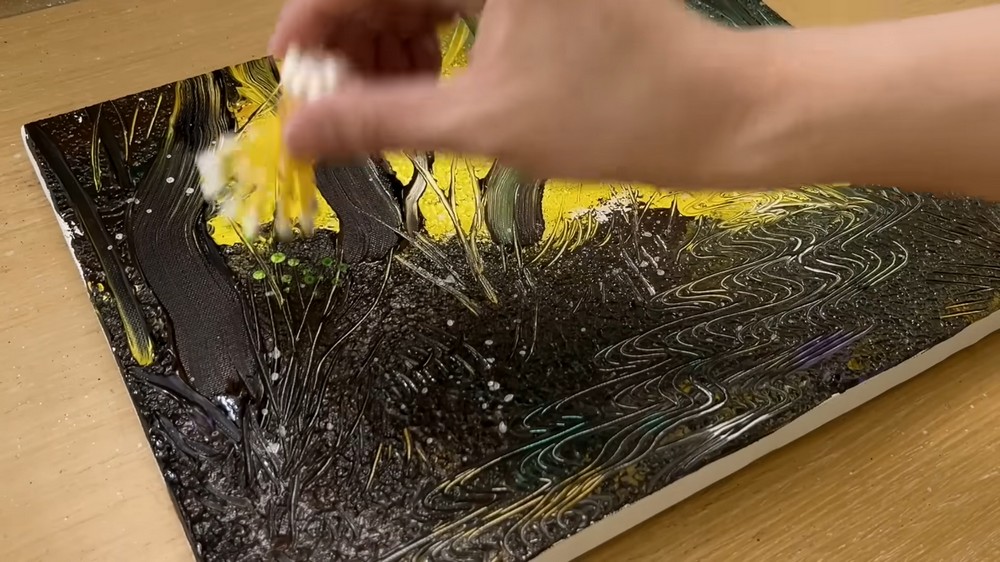
Bundle a few cotton swabs with a rubber band. Dip in thin light green and tap clustered dots along the ground’s edges to mark shrubs. Switch to white and place small blooms around the path, keeping them denser near the foreground. Random spacing looks most natural—avoid perfect rows. Add a few single dots within the glow to suggest floating pollen. The goal is establishing spots of interest, not finishing details. Leave negative space so darker strokes still breathe and contrast.
Stipple Lush Foliage
Take a clean scrubber pad or dish sponge. Load with yellow, then tap repeatedly around the upper branches to build soft, cloudlike foliage. Add intermittent touches of mid and dark green to vary depth, keeping the yellows strongest near the light source. Let some background show through for air. If edges get too hard, tap lightly with an almost dry pad. Keep trunks visible by avoiding solid blocks. This fast stippling quickly suggests thousands of leaves without painting each one.
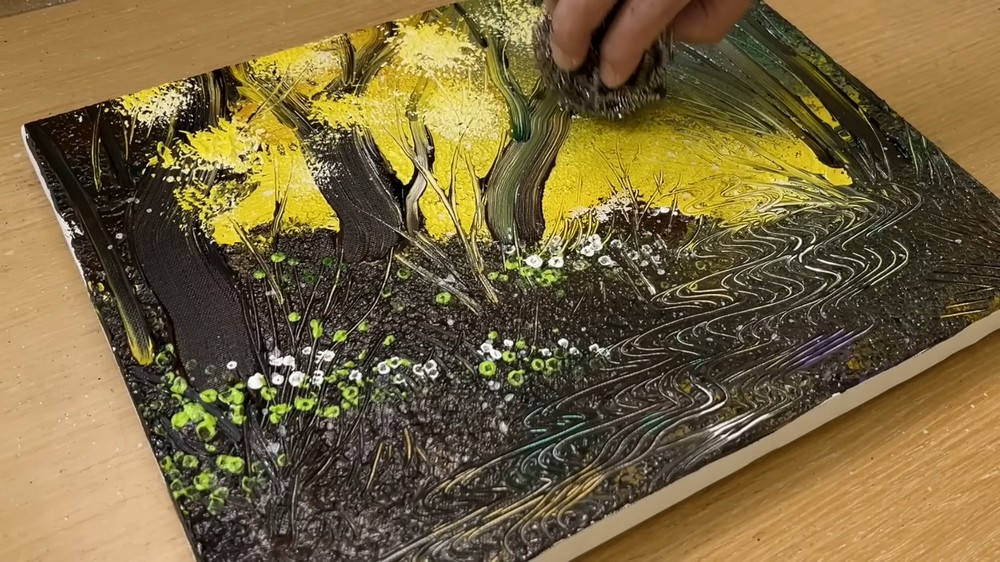
Enrich Bushes and Foreground
Return to the cotton swabs for layered clusters. Tap pale yellow-green over earlier dots, then a few deep green centers for dimension. Add scattered white blossoms near the path’s edges to lead the eye inward. With the knife edge, drag a few sharper grasses across dark ground so they catch the light. Reinforce shadows under bushes using a small amount of umber. These pushes and pulls create depth and anchor plants to the soil while keeping the textures lively everywhere.
Brighten the Winding Road

Mix white with a touch of yellow. Using the knife or a small flat brush, lay broken strokes along the carved groove, thicker toward the foreground and tapering as the path recedes. Allow bits of dark ground to peek between strokes so the surface feels rippled and wet. Add highlight touches on nearby grasses and the trunk edges facing the light. If needed, gently soften transitions with a barely damp sponge. Keep the brightest passage aimed toward the glowing center.
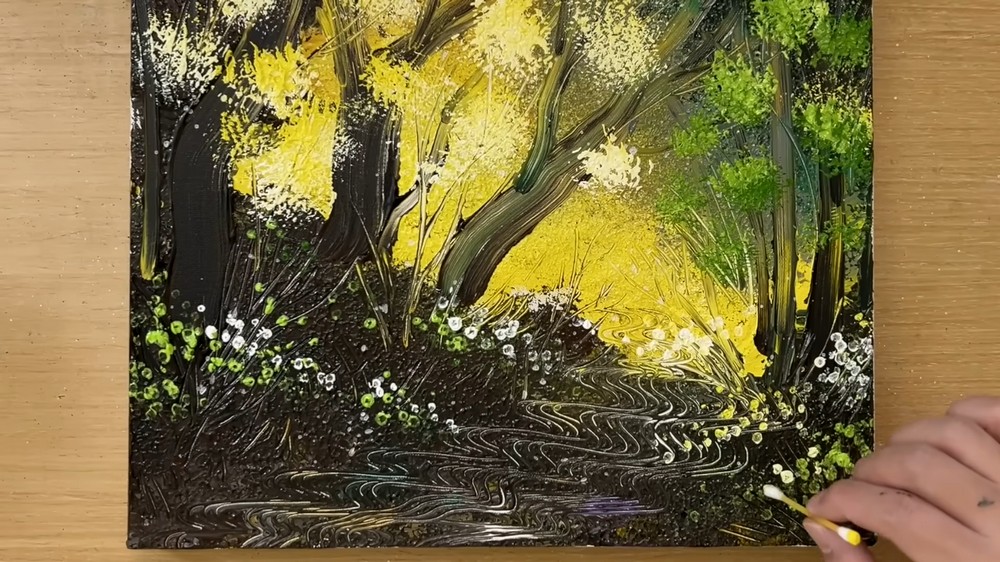
Final Accents and Balance
Step back and scan for balance. Pop a few extra white blossoms where clusters look thin, and counter them with darker marks where areas feel too bright. Strengthen the main trunks’ bases so they sit firmly on the ground. Add a whisper of reflected yellow on trunk edges nearest the road. Use the fork lightly once more to refresh path ripples. Stop before details become fussy; the bold textures should lead. Sign in a dark corner and let it dry.
Conclusion
Thick paint, simple tools, and strokes make this yellow forest road come alive without fussy drawing. Use your knife for bold shapes, your sponge for atmosphere, and your swabs for flowers that sparkle. Keep the center glowing and the path broken so light feels active. If something muddies, scrape and rebuild; acrylic is forgiving. Repeat the process with different color schemes once you’re comfortable. Each pass gets faster, and textures will grow richer and confident.
A Bonus Tip
Angle the path so it narrows toward the glow; the visual taper creates depth even before highlights are added.
FAQs
Q: How long will this take?
A: Most people finish in 45–90 minutes, depending on drying and detail time.
Q: What paper or canvas works best?
A: Use a primed canvas or canvas panel, 280–380 gsm. Heavier surfaces handle thick texture well.
Q: My proportions feel off. Fixes?
A: Keep the glow off-center and the path narrower as it recedes. Trim or expand shapes with the knife.
Q: In what order should I shade?
A: Establish the bright center first, then place darkest masses, midtones, and finally crisp highlights.
Q: Markers or pencils instead of paint?
A: You can sketch first, but the look relies on thick acrylic texture and knife marks.


