
Romantic Rainy Night Acrylic Painting
Paint a cozy stroll under a glowing umbrella on a rainy night. This acrylic project builds from a deep blue gradient to fiery trees, shimmering reflections, and soft bokeh lights. You’ll block shapes, glaze warmth, pull quick knife-like highlights, and define two figures with simple shadow-and-light. The steps match your images, so follow in order and pause between layers. Keep early strokes broad and feathered; tighten edges as the focal couple appears. You’ll learn wet reflections, falling leaves, misty light, and final rain streaks. A limited palette keeps mixes clean and luminous. Beginners can follow slowly; intermediates can push detail. Ready to brighten a quiet evening with color and romance? Gather canvas, brushes, water, paper towels, and your favorite yellows, blues, and earths. Breathe, relax, and enjoy the process today.
Supplies for This Drawing
- Acrylic paints: titanium white, lemon yellow, yellow ochre, cadmium orange, alizarin crimson, ultramarine blue, cobalt blue, phthalo blue, Payne’s gray, burnt sienna, ivory black (optional)
- Canvas/panel: A4 (8.3×11.7 in) or 9×12 in, pre-primed
- Mediums: glazing medium, clean water, paper towels
- Brushes: 1″ flat, ½″ flat, filbert, small rounds, liner
- Palette, palette knife, masking tape
- Chalk or pencil for light sketch marks
Prepare the Materials
- Tape edges and set bright, even lighting.
- Arrange paints from light to dark on the palette.
- Keep one clean damp brush only for blending.
- Pre-mix three blues, two warms, and a dark neutral.
- Place references beside the easel; protect table.
- Test rain lines, bokeh dots, and reflection pulls on scrap.
Special Features of This Drawing
- Cinematic warm-cool contrast with a central glow.
- Bokeh lights for atmosphere and depth.
- Wet ground reflections made with vertical-then-horizontal pulls.
- Leaves drifting through light to animate space.
- Backlit figures unified by umbrella color.
- Soft glazing layers that keep saturation high.
- Selective edge control for believable night mood.
Tutor’s Suggestions
- Blend early, then stop to avoid chalky mud.
- Design reflections as shapes, not random streaks.
- Keep features minimal; silhouettes tell the story.
- Vary leaf sizes and opacity for motion.
- Reserve pure white for the brightest sparkle.
- Squint often to judge value hierarchy.
- Let layers tack before glazing new color.
Uses
- Date-night paint-along or workshop piece.
- Wall art for bedrooms, cafés, or hallways.
- Greeting card prints or posters.
- Study in night lighting and reflections.
- Gift for anniversaries or weddings.
- Practice for figures without complex anatomy.
Level of Difficulty
Intermediate — relies on value contrasts, glazing control, and wet reflections.
Night Gradient Base

Cover the canvas with a smooth vertical gradient: deepest navy at the top, easing into rich ultramarine, then brighter cobalt near the horizon, finally a darker band for the wet ground. Blend quickly with a wide flat, working side-to-side. Keep the lightest blue slightly left of center to save room for glow and reflections. Let this foundation dry before adding textured shapes.
Block Trees and Foreground
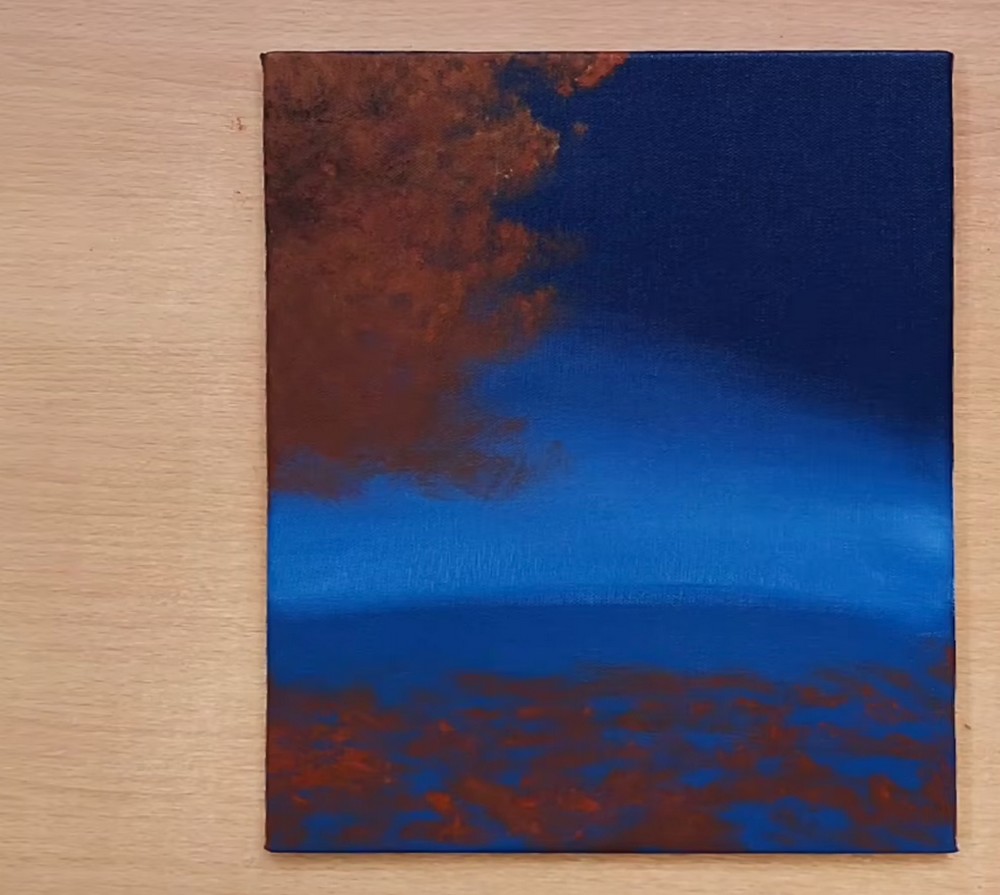
Using burnt sienna plus a touch of ultramarine, scrub in a big leafy mass from the upper left, tapering toward center. Keep the bottom edge ragged. With the same earthy mix, tap broken shapes across the lower third to suggest wet leaves and puddle edges. Leave a dark horizon line. Preserve the bright mid-blue pathway; it’s where your reflected light will sparkle.
Glow and Water Reflections

Mix yellow ochre with a little white and orange. Stipple a warm glow under the foliage, letting edges dissolve into blue. With a soft flat, pull vertical strokes of creamy light down the center waterway, wiping and repeating to build a shimmering column. Add scattered dabs of lights onto the foreground patches. Sprinkle a few floating embers in the dark sky above.
Place Couple Silhouettes and Umbrella Base

Block the couple as simple shapes using a dark reddish brown: two connected torsos, tapered legs, and soft head ovals. Add the umbrella canopy as a clean lemon-yellow wedge, slightly forward of the faces. Indicate a few pale bokeh clouds with bluish white puffs near the horizon. Keep edges soft for now. Reinforce warm sky glow around them to backlight the figures.
Define Clothing, Faces, and Umbrella Ribs

Switch to smaller rounds. Paint the man’s jacket deep blue-black with soft highlights on shoulders. Give the woman a warm orange-rust coat, darker tights, and long hair. Shape noses and jaws with value shifts, keeping features minimal. Draw umbrella ribs and handle in thin dark lines. Add misty puffs behind them to separate silhouettes from background glow and to suggest drifting rain.
Add Distant Figures and Depth

Suggest background pedestrians as soft vertical silhouettes in cool blues and violets. Keep them smaller and partly lost into mist to push distance. Strengthen the tree’s lit edge with warm oranges, letting leaves float across the night. Deepen the far waterline and hint at a low shore behind the couple. Maintain the light path down the center; it leads the viewer forward.
Spark Umbrella and Falling Leaves
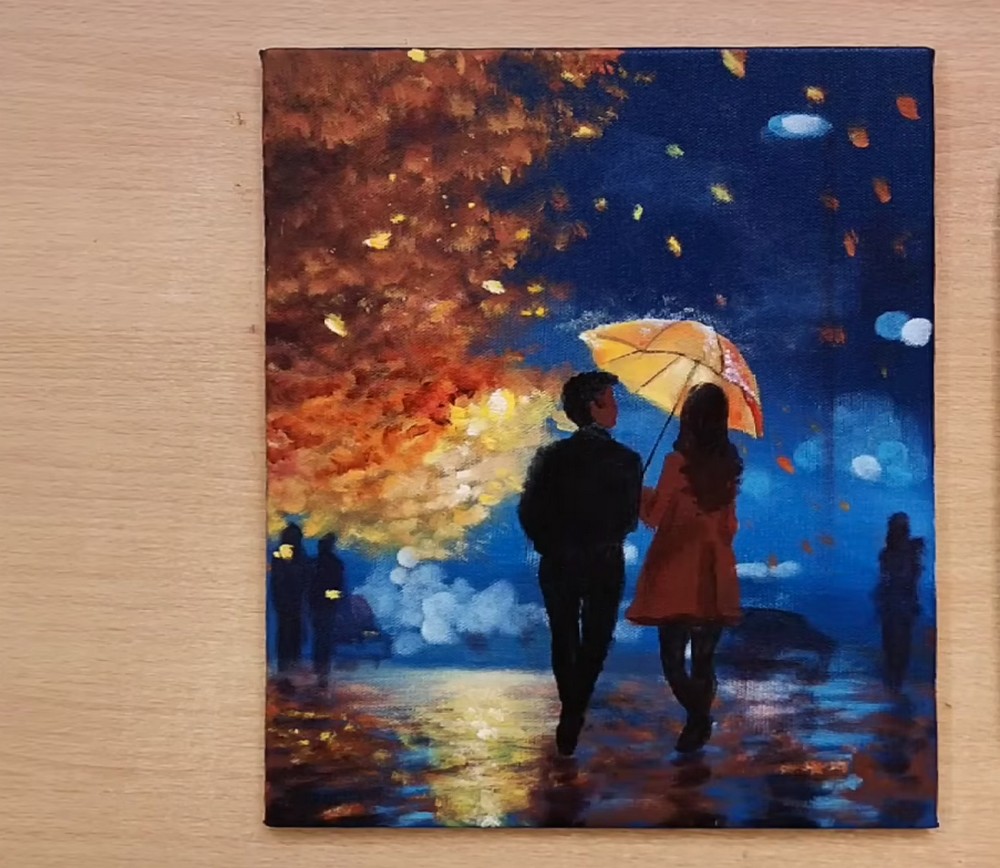
Glaze a soft orange over the umbrella’s underside, then pop white highlights along the rim to suggest raindrops. Add dark ribs where needed. With a small round, flick warm yellow-orange leaves across the scene, clustering near the glowing tree and scattering a few over the blue night. Keep sizes varied and edges crisp against soft backgrounds. Refresh water highlights beneath the couple.
City Elements and Wet Reflections
Introduce city hints: a distant car with luminous headlights, a tall lamppost, and blurred signage. Keep shapes minimal, edges soft. Pull vertical strokes from each light source, then drag sideways gently to mirror ripples. Drop deeper maroons and blues into the foreground puddles, leaving sparks of yellow on top. Soften transitions with glazing medium, preserving the central light path’s bright rhythm beautifully.
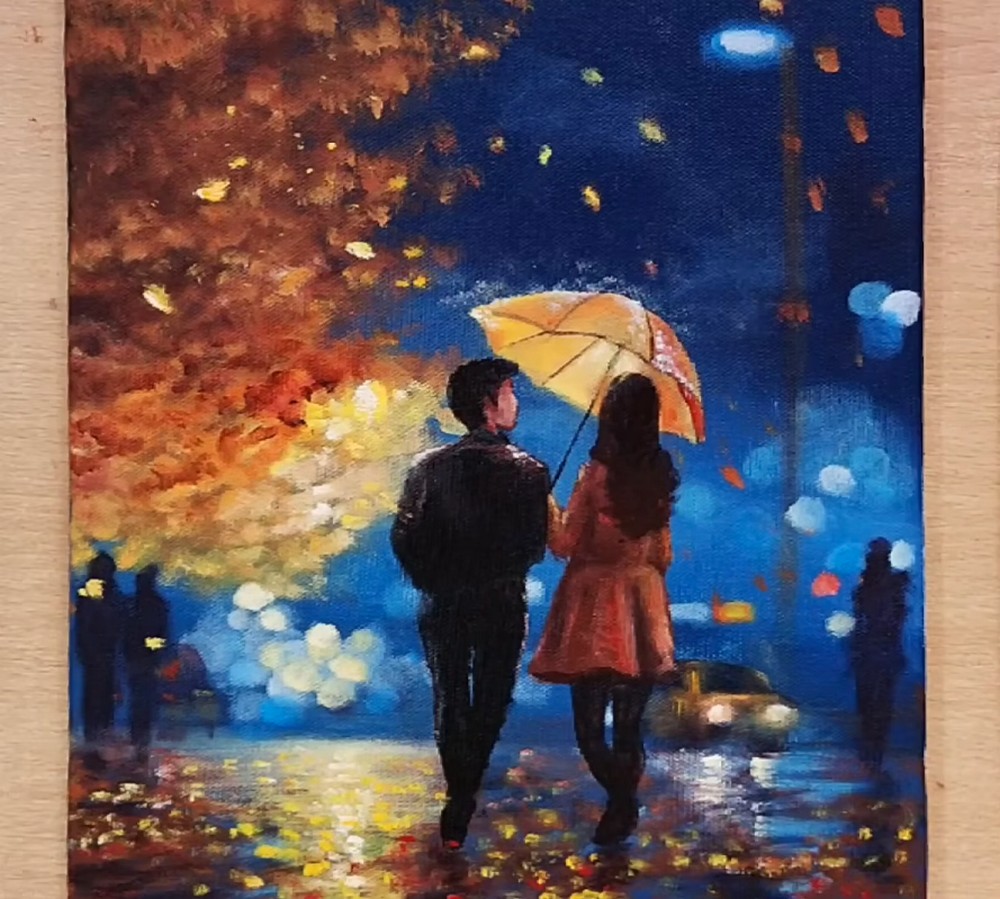
Final Rain, Edges, and Sparkle

With a liner, pull quick diagonal rain streaks, varying length and pressure. Add a few brighter drops catching lamplight. Sharpen selected edges on the couple and umbrella, leaving others lost for atmosphere. Punch tiny white and lemon dots in the brightest bokeh. Glaze thin cobalt into deep sky corners for contrast. Step back, balance warms and cools, sign lightly, and let dry.
Conclusion
Well done. You shaped a glowing night with confident contrasts, then led the eye using reflections, bokeh, and falling leaves. The gentle couple grounds the scene while the umbrella gathers light. Revisit this study with different coat colors, umbrellas, or weather, and keep practicing quick rain lines and wet reflections. Hang it somewhere cozy and enjoy the mood today. Congratulations.
A Bonus Tip
Angle rain consistently with the light wind direction; misaligned streaks instantly flatten depth.
FAQs
Q: How long does this take?
A: Around 2–3 hours including drying pauses and glazing passes.
Q: Can beginners handle the figures?
A: Yes—treat them as simplified silhouettes with small value touches for heads and coats.
Q: My reflections look messy. What fixes it?
A: Pull vertical first from each light, then gently sweep sideways. Keep a clean brush for blending.
Q: Which colors make that warm glow?
A: Start with yellow ochre plus white; nudge warmer with cadmium orange, cooler with a hint of crimson.
Q: Do I varnish this?
A: After curing 24–72 hours, apply a thin satin or gloss varnish in one direction for protection and depth.
Q: How do I avoid muddy mixes?
A: Limit the palette, glaze transparently, and stop over-blending. Let layers dry before adding darker accents.


