How to Draw a Butterfly
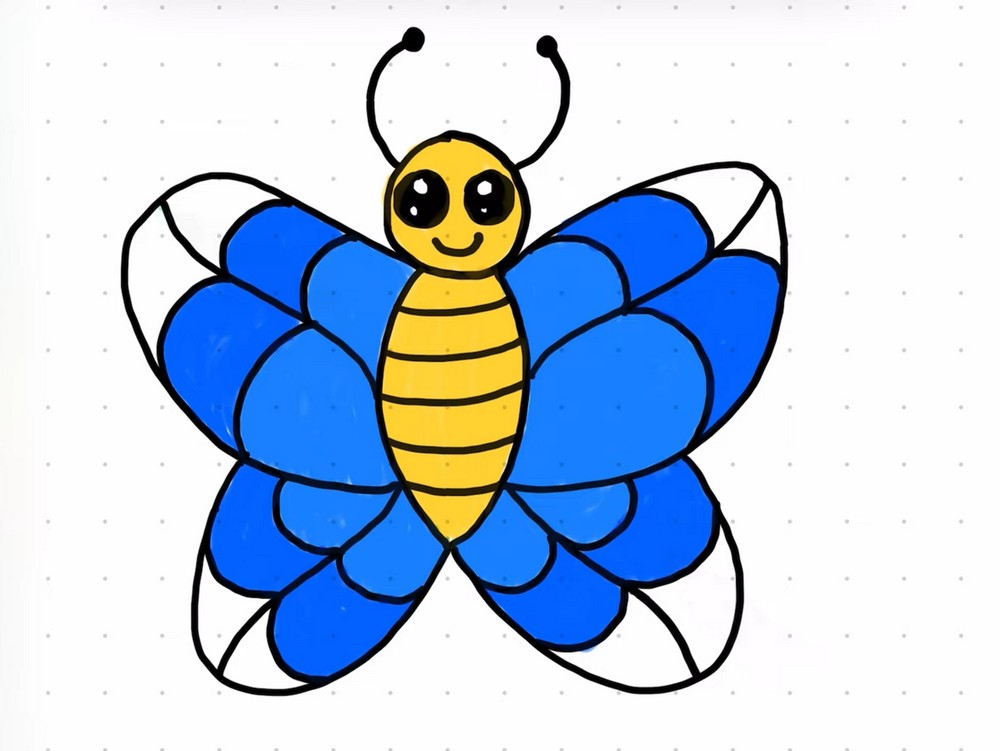
Butterflies are a joy to draw because their shapes are simple and their colors pop. Here, you’ll build a cute butterfly from easy circles and smooth ovals, then add layered wing patterns. Each image shows a clear stage, so you can follow at your own pace. Start with a light sketch, check proportions, and then trace confidently with a fine liner. We’ll add sparkling cartoon eyes, curved antennae, and a striped body, before decorating the wings with soft panels. Finally, we’ll color the body warm yellow and the wings in cool blues with green tips. Use any tools you have—pencils, markers, or crayons all work. This guide keeps lines simple, friendly, and forgiving, perfect for kids or beginners. Expect clean steps, quick wins, and plenty of room for creative choices. Today.
Supplies for This Drawing
- HB and 2B pencils
- Fineliner or brush pen (0.5–1.0 mm)
- Kneaded eraser + plastic eraser
- A4 (8.3×11.7 in) smooth drawing paper, 120–160 gsm
- Ruler (for centering)
- Sharpener
- Alcohol markers or colored pencils: yellow, light blue, medium blue, light green
- Optional: white gel pen for highlights
Prepare the Materials
- Clear your workspace and set bright, even light.
- Tape paper edges to the desk or board.
- Sharpen pencils; test pressure on scrap.
- Place references within easy view.
- Keep tissues or scrap paper for blotting markers.
- Warm up with a few smooth circles and arcs.
Special Features of This Drawing
- Big, sparkly cartoon eyes add instant charm.
- Symmetrical four-wing layout built from simple ovals.
- Layered wing panels invite playful color schemes.
- Soft, thick outlines unify the design for kids.
- Curved body stripes suggest gentle volume.
- White wing tips create contrast and pop.
Tutor’s Suggestions
- Sketch lightly first; commit with ink after checking symmetry.
- Vary line thickness—thicker outside, thinner inside details.
- Build color in passes to avoid streaks.
- Keep hand moving in long, confident arcs.
- Clean edges with a plastic eraser after inking dries.
- Compare left and right wings using the head as your centerline.
- Take quick breaks; fresh eyes spot tilts fast.
Uses
- Classroom drawing practice and early art lessons.
- Coloring page for kids’ parties or camps.
- Cute greeting card, sticker, or notebook cover.
- Wall print for a nursery or playroom.
- Relaxing warm-up for sketchbook sessions.
- Fan art base for themed butterflies.
Level of Difficulty
Beginner-friendly — built from simple shapes, forgiving symmetry, and bold outlines.
Eyes and Head Circle

Draw a medium circle near the top center of your page. Inside, add two large round eyes, leaving white highlights to make them shine. Fill the pupils dark. Keep edges smooth and slightly thick for a cartoon look. Leave space below for the body and wings. If using pencil, sketch lightly; you’ll ink later. Keep eye circles touching slightly for extra cuteness.
Antennae and Long Body

Add two curved antennae on top of the head, ending each with a small dot. From the bottom of the head, sketch a tall teardrop for the body, point down. Keep it slimmer than the head so the wings feel big and friendly. Straighten any wobbles, but keep softness. Check vertical balance before moving on. Leave space for wing roots near neck.
Four Wing Shapes

Now draw the wings. Add a large rounded triangle shape from each side of the neck for the upper wings. Underneath, attach two longer oval wings that overlap slightly at the body’s tip. Aim for symmetry but don’t chase perfection—charm lives in small differences. Leave roomy outer edges for later patterns and color. Use soft corners, not points, to keep everything friendly.
Stripes and Inner Wing Guides

Lightly stripe the abdomen with several curved bands. Next, draw a gentle inner arc inside each wing, echoing the outer edge; these guide the future panels. Keep lines meeting the body clean so sections read clearly. If something feels tilted, nudge it now. A tidy centerline makes the butterfly read balanced and calm. These arcs also help shading and color transitions later.
Segment the Wings and Add Smile

Using the arcs as guides, add scalloped lines to break each wing into rounded panels. Space them comfortably so coloring later feels easy. Return to the face and draw a small smiling mouth between the eyes. Thicken the outside contour of the whole butterfly to unify the shapes and make everything pop pleasantly. Keep panel edges meeting neatly at the body’s centerline.
Color Head and Body

Choose a warm yellow for the head and body. Fill evenly, following the curved stripe bands so the belly looks gently rounded. Leave the eye highlights crisp white. If you’re using colored pencils, layer softly, then burnish lightly to smooth. With markers, work in small passes to avoid streaks and preserve edges. Deepen shadows slightly near the neck and under the belly.
Fill Wings with Blues
Color the wing panels with two blues, alternating light and medium to create layered depth. Keep white tips on the outer corners for sparkle. Trace the outlines again if any color crossed them. Try flat fills first; you can always deepen shadows later where panels meet the body and under the top wings. Follow panel curves so forms look nicely rounded throughout.
Add Green Tips and Clean Up

Add fresh green to the top outer sections of both wings for a lively accent. Check symmetry, close any gaps in the linework, and erase stray pencil beneath the ink. If colors feel uneven, add a second pass once the first layer dries. Step back, admire your butterfly, and sign your finished drawing. Optional: add tiny white highlights on wings for sparkle.
Conclusion
Your butterfly works because it stacks simple shapes in a sensible order, then finishes with bold lines and cheerful color. Don’t worry about perfect symmetry; nature isn’t perfect either. Focus on clean edges, confident curves, and consistent fills. Try another version with new color pairs or different panel shapes. Small tweaks create surprising personality with almost no extra effort. Quickly.
A Bonus Tip
Mirror-flip your paper against a window or snap a phone photo; asymmetries jump out and are easy to fix.
FAQs
Q: How long will this take?
A: Most beginners finish in 30–45 minutes, including coloring.
Q: What paper size is best?
A: A4 (8.3×11.7 in) or US Letter works great; choose smooth paper around 120–160 gsm.
Q: My wings don’t match—what now?
A: Thicken the outline and adjust inside panels to disguise small differences.
Q: In what order should I shade?
A: Add gentle shadows near the body first, then deepen panel edges.
Q: Markers or colored pencils?
A: Either works. Markers give flat, bold color; pencils blend softly and layer well.
Q: How do I keep lines clean?
A: Let ink dry fully before erasing, and redraw any colored edges last.