How to Draw and Color Tails
Tails is Sonic’s best friend—a clever, two-tailed fox with a cheerful face and big, pointy ears. This friendly lesson walks kids through drawing and coloring Tails using simple shapes and clear lines. We’ll begin with a tiny nose and a soft guideline for the cheeks, build tall eye shapes, then sketch the fluffy muzzle. After that, we add the head outline, perky ears, and the little hair tufts on top. Once the outline looks right, we trace with a fineliner and bring him to life with bright orange fur, a blue eye, and clean white cheeks. You only need a pencil, eraser, paper, a black pen, and a few markers or pencils. Work slowly, check each step, and keep your strokes light until inking. If you’re teaching a class, pause after every step so everyone can catch up. Use A4 (8.3×11.7 in) paper or similar, and draw large so details are easy to see. Ready to start? Let’s make Tails—simple, neat, and fun for every young artist. We’ll keep lines bold and shapes very friendly.
Supplies for This Drawing
- HB pencil for sketching
- 2B pencil for darker details (optional)
- Kneaded eraser + vinyl eraser
- A4 (8.3×11.7 in) 160–200 gsm drawing paper
- Black fineliner (0.4–0.6 mm)
- Alcohol markers or colored pencils: orange, light blue, dark blue, pale peach/cream, light gray
- Sharpener
- Ruler (for centering marks, optional)
Prepare the Materials
- Clear your workspace and set good lighting.
- Tape the paper edges to a board for clean borders.
- Sharpen pencils; test on scrap.
- Uncap markers and check colors.
- Place a Tails reference nearby.
- Keep tissues for marker blotting.
Special Features of This Drawing
- Big, readable shapes for kids
- Fluffy cheek spikes for personality
- One winking eye for charm
- Bold outlines that pop after inking
- Bright orange and clean white contrast
- Simple gray shading for depth
Tutor’s Suggestions
- Sketch lightly first; save pressure for inking.
- Build shapes from simple curves before details.
- Keep outlines consistent in thickness.
- Shade sparingly—less is more on cartoons.
- Rotate the page for easier curves.
- Step back often to check symmetry.
- Erase gently to protect paper surface.
Uses
- Classroom drawing practice
- Rainy-day art activity
- Fan art for gifts
- Coloring page printout
- Kids’ room mini poster
- Social media share for parents
Level of Difficulty
Beginner-friendly — large shapes, minimal shading, and clear, easy lines.
Nose and Cheek Guide
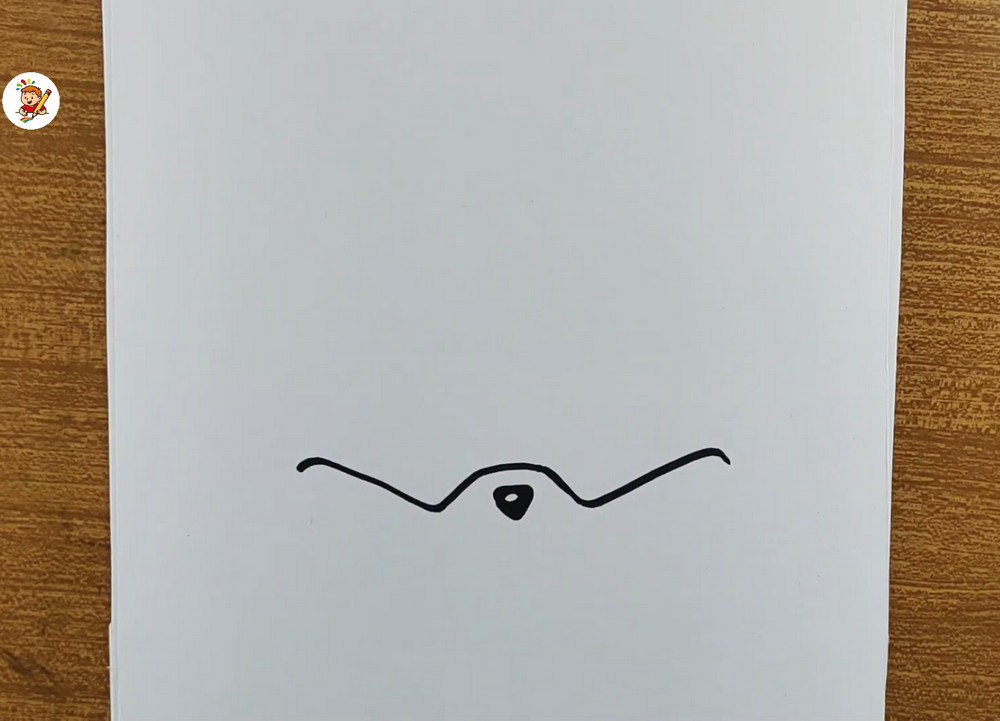
Start in the lower middle of the page. Draw a gentle, wavy line like a shallow ‘W’; this is the top edge of Tails’s fluffy cheeks. At the small dip in the center, add a tiny upside-down teardrop for the nose and fill it black, leaving a pinpoint highlight. Keep the waves soft; avoid sharp corners. This line sets the width of the face, so leave room on both sides for the big cheek tufts. Lightly mark the page’s center.
Eye Shapes

From the central dip, rise upward to sketch two tall, rounded rectangles for the eye areas. Keep them slightly tilted toward each other so they hug the nose curve. Leave a small gap between the shapes and the wavy cheek line. The left eye can be narrower to suggest a wink later; the right eye stays wide for the iris. Use smooth, confident strokes. These shapes act as guides, so don’t worry about perfection—keep them balanced and similar in height.
Muzzle, Wink, and Pupil

Wrap the cheeks around the eyes: extend both sides of the wavy line outward and curve down to form a wide, rounded muzzle. Add three feathered spikes on each side to show fluffy fur. Inside the left eye shape, draw a simple curved line to show a closed, winking lid. In the right eye shape, draw a vertical oval iris with a smaller oval pupil. Under the nose, add a curved smile. Keep everything big and readable for young artists.
Head Outline and Ears

Now build the head. From above the eyes, draw a smooth dome that rounds over the top and down the sides, stopping near the cheeks. Add two large fox ears: tall triangles with slightly curved sides and a smaller triangle inside each for the inner ear. On the left side of the forehead, add three sweeping hair tufts that curve back like soft ribbons. Check symmetry, but let the hairs overlap the ear. Erase extra guidelines that peek outside the outline.
Base Colors
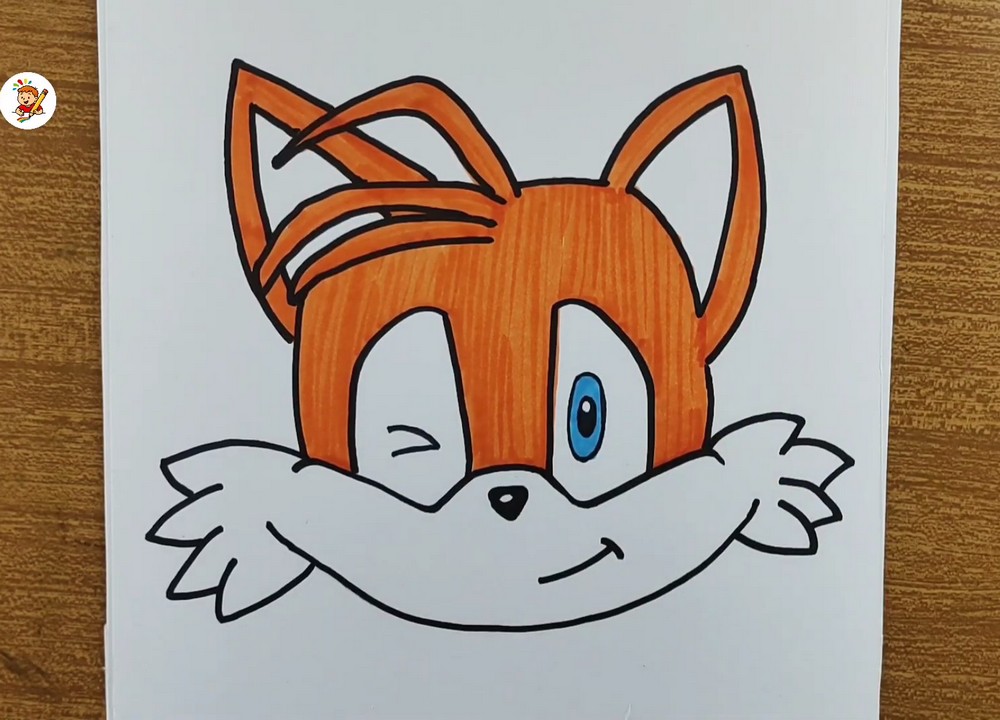
Time to color the base. Fill the head and hair tufts with a bright orange. Keep the cheeks, muzzle, and nose bridge white. Color the right iris light blue with a darker blue pupil, leaving a tiny highlight. Leave the left, winking eye white with a thin lid line. Color the ear interiors a pale peach or light cream. Use even strokes in one direction to avoid streaks. If using pencils, press lightly and layer; markers should glide smoothly. Evenly.
Shading and Final Lines

Finish with shading and polish. With a light gray, add a soft shadow under the cheeks and along the lower edge of the muzzle. Feather the gray so it blends. Thicken the outline with a black pen, especially around ears and hair tufts. Add a thin darker rim inside the ear edges. Clean stray pencil marks, step back, and check balance. A final, small highlight on the nose makes Tails look lively. Add tiny eyelashes if desired—just two dashes. Nicely.
Conclusion
Great work! You drew and colored a bright, friendly Tails using simple shapes, clean lines, and smooth color. Remember that big eyes, fluffy cheeks, and crisp outlines create that classic Sonic look. If something felt tricky, practice the steps on scrap paper and try again larger. Once comfortable, add the rest of his body or pose the head differently. Most of all, keep drawing often—confidence grows fast when you repeat small wins. You’ve got this!
A Bonus Tip
Place a blank sheet under your drawing to stop marker bleed and keep edges crisp.
FAQs
Q: How long will this take?
A: Most kids finish in 25–40 minutes, including coloring.
Q: What paper size is best?
A: A4 (8.3×11.7 in) or US Letter works well; thicker paper resists marker bleed.
Q: My eyes look uneven—how do I fix that?
A: Lightly box in equal heights and adjust before inking.
Q: Should I ink before or after coloring?
A: Ink first, let it dry, then color to avoid smudges.
Q: Are markers better than pencils?
A: Either works. Markers give flat, bold color; pencils blend softly.
Q: How do I shade without overdoing it?
A: Add a small gray edge under the cheeks and stop.