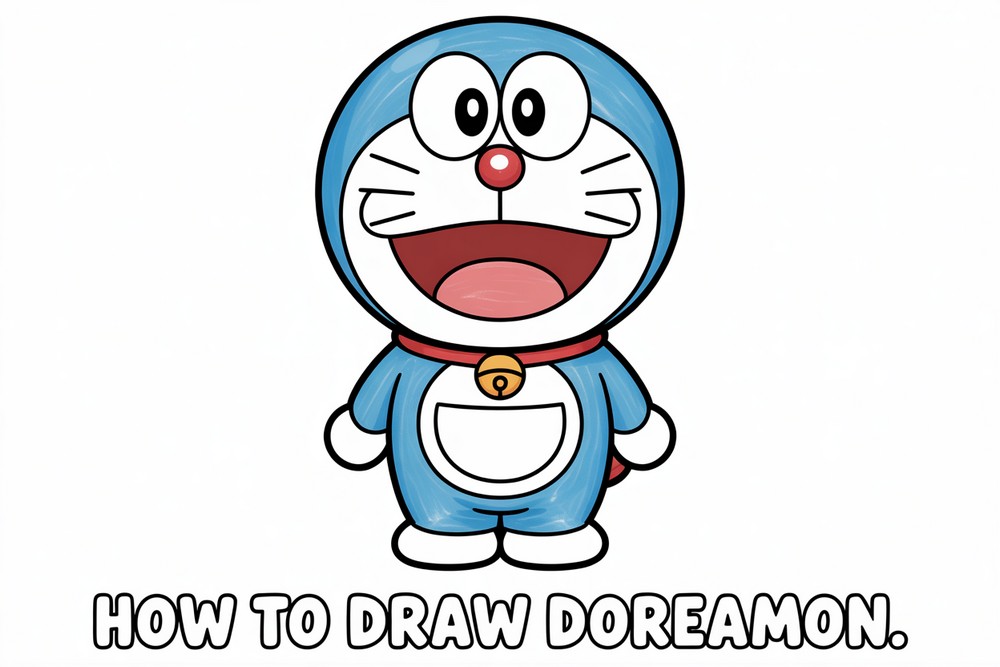
How To Draw Doreamon
Doraemon is a friendly blue robot cat with simple, rounded shapes, so he’s a great character to practice clean lines, big forms, and cartoon expression. In this tutorial, you’ll draw him step by step from circles to color. Keep your sketch light at first, then darken confident outlines at the end. Measurements don’t need to be perfect; focus on symmetry and smooth curves. We’ll build the head, features, body, collar, pocket, bell, and waving arm, add ink, then color everything. Grab a pencil, eraser, fineliner, and a few markers or crayons. Work on A4 or letter paper with room to move your wrist. Follow each image in order, compare landmarks often, and pause between steps. By the last panel you’ll have a cheerful Doraemon ready for display. Have fun drawing.
Supplies for This Drawing
- HB and 2B pencils
- Kneaded eraser and vinyl block eraser
- 0.4–0.5 mm black fineliner
- A4 (8.3×11.7 in) or Letter (8.5×11 in) 160–200 gsm paper
- Alcohol markers, crayons, or colored pencils: blue, red, yellow, gray, black
- Pencil sharpener
- Small ruler (for pocket alignment) and optional compass (for clean circles)
Prepare the Materials
- Clear your workspace and set good lighting.
- Tape paper edges to a board for stability.
- Sharpen pencils and test pressure on scrap.
- Place your reference images nearby.
- Keep tissues for marker blotting and a spare sheet under your drawing.
- Open a window or use ventilation if using markers.
Special Features of This Drawing
- Iconic round head with a secondary inner hood line
- Oversized eyes and tiny pupils for charm
- Big smile with tongue, plus three whiskers per cheek
- Bold collar and bell that frame the face
- Large tummy pocket centered for balance
- Soft, tubular limbs and slipper-like feet
- High-contrast blue, red, white, and yellow palette
Tutor’s Suggestions
- Start with very light, sweeping strokes; avoid short, scratchy lines.
- Mirror-check symmetry by flipping the page against light.
- Use the pencil’s side for soft guides, pencil tip for precise features.
- Ink slowly, turning the page so curves match your wrist movement.
- Let ink dry before erasing to prevent smudges.
- Build color in two passes for even coverage.
- Add shadows last, extremely lightly.
Uses
- Classroom practice on clean cartoon construction
- Portfolio warm-up for confident line control
- Fan art, posters, or notebook covers
- Greeting cards or birthday decorations
- Fridge or wall print for a kid’s room
- Coloring page to share with friends
- Simple marker rendering exercise
Level of Difficulty
Beginner-friendly — large, forgiving shapes with clear, repeated curves.
Basic Head and Eyes
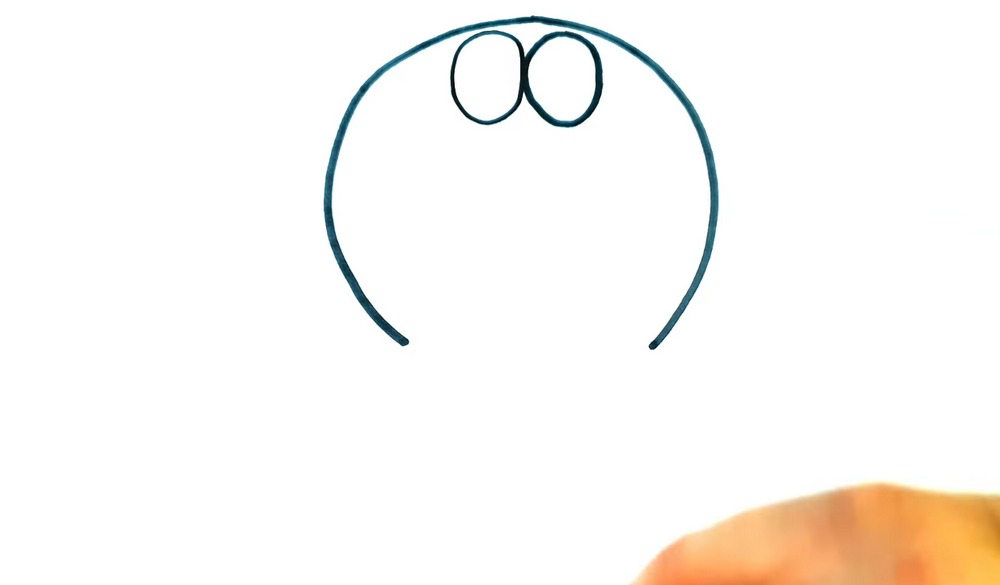
Draw a wide arc for the top of the head, leaving an open gap at the bottom. Inside the arc, sketch two tall, touching ovals near the top center. These are Doraemon’s big eyes. Keep the edges soft and the ovals slightly different to feel natural. Don’t worry about pupils yet; we’ll place them once the face layout is settled. Lightly erase.
Pupils and Nose
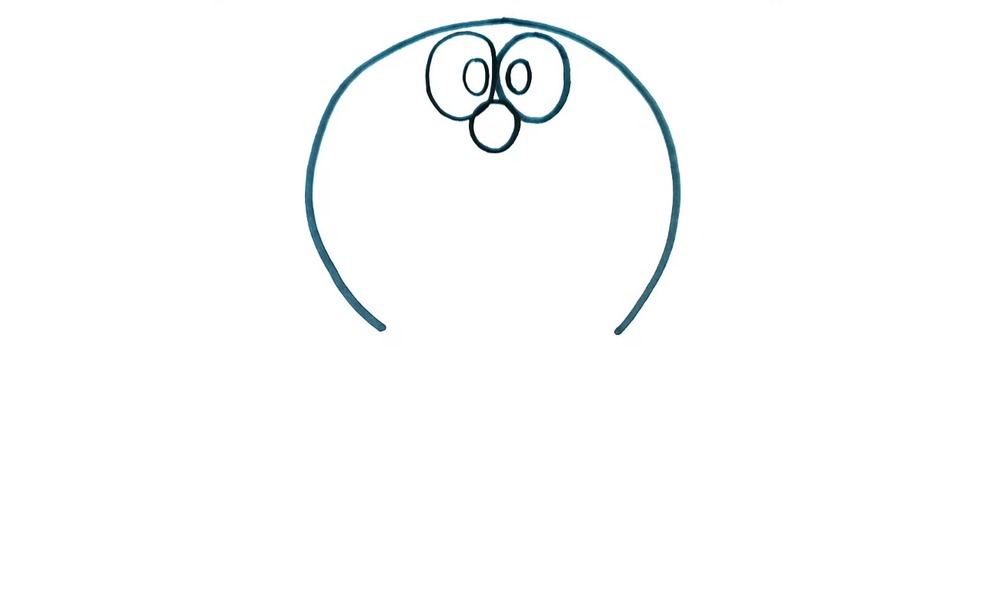
Add pupils by placing two small ovals inside the big eyes, touching the top edges for that surprised, excited look. Under the eyes, draw a small vertical oval for the nose, centered between them. Keep everything stacked on the head’s centerline. The arc of the head remains open. Stay light; we’ll refine shapes and thickness later while inking details. Check spacing carefully.
Face Frame and Mouth
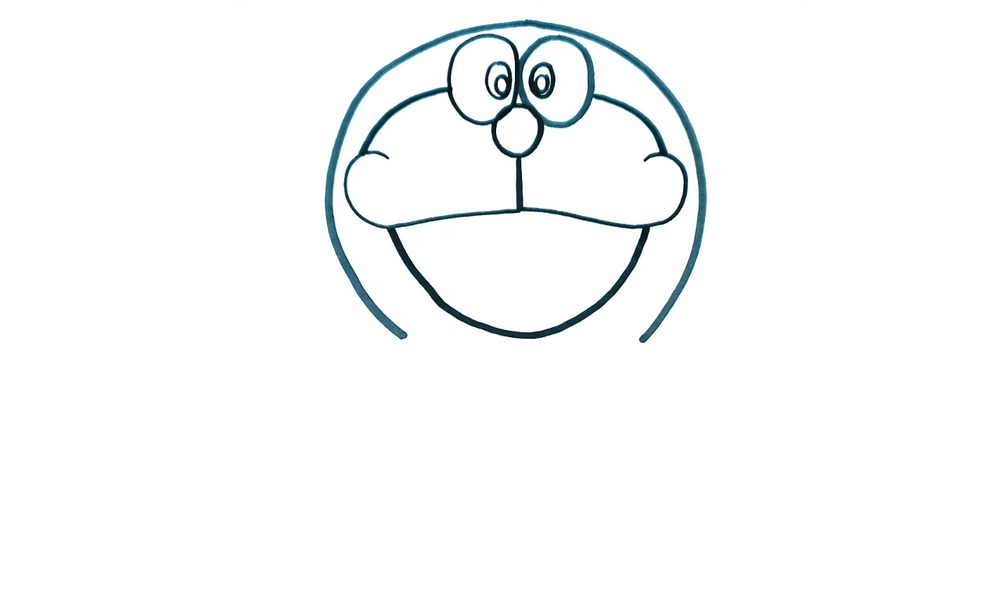
Add an inner outline following the head curve, leaving a slim gap for the blue hood. Build the white muzzle: draw two rounded cheek pads left and right, joined by a smooth horizontal shape. Drop a short vertical line from the nose, then sketch a large U-shaped mouth below that touches the muzzle. Keep corners soft and balanced. Avoid sharp angles anywhere.
Tongue and Whiskers
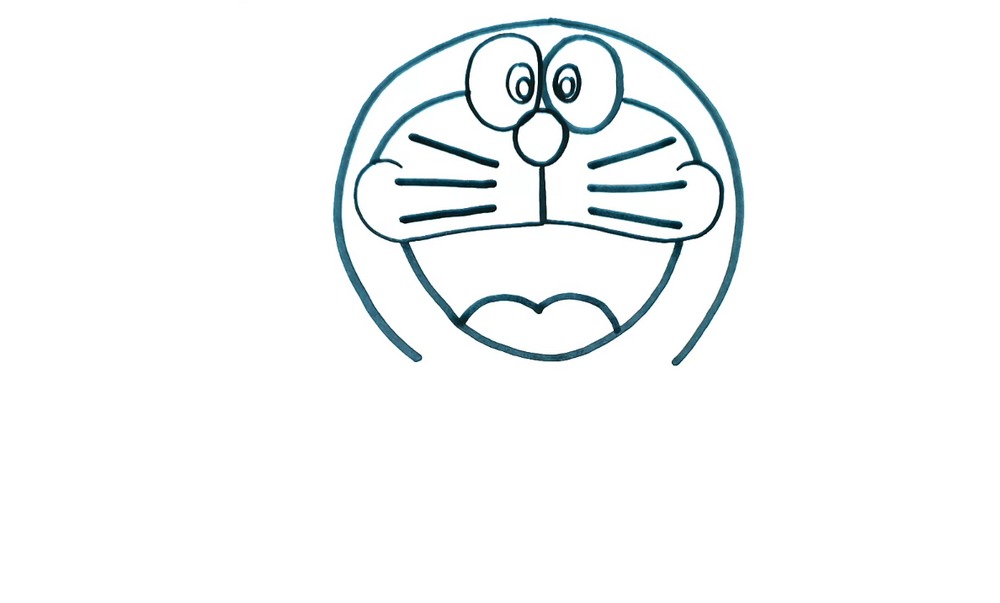
Inside the mouth, add a small heart-like curve along the bottom to suggest the tongue. On each cheek pad, draw three short horizontal whisker lines that taper toward the center. Keep pairs level and evenly spaced. Reinforce the vertical centerline from nose to mouth. The outer head arc remains open at the bottom for the neck area. Keep your pressure light. Always.
Collar Placement

Close the head with two parallel curves under the chin to form the collar. Leave a small gap at the front for the bell. Add a second inner collar line to feel like a thick ring. Clean the mouth edge and define the inner hood line. Keep curves smooth and consistent for that soft look. Avoid kinks, bumps, or corners. Stay relaxed.
Bell and Torso Lines
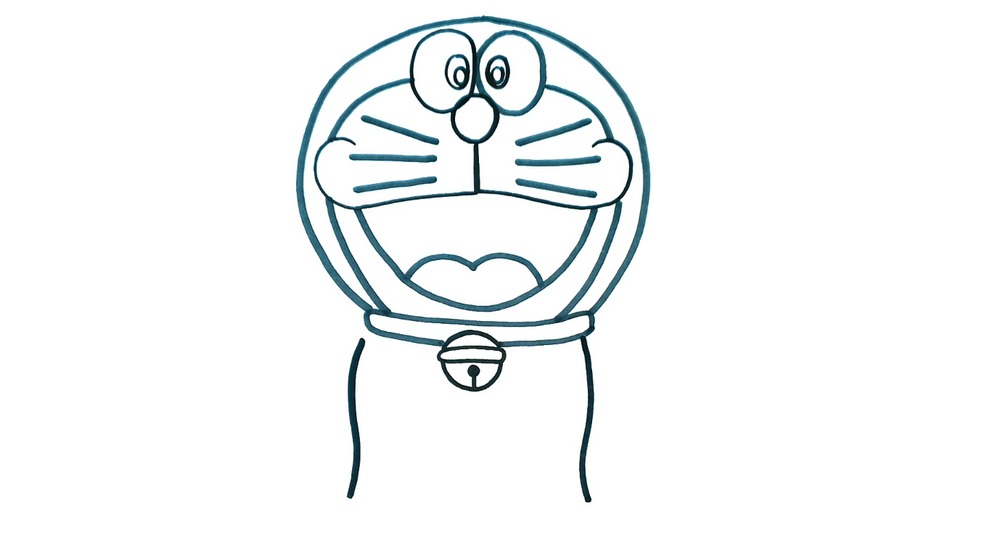
Draw a small circle hanging at the collar gap for the bell, then add a horizontal slit and a short vertical drop for the clapper. From the collar, pull two long downward curves to start the body sides. Keep them tapering toward the feet. Leave space between for the tummy and pocket. Maintain chubby, rounded proportions, not straight, stiff lines. Stay curvy.
Arms, Paws, and Tummy
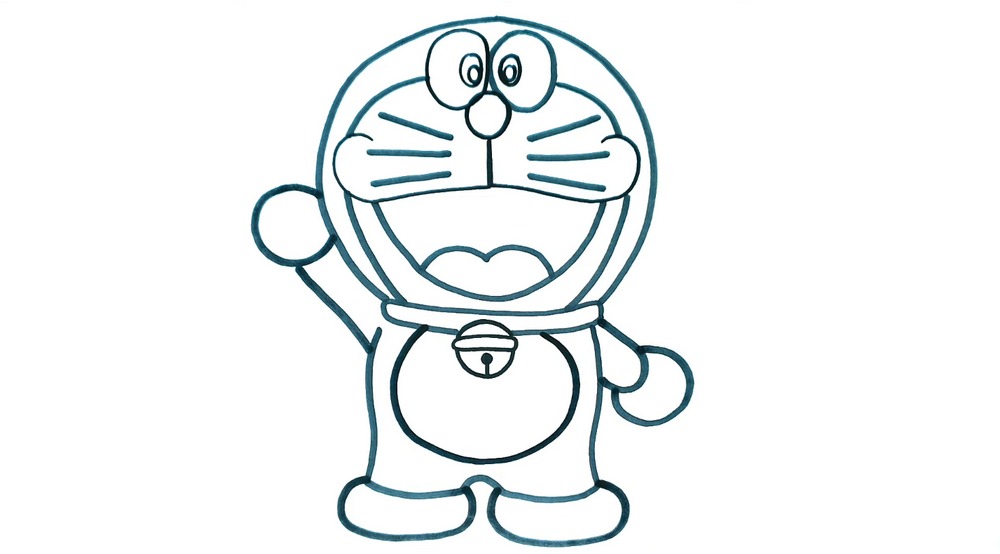
Add arms and legs using soft tube shapes. Raise the left arm in a waving curve; attach a simple mitten-like circle for the paw. Build the right arm lower with the same rounded paw. For the legs, draw two stubby pillars ending in big oval slippers. Inside the body, place a large tummy oval centered under the collar. Keep overlaps tidy. Everywhere.
Pocket and Feet Details
Draw the signature pocket: a wide circle or slightly flattened oval centered on the tummy, with a horizontal opening line across the upper third. Add a short vertical seam line down from the collar to the pocket’s top to align the chest. For the feet, sketch a gentle sole line on each slipper. Check symmetry left to right and adjust curves carefully.
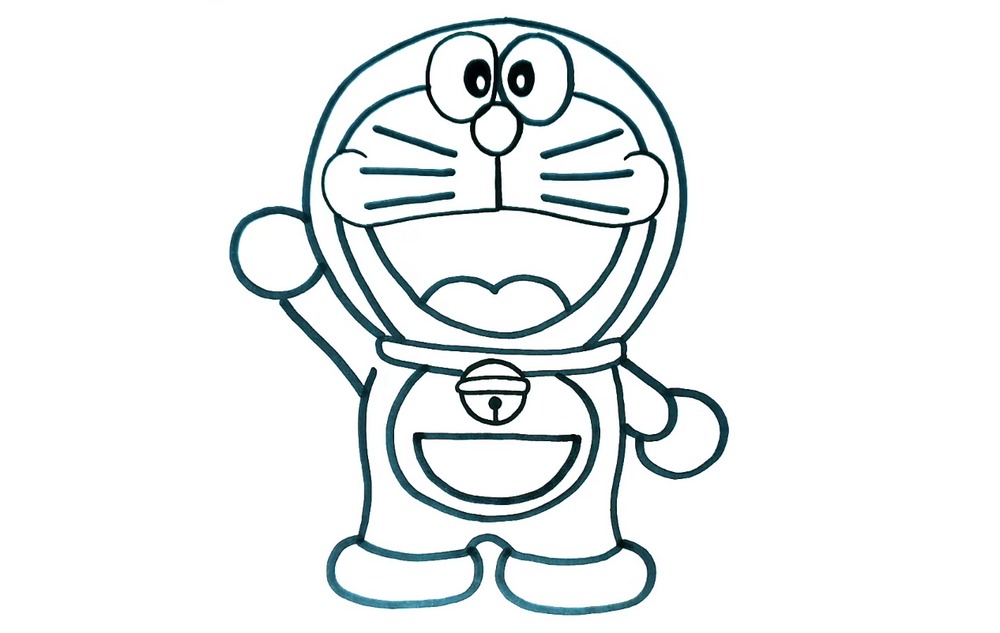
Inking the Lines
Time to ink. With a 0.4–0.5 mm fineliner, trace final outlines: head, inner hood, eyes, nose, muzzle, mouth, whiskers, collar, bell, body, pocket, arms, legs, and paws. Thicken the outer contour slightly for a cartoon pop. Let the ink dry fully, then gently erase all remaining pencil lines. Review proportions and correct any wobbles with small hatch fixes or careful redraws. Cleanly.
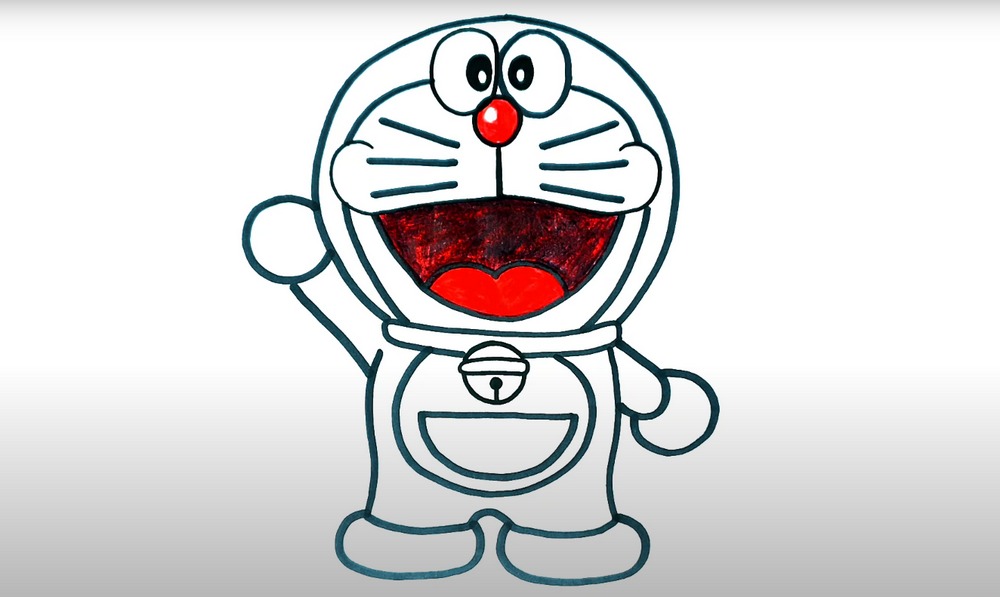
Coloring Doraemon
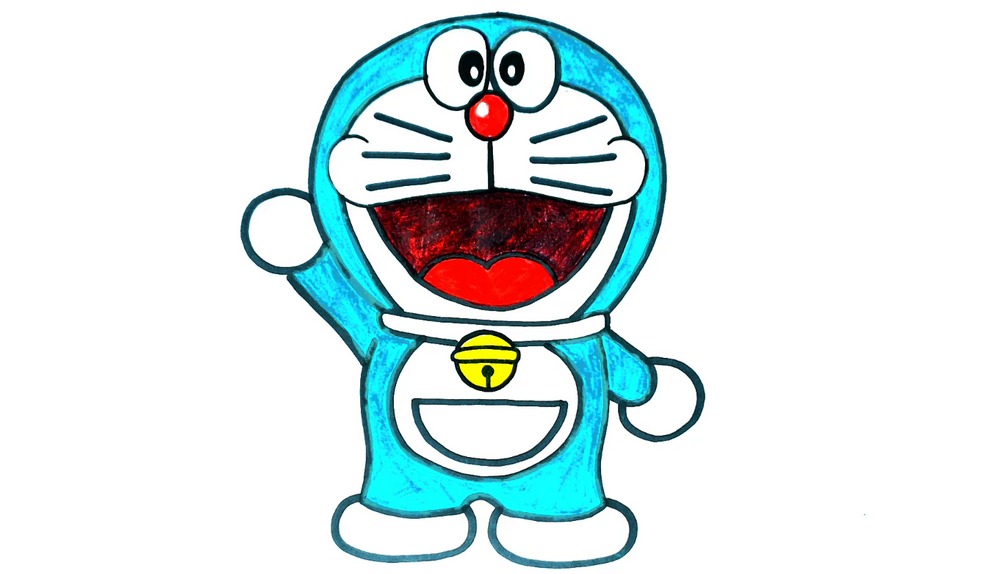
Color time. Fill the hood, arms, body sides, and back of the head with bright blue. Keep the face, muzzle, tummy, and paws white. Make the nose and collar red, the bell yellow with a gray slit. Add light gray shadows under the head, inside the mouth, under paws, and along the pocket rim. Leave highlights on eyes and nose for sparkle.
Conclusion
You did it! Building Doraemon from simple curves keeps everything friendly and bold. The big eyes and clean mouth sell the expression; the collar, bell, and pocket finish the look. Keep practicing smooth, confident lines and even color fills. Next time, try a different pose or prop, like the bamboo-copter, to grow your cartoon skills. Save your sketch for reference.
A Bonus Tip
Outline the outer silhouette with a slightly thicker ink line; it instantly adds depth and makes Doraemon read clearly from across the room.
FAQs
Q: How long will this take?
A: Most beginners finish in 40–60 minutes, including inking and color.
Q: What paper size is best?
A: A4 or Letter gives comfortable room for smooth curves; heavier 160–200 gsm paper handles markers better.
Q: My eyes look uneven. What should I do?
A: Lightly box in a centerline and equal widths, then adjust one oval at a time before inking.
Q: Should I shade before or after color?
A: Lay flat colors first, then add light gray shadows so you don’t muddy the hues.
Q: Can I use pencils instead of markers?
A: Yes—layer blue, red, and yellow lightly, then burnish gently for smooth fills without streaks.
Q: How do I keep lines clean when inking?
A: Rotate the page, pull strokes toward you, and lift at corners to avoid blots.