Cute Lotus Acrylic Painting
Paint a glowing lotus floating on calm water—soft bokeh behind, fresh pads below, and pearly reflections. This beginner-friendly acrylic lesson follows the images step by step: tone, glow, sketch, block petals, model with magenta veining, add pads and reflection, refine the atmosphere, then polish highlights. You’ll practice glazing, scumbling, crisp-edge control, and simple value grouping to keep the flower luminous. We’ll keep a compact palette, repeat colors in water and petals for harmony, and place the brightest accents last so nothing turns chalky. Set aside a relaxed afternoon, work in light layers, and keep one clean brush only for blending. Ready to turn a dark panel into a serene, meditative bloom? Tape your canvas, mist paints, and let’s begin. Keep reference nearby and pause often to judge values and edges.
Supplies for This Drawing
- Acrylic paints: titanium white, quinacridone magenta, lemon yellow, yellow ochre, phthalo green, ultramarine blue, Payne’s gray/ivory black
- Canvas/panel: A4 (8.3×11.7 in) or 9×12 in, 280–380 gsm, pre-primed
- Mediums: glazing medium, clean water, paper towels
- Brushes: 1″ flat, ½″ filbert, small round, liner, soft mop/sponge for bokeh
- Palette, palette knife, masking tape, pencil/pastel for sketch
Prepare the Materials
- Tape the canvas edges; set even lighting.
- Lay out paints light-to-dark; premix teal and pink tints.
- Keep one damp “blend-only” brush separate.
- Place reference nearby; protect your table.
- Test bokeh dabs and petal veins on scrap.
- Mist paints occasionally to prevent skinning.
Special Features of This Drawing
- Luminous teal background with soft, layered bokeh.
- Petal modeling using transparent glazes plus crisp vein lines.
- Floating lily pads framing the bloom.
- Gentle reflections that echo petal color.
- Dew droplets and sparkles for a magical finish.
Tutor’s Suggestions
- Blend early, then stop—overworking kills glow.
- Leave skinny dark gaps between petals for clarity.
- Keep reflections horizontal and slightly blurred.
- Use glazing medium (not water) for smooth tints.
- Reserve pure white for final dots and rim-lights.
- Squint often to judge value separation.
Uses
- Relaxing paint-night project.
- Calm wall art for bedroom or yoga space.
- Greeting cards or printables.
- Study in bokeh, glazing, and soft reflections.
- Gift for meditation or nature lovers.
Level of Difficulty
Beginner-friendly — simple shapes, gentle glazing, and manageable details.
Deep Teal Ground

Brush a dark teal ground across the whole canvas using a wide flat brush. Work horizontally to keep strokes calm and even. Mix phthalo green, ultramarine, and a touch of black with matte medium for smooth coverage. Wrap edges. Let hints of lighter streaks remain—they’ll read as water depth later. Allow this layer to dry before glazing, so later blends stay clean.
Hazy Glow Patches

Glaze a darker band through the upper half using ultramarine and a little black. While damp, tap soft, round patches of brighter green with a makeup sponge or mop, creating out-of-focus foliage. Keep edges hazy and values subtle. Leave the lower third darker for water. Let this stage dry; those blurred shapes provide depth behind the lotus and guide brighter bokeh later.
Sketch & Bokeh Guides

Lightly sketch the lotus with a pastel pencil: central cup, overlapping petals, and a few floating leaf arcs. With a small round, stamp pale turquoise circles in wandering clusters to map bokeh strands. Vary sizes; overlap some. Keep everything transparent. These guides show placement, rhythm, and flow, so the flower sits naturally on the water and the background looks alive and harmonized.
Block Lotus Silhouette
Paint the lotus silhouette with an opaque pastel pink made from titanium white plus a touch of magenta. Use a filbert, pulling strokes from base to tip to suggest form. Leave thin dark slivers between petals for separation. Add a light oval for the seedpod and a soft shadow beneath. Keep edges clean; this flat base sets your highlights and veining beautifully.
Veins, Light, Dimension
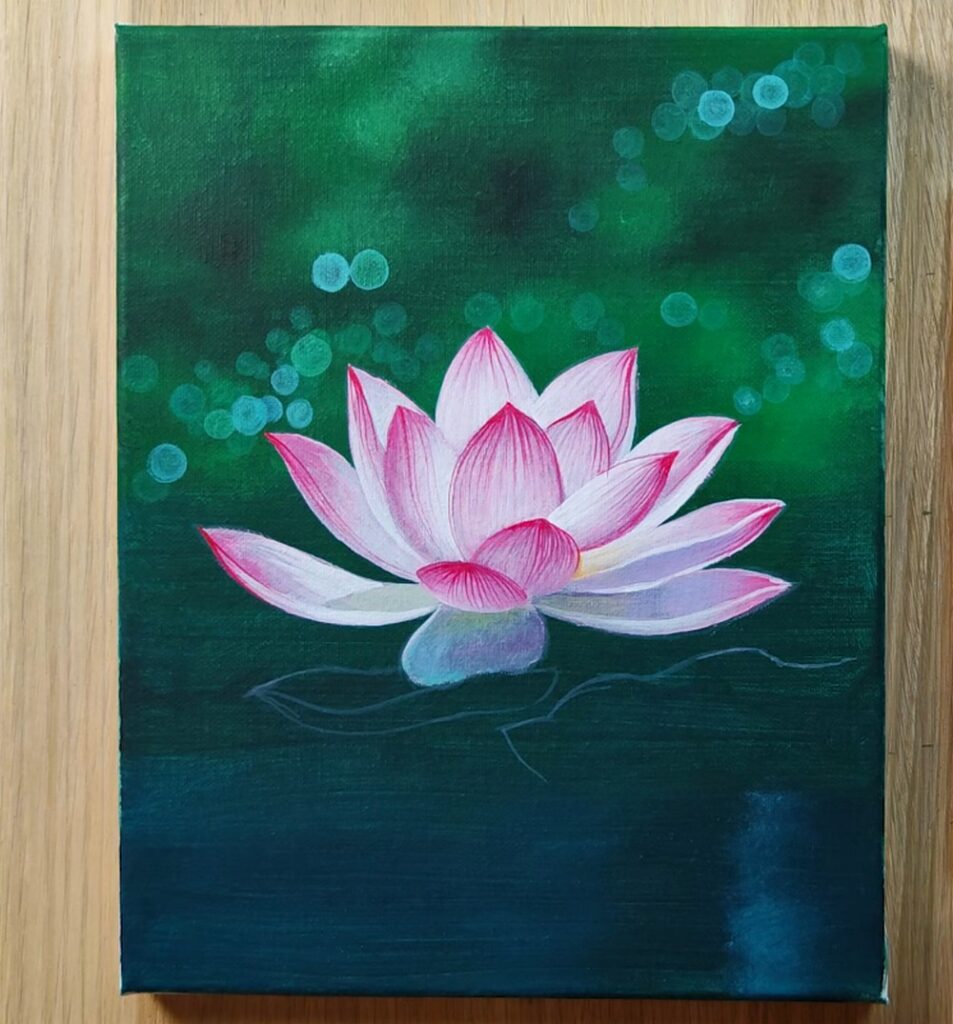
Model each petal. Glaze a lavender shadow near bases, then pull magenta veins upward with a liner, easing pressure toward tips. Drop a hint of warm yellow where light glows through. Keep outer edges lighter for rim-light. Round the central bud with cooler grey. Maintain crisp separations between overlaps so the lotus reads dimensional and luminous against the dark water at night.
Pads & Reflection
Block lily pads beneath the flower using deep green, teal, and touches of yellow-green. Shape overlapping ovals, leaving narrow dark gaps. Under the bloom, paint the water’s reflection: a vertical pink column broken by horizontal strokes. Blur slightly. Add darker water to the foreground for contrast. These layers anchor the flower and create the calm mirror the highlights will sparkle across beautifully.
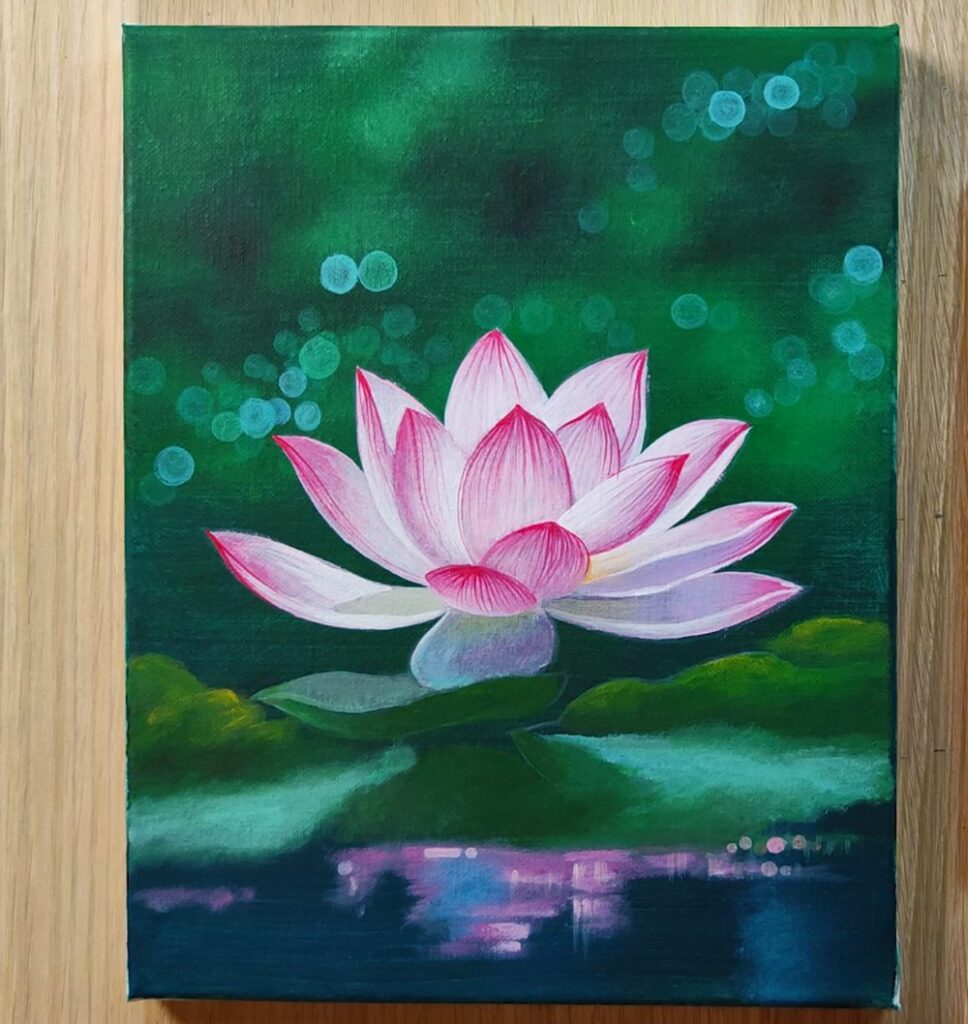
Bokeh, Dew & Depth

Deepen the background with transparent green glazes, then float new bokeh rings—some crisp, some barely there. Edge lily pads with soft light, add small dew beads and tiny sparkles along rims. Strengthen shadows under overlapping leaves to separate planes. Calm the reflection with a few horizontal passes. Keep attention on the lotus by reserving the brightest accents around its crown and heart.
Final Polish

Make final passes. Sharpen a few petal tips, brighten warm highlights, and cool select shadows. Paint delicate water ripples and the soft rim-light under petals. Add three or four brightest bokeh dots for sparkle. Balance values, step back, and sign your work. The lotus now floats serenely, luminous against emerald water with reflections, bubbles, and leaves supporting a peaceful composition for you.
Conclusion
Step back and enjoy the quiet glow you built from simple layers. The lotus feels weightless because you kept edges varied, bokeh soft, and reflections horizontal. Keep practicing quick glazes and confident vein lines; the timing becomes natural. Next time, try a different palette, adjust petal count, or add koi beneath for extra story and motion in the still water.
A Bonus Tip
Outline bokeh with translucent halos first, then place a tiny white dot off-center—this pairing reads like light, not stickers.
FAQs
Q: How long will this take?
A: Around 90–120 minutes, including short drying breaks between glazes.
Q: What brush carries the petals best?
A: A medium filbert pulls base-to-tip strokes that naturally curve like petals.
Q: My bokeh looks chalky—help?
A: Thin the paint and soften edges with a clean, barely damp brush; build in layers.
Q: How do I keep the flower bright?
A: Paint an opaque light base first, then add transparent shadows and veins.
Q: Should I varnish?
A: After curing 24–72 hours, apply a thin satin or gloss varnish to deepen color and protect the surface.