Easy Acrylic Painting For Beginners
This beginner acrylic painting walks you through a calm sunset scene with a cottage silhouette and hanging string lights. First, you’ll blend a warm gradient sky, then block in simple dark shapes, and finally add crisp highlights that make everything pop. The steps are straightforward and forgiving, so you can relax and enjoy the paint. Keep your brush damp, work from light to dark, and don’t rush drying. We’ll use only a few colors and basic tools, perfect for a short creative break. Ready to paint something pretty? Set out a small square canvas or thick paper, load your palette, and keep a tissue handy for quick dabs and clean edges. Breathe, paint steadily, and let the sky glow. This project fits any schedule and builds confidence with smooth blends.
Supplies for This Drawing
- A square canvas panel or acrylic paper, 20×20 cm (8×8 in), 300 gsm
- Acrylic paints: titanium white, primary yellow, primary magenta, crimson, peach mix, black
- Brushes: medium flat, small flat, small round, dry brush
- Palette, water cup, paper towels/tissue
- Pencil and kneaded eraser
- Masking tape (optional)
- Ruler (for fence spacing, optional)
Prepare the Materials
- Clear your workspace and set good lighting.
- Tape paper edges to a board, if using paper.
- Sharpen pencils; pre-wet brushes and blot.
- Arrange paints from light to dark on the palette.
- Keep tissues ready for quick cleanups.
- Place references where you can glance easily.
Special Features of This Drawing
- Smooth sunset gradient using three warm hues
- Simple, readable silhouettes with bold edges
- Cozy window glow contrasted against black forms
- Playful string lights that add atmosphere
- Beginner-friendly composition with strong diagonals
- Quick drying layers and minimal color mixing
Tutor’s Suggestions
- Blend while the sky is wet; keep strokes horizontal.
- Use confident, single passes for silhouette edges.
- Wipe your brush often to avoid muddy mixes.
- Let layers dry before adding crisp details.
- Vary bulb spacing slightly for a natural look.
- Step back often to judge spacing and angles.
- Keep water nearby, but avoid over-thinning acrylics.
Uses
- Classroom painting practice or workshop demo
- Relaxing evening craft project
- Handmade card or small wall art gift
- Social post or process reel subject
- Portfolio warm-up for color blending
- Family paint-along activity
Level of Difficulty
Beginner-friendly — simple shapes, limited colors, and forgiving silhouettes keep stress low while teaching useful blending and edge control.
Blend the Sunset Base

Load a medium flat brush with peach, pink, and crimson. Starting at the bottom, brush peach horizontally, then blend upward into pink, finishing with bright crimson at the top. Work quickly while wet, feathering overlaps for a smooth gradient. Wipe excess paint between passes. Let faint streaks show; they add texture. Allow this background to dry completely before moving on. Totally dry.
Block the Cottage Shapes
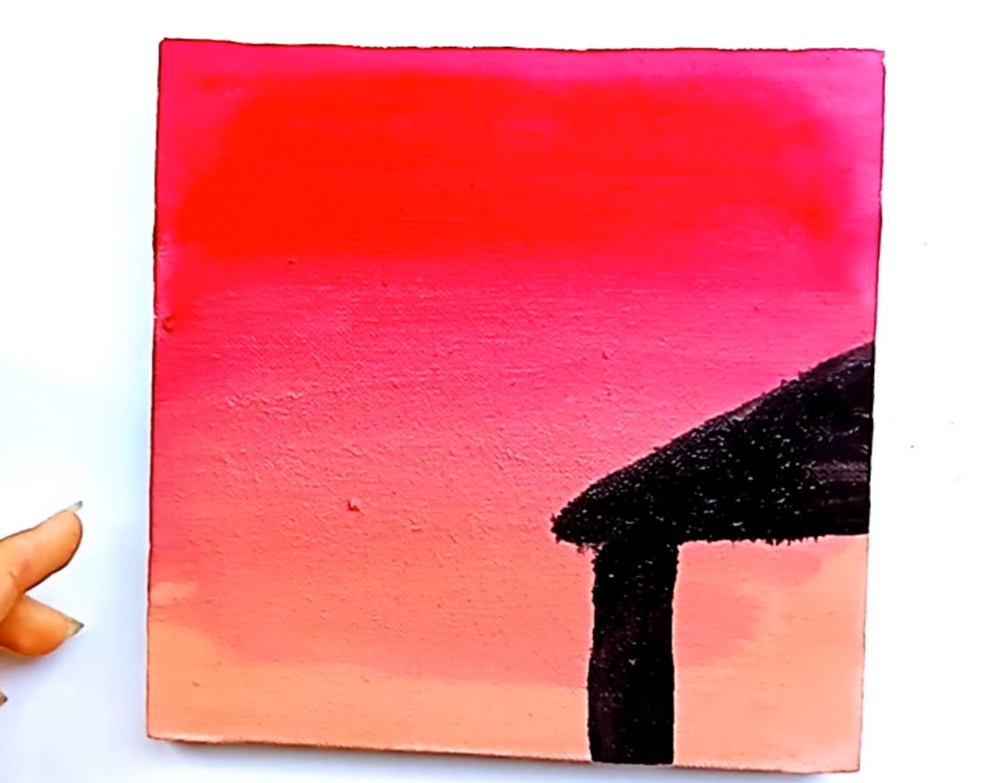
Switch to black acrylic. With a small flat brush, block a vertical wall shape on the lower right edge. Add a slanted triangular roof cutting across the upper right corner. Keep edges bold and confident; silhouettes are forgiving. Fill the shapes solid. Leave the rest of the sky untouched for now, keeping the gradient visible. Let the black layer set briefly. Smoothly.
Mark the Window

Sketch a small square window on the wall area using a light pencil or thinned paint. Divide the square with a vertical and horizontal bar to make four panes. Carefully paint around the window with black, keeping the bars neat. Don’t worry about glow yet. Keep the panes lightly tinted by the background for now. Let things dry for cleaner edges. Lightly.
Strengthen the Silhouette

Deepen the house silhouette. Repaint the roof and wall with another pass of black, smoothing any streaks. Sharpen the roof’s lower edge with one confident stroke. Leave the window panes unpainted so they read as lit from inside. Double-check the corner where roof and wall meet, keeping it slightly rounded for a cozy feel. Pause a minute for drying. For even coverage.
Add Bush and Fence

On the left, switch to a small round brush and tap clustered leaf shapes for a bush silhouette. Keep the base denser and the top airy. Add a simple fence near center: vertical posts with a horizontal rail. Let some posts overlap the lighter horizon gap for depth. Keep everything in black so the shapes read clearly against the sunset. And simple.
Refine Natural Details

Refine shapes. Break the shrub edge with a few leaf spikes and negative notches so it feels natural. Thicken select fence posts, tapering tops slightly. Add a darker shadow mass along the foliage’s base to anchor it. Step back and check spacing: aim for irregular, pleasing gaps between posts and leaves. Let the paint sit until fully touch-dry. Check verticals remain upright.
Draw the Light Strings

Light time. With thinned black, draw two relaxed curves across the upper sky, sagging slightly like festive strings. Keep them parallel and clean. Dot tiny downward ticks along the lines to mark bulb hangers. Avoid symmetrical spacing; a bit of randomness feels lively. If a line wobbles, straighten it with a careful second pass once the first is dry. Keep pressure steady.
Paint Bulbs and Glow

Load white on a small round brush. Paint small circular bulbs hanging from the strings, leaving slim gaps between bulb and string to keep them readable. Vary sizes slightly. While the white is still damp, softly tap around a few bulbs with a dry brush to suggest glow. Keep the rest crisp. Avoid overblending so the circles stay bright. Let highlights breathe.
Warm Centers and Finishing

Add warm centers by tapping pale yellow into each bulb’s middle. Reinforce the strings where needed. Place a tiny pale highlight along the roof edge facing the lights so the cottage catches the glow. Clean the window bars if needed with a careful black stroke. Step back, tidy any edges, and enjoy your finished, cozy dusk painting. Sign your piece discreetly below.
Conclusion
Sunset gradients and bold silhouettes make a satisfying beginner piece. You practiced blending, shape design, and tiny highlights without fussing over realism. Use this process again with different colors or shapes—mountains, trees, or city rooftops. Keep experimenting with brush pressure, drying time, and glow. Most important, paint often; short sessions build skill fast and keep the joy fresh. For you.
A Bonus Tip
For smoother blends, lightly mist the sky area with clean water before painting; the damp surface buys time without flooding the colors.
FAQs
Q: How long will this take?
A: About 30–45 minutes, plus drying time between layers.
Q: What paper size works best?
A: A square A5/A4 cut (15–20 cm / 6–8 in) on 300 gsm acrylic paper or a small canvas panel.
Q: My gradient looks streaky. Fixes?
A: Work faster on a damp surface, use wider horizontal strokes, and wipe the brush before each pass.
Q: The silhouettes look fuzzy.
A: Let the sky dry, then use thicker paint and one confident edge stroke.
Q: Should I shade the house?
A: Keep it flat black for contrast; add only a slim roof highlight from the bulbs.
Q: Can I use markers instead?
A: Yes—paint the sky with acrylics, then use black paint marker for silhouettes and lines.