How To Draw A Beautiful Girl Face
Want to draw a beautiful girl’s face with gentle anime-style features? This step-by-step guide walks you from the first guiding lines to polished shading. We’ll build the head shape, place the fringe and ear, map long hair, then draw expressive eyes, brows, nose, and lips. You only need a few pencils and a soft eraser. Keep your sketch light at first so changes are easy. We’ll focus on clear proportions: eyes halfway down, nose halfway between eyes and chin, mouth a little above the halfway point to the chin. Soft hair shading and a subtle headband finish the look. Work on A4 (8.3×11.7 in) or similar paper, turning the sheet if lines feel awkward. Ready? Sharpen your pencil and follow the images in order. Take your time and enjoy learning.
Supplies for This Drawing
- HB pencil for layout, 2B and 4B pencils for shading
- A4 (8.3×11.7 in) smooth drawing paper, 160–200 gsm
- Kneaded eraser and vinyl eraser (precision edge)
- 0.3–0.5 mm mechanical pencil (optional for lashes/brows)
- Blending stump or soft tissue
- Ruler for quick centerlines; compass optional for headband arc
- Sharpener with point saver setting
Prepare the Materials
- Clear your desk and set bright, even lighting.
- Tape the paper edges to a board for a clean border.
- Lightly draw a vertical centerline and eye guideline.
- Sharpen pencils; test pressure on scrap.
- Place the reference images within easy view.
- Keep erasers clean and blending tools ready.
Special Features of This Drawing
- Simplified anime-inspired proportions with large eyes
- Clean face silhouette leading into delicate jawline
- Expressive fringe and wide headband shape
- Long, straight hair with directional stroke texture
- Soft graphite skin shading with preserved highlights
- Balanced earrings to add sparkle and asymmetry
- Emphasis on tidy linework before values
Tutor’s Suggestions
- Start with the lightest marks you can make.
- Compare distances: eye-width, chin height, hair margins.
- Erase by dabbing, not scrubbing, to protect paper tooth.
- Build values slowly from mid-tones to darkest darks.
- Keep lashes grouped, not evenly spaced.
- Turn the page to pull smoother curves.
- Take short breaks to refresh judgment.
- Squint often to judge overall value balance.
Uses
- Classroom portrait practice or club activity
- Portfolio warm-up focusing on proportions
- Fan-art base for different hairstyles or accessories
- Greeting card or bookmark illustration
- Framed wall print in graphite
- Coloring page after inking
- Social post showcasing shading progress
- Personalized gift sketch
Level of Difficulty
Beginner-friendly — clear shapes, gentle proportions, and forgiving graphite shading.
Face Edge and Forehead
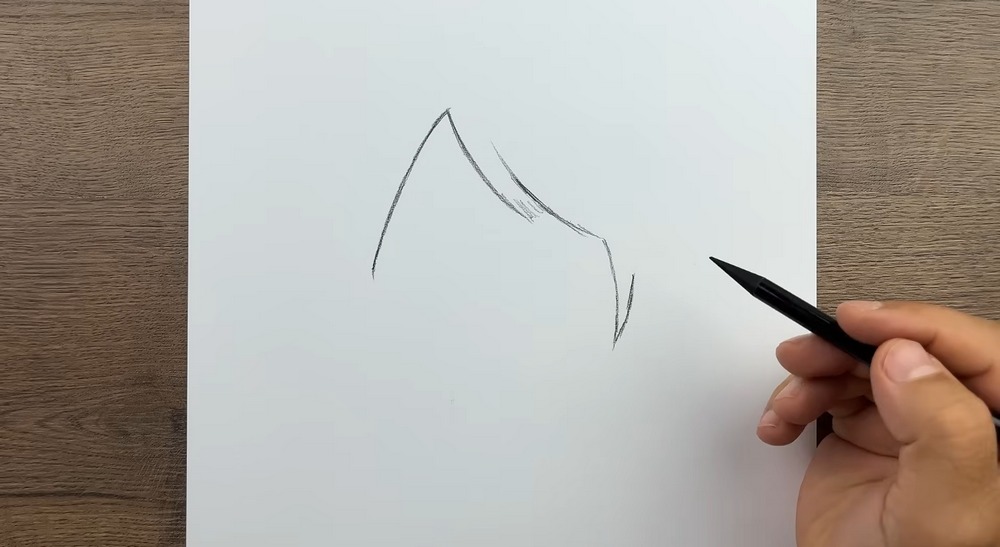
Lightly sketch a tall curved line for the forehead sweeping into the left cheek. Add a short inward bend near the cheekbone and a small tapered mark for the jaw on the right. Keep pressure soft so you can adjust later. Think of a leaf edge: one flowing curve, one broken angle to guide the face. Leave space above for hair later.
Chin Curve and Jawline
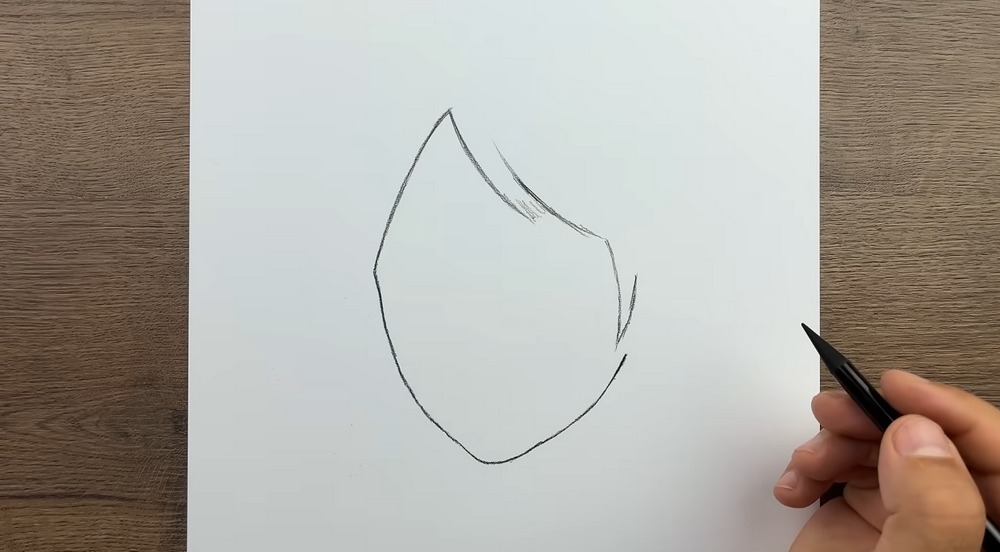
Continue the contour down to form the jaw and chin. Use a smooth rounded arc that narrows slightly before turning up. Connect it to the earlier jaw mark on the right. Keep the line single and clean, avoiding fuzzy sketching. The shape should feel like an upside-down teardrop—wide near cheeks, tapering to a gentle point at the chin. Soften the bottom edge.
Hairline, Ear, and Earring
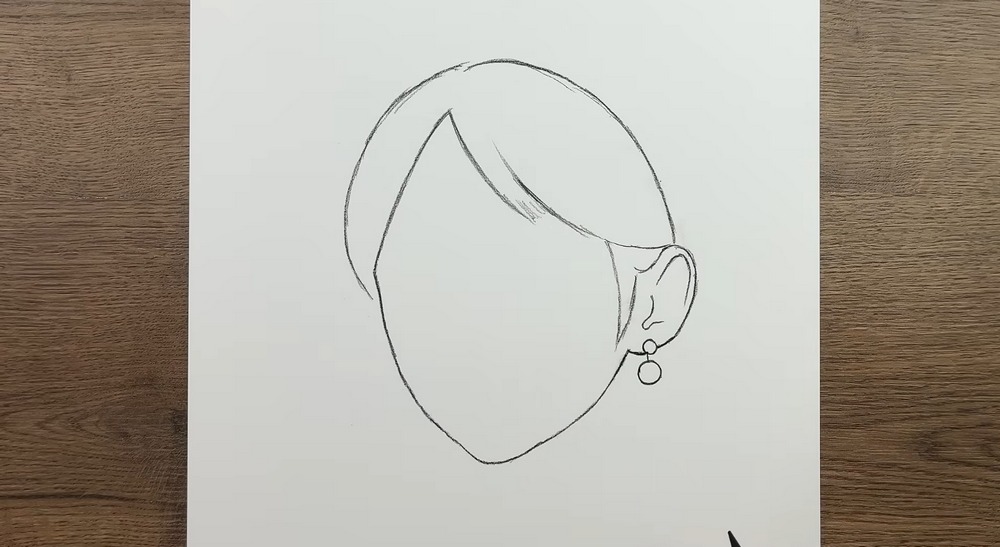
Sketch the hairline sweeping over the forehead as a curved band. Leave a triangular fringe opening on the left. Draw the ear where the jaw meets the head; think a folded question mark inside an oval. Add a small hoop and bead earring. Keep all lines light so you can refine placements, especially the ear height relative to the eyes and brows.
Headband and Hair Guides
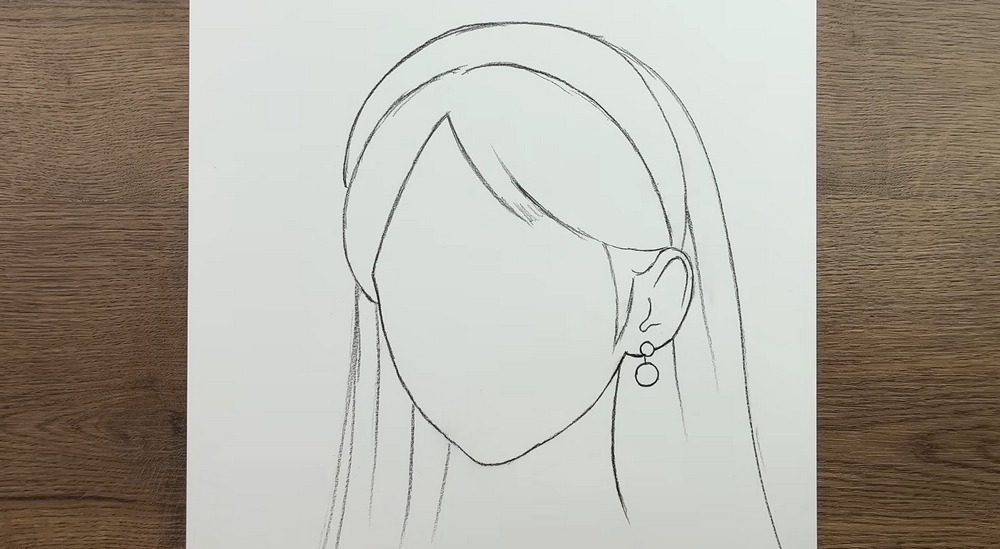
Outline a wide headband that follows the skull’s curve. From beneath it, drop long parallel guide lines for straight hair, letting a few strands overlap the cheek. Keep the neck narrow and simple. Don’t fuss about thickness yet—these are placement tracks. Ensure the hair falls past the shoulders, framing the face with balanced spacing on both left and right for pleasing symmetry.
Big Eyes and Brows
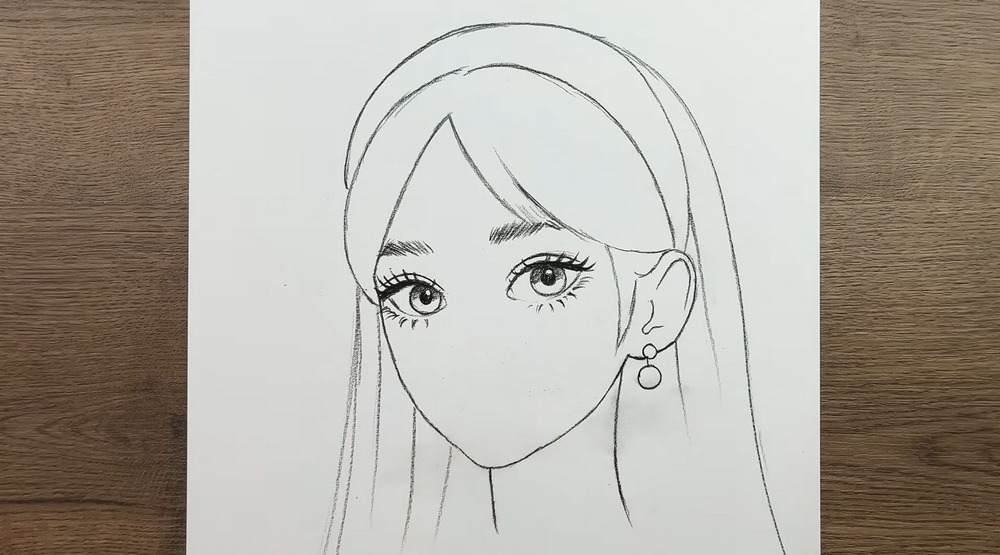
Place a horizontal guideline halfway down the head. Build large almond eyes along it: upper lid thick, lower lid lighter. Add irises, pupils, small catchlights, and delicate lashes. Shape full brows with soft arches. Indicate a subtle nose bridge near the fringe. Keep symmetry by measuring from the centerline; both eyes should sit one eye-width apart. Adjust angles until they read evenly.
Nose and Lips
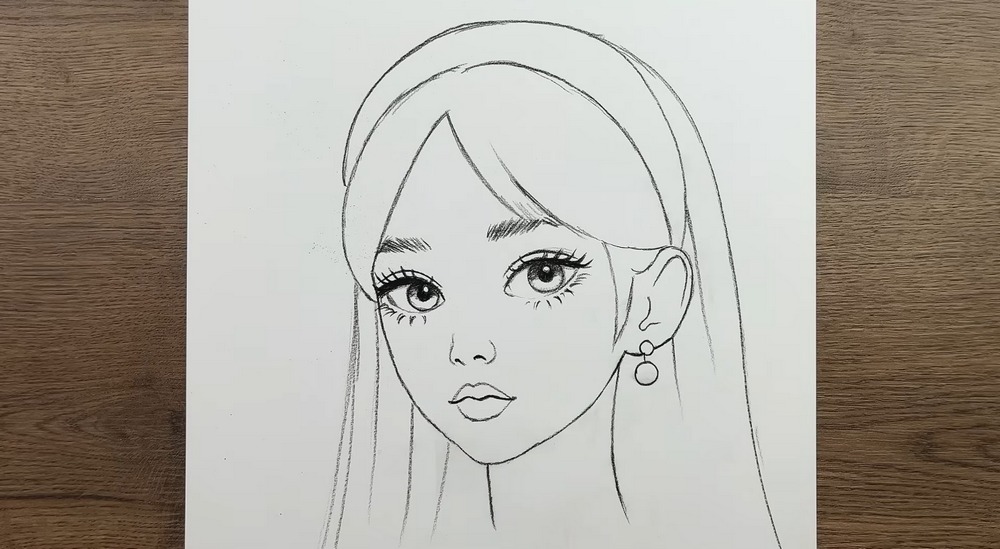
Sketch the nose using three light marks: a tiny tip, two soft nostril shadows, and a short bridge line. For the mouth, place the center between nose and chin. Draw a bow-shaped upper lip and fuller lower lip, keeping corners relaxed. Refine the jaw curve and chin point if needed. Keep construction lines faint for easy cleanup before moving to shading details.
Shade Hair and Features

Block in mid-tones on the hair, following strand direction with long strokes. Darken under the headband and behind the neck for depth. Add gentle shadows under brows, nose, lower lip, and chin. Keep cheeks lighter to suggest soft skin. Deepen pupils and lash lines. Blend lightly with tissue or stump, keeping highlights crisp around the eyes. Soften edges where planes turn gradually.
Final Polish
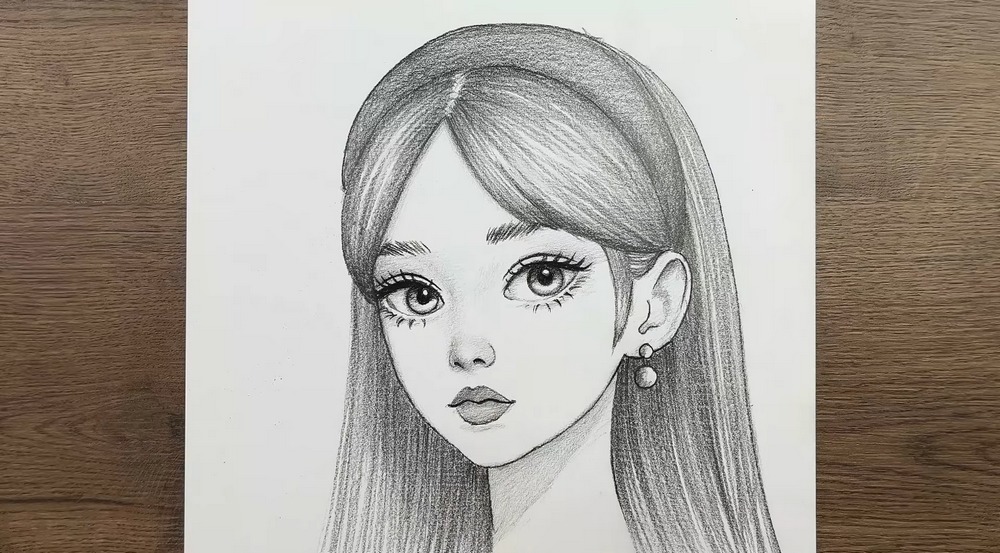
Clean stray marks with a kneaded eraser. Sharpen darkest accents: upper lashes, irises, hair gaps, and the headband edge. Lightly shade the neck triangle beneath the chin. Add a few flyaway hairs for life. Check symmetry and proportions; adjust brows, lips, or ear if needed. Step back, squint, and even values until everything feels calm. Sign your drawing to celebrate the finish.
Conclusion
You just built a graceful portrait using simple shapes, steady placements, and soft graphite. Keep practicing this order until it feels natural, then try new hairstyles, earrings, or expressions. Swap paper angles, vary pencil grades, and time yourself to stay loose. Save each attempt; comparing them will show progress fast. Most of all, enjoy the process. Keep drawing every day.
A Bonus Tip
Lightly hatch hair from dark to light in long, consistent strokes, then lift a few thin highlights with a kneaded eraser to create believable shine.
FAQs
Q: How long will this take?
A: Most beginners finish in 40–60 minutes, including shading. Add time if you experiment with hairstyles.
Q: What paper size works best?
A: A4 (8.3×11.7 in) or 9×12 in is comfortable. Heavier 160–200 gsm paper resists erasing and blending marks.
Q: My eyes don’t match. How do I fix them?
A: Measure from the centerline. Check height, tilt, and width. Redraw the smaller eye lightly until both align one eye-width apart.
Q: Should I shade or ink first?
A: For soft portraits, shade with pencil first. If you prefer crisp, graphic lines, ink clean contours, let them dry, then add very light graphite.
Q: How do I color it later?
A: Seal graphite with a light workable fixative, then layer colored pencils or markers softly, preserving highlights and deepening shadows gradually.